iOS 安装包1-编译&打包

iOS 安装包1-编译&打包

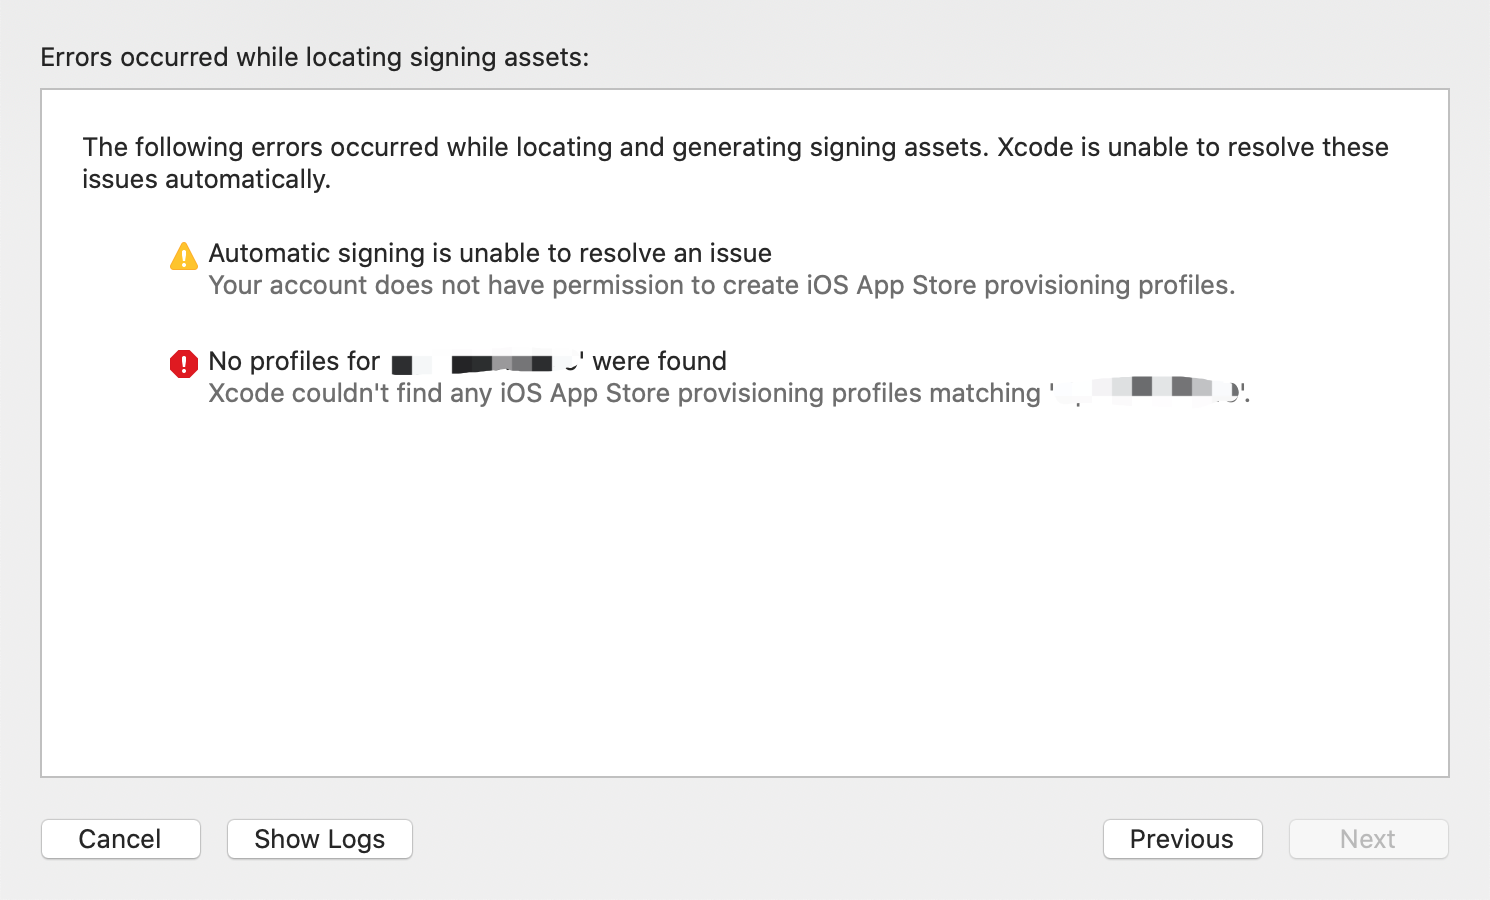
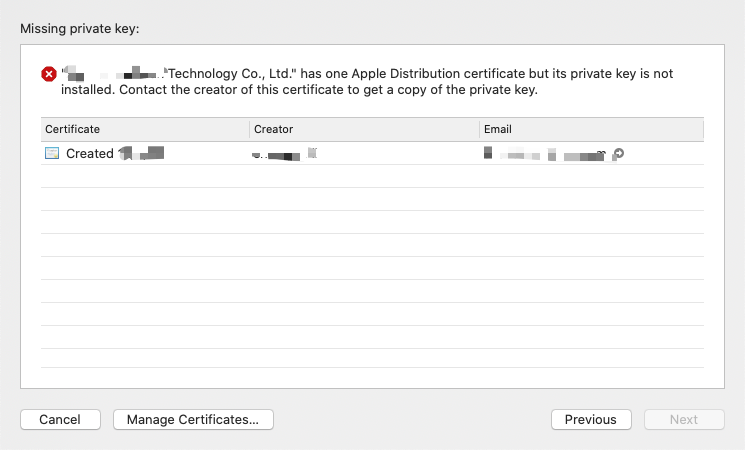
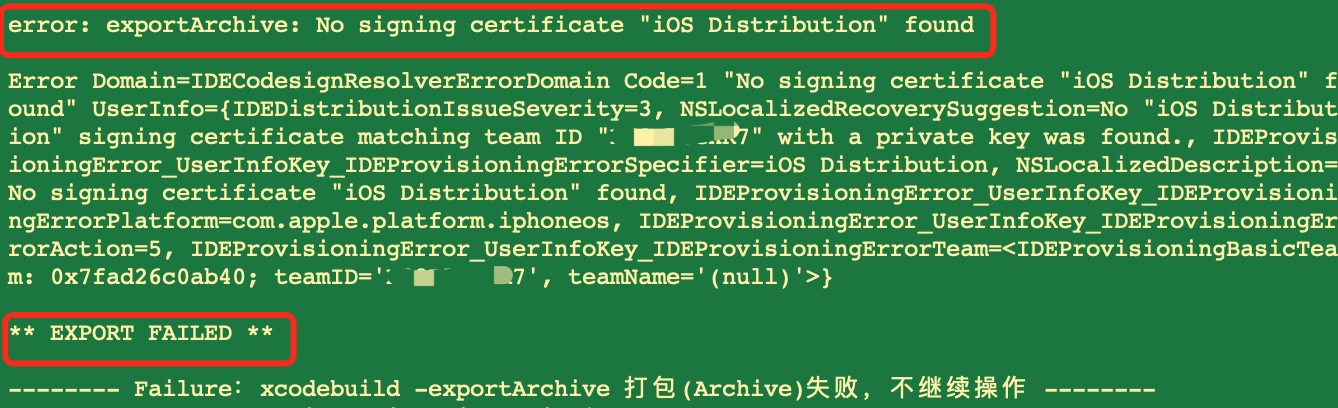
error1_nosigningcer

原因:本地钥匙串中缺少iOS发布证书,即缺少Apple Distribution: xxx Co.,Ltd. (yyy)

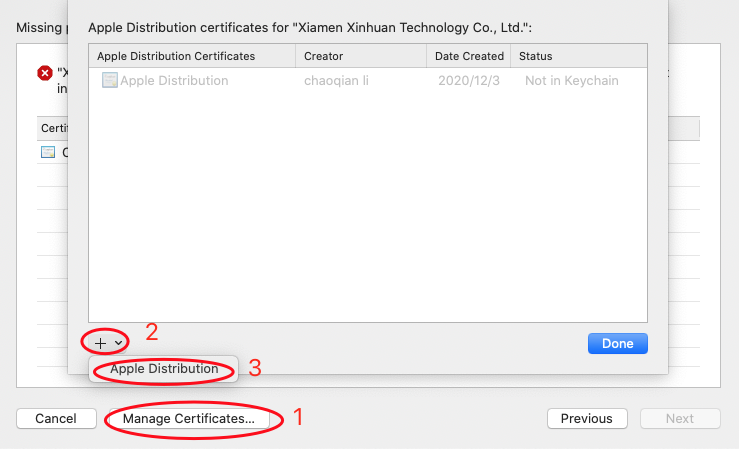
error1_nosigningcer_solve

小技巧,为了减少命令编译的错误次数,我们可以使用XCode的界面操作先自己编译导出一次。

如下,在导出的时候遇到如下错误。

error3_noprofiles

自动打包时候,自动更新添加进去的设备~/Library/MobileDevice/Provisioning Profiles

进入 ~/Library/MobileDevice/Provisioning Profiles查看证书文件,

参考文章:自动打包时候,自动更新添加进去的设备

Provisioning profile实际上包含了Device ID,因此更新Provisioning profile就可以更新Device ID。根据xcode编译提示在archive阶段加入了-allowProvisioningUpdates这个参数的,应该会自动更新。

实时新增用户反馈<font color="warning">132例,请相关同事注意。

​ 类型:<font color="comment">用户反馈

​ 普通用户反馈:<font color="comment">117例

​ VIP用户反馈:<font color="comment">15例

iOS 安装包2-上传

image-20210123122550446

image-20210123122846919

一、ApplicationLoader -> Transporter

1、ApplicationLoader(新版本的xcode11后不再提供)

以前:使用Application loader上传安装包。

现在:升级xcode11后,你会发现找不到Application loader这个工具了。(附:实际上Application loader只是对altool的封装。)
去查看xcdoe11的**更新说明**,有这样一段话

Xcode supports uploading apps from the Organizer window or from the command line with xcodebuild or xcrun altool. Application Loader is no longer included with Xcode. (29008875)

2、Transporter

ApplicationLoader不能使用了,那我们使用什么。苹果在2019年10月份上线了Transporter

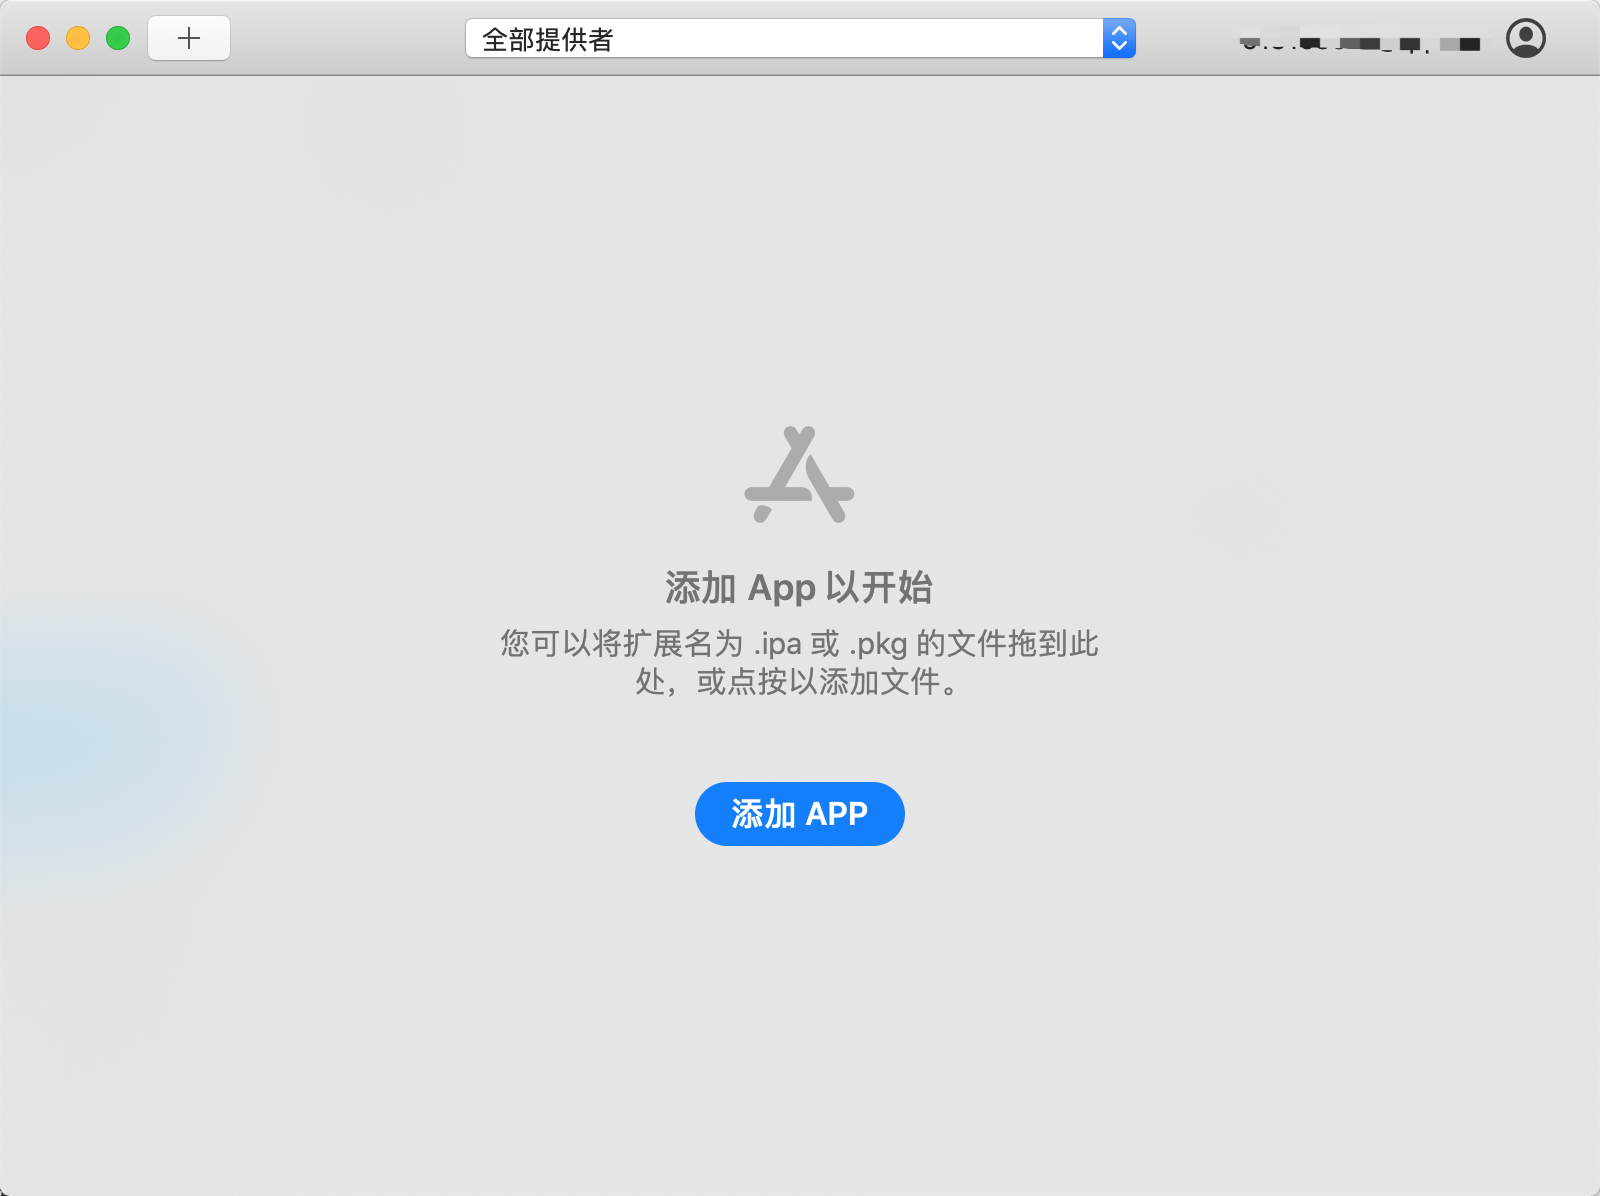
在 App Store Connect 中创建 App 记录后,您便可以通过 Xcode、macOS 版 Transporter 或 altool 上传构建版本。其界面如下:

image-20200921095227639

如果您使用 App Store Connect API,则建议您通过命令行工具 Transporter 和 JSON 网络令牌(JWT)验证来上传二进制文件。用于 API 的 JWT 也可以用于上传二进制文件。

二、xcrun altool

Xcode11前:旧版本的altool只支持ipa、pkg的上传。

xcode11后,新版本的altool在旧版本的基础上,额外支持了各种文件压缩包的上传,应该就是mac、ipad、iphone应用和其他相关打包产物的集合包。

altool 位于:/Applications/Xcode.app/Contents/Developer/usr/bin/altool

altool位置

1、查看xcrun altool的用法

终端执行xcrun altool命令,可见其命令用法如下:

1
2
3
4
5
6
7
8
9
10
11
12
13
14
15
16
17
18
19
20
21
22
23
24
25
26
27
28
29
30
31
32
33
34
35
36
37
38
39
40
41
42
43
44
45
46
47
48
49
50
51
52
53
54
55
56
57
58
59
60
61
62
63
64
65
66
67
MacBook-Pro:~ $ xcrun altool
Copyright (c) 2009-2019, Apple Inc. Version 4.00.1181

Usage: altool --validate-app -f <file> -t <platform> -u <username> {[-p <password>] | --apiKey <api_key> --apiIssuer <issuer_id>}
altool --upload-app -f <file> -t <platform> -u <username> {[-p <password>] | --apiKey <api_key> --apiIssuer <issuer_id>}
altool --notarize-app -f <file> --primary-bundle-id <bundle_id> -u <username> {[-p <password>] | --apiKey <api_key> --apiIssuer <issuer_id>} [--asc-provider <provider_shortname>]
altool --notarization-info <uuid> -u <username> {[-p <password>] | --apiKey <api_key> --apiIssuer <issuer_id>}
altool --notarization-history <page> -u <username> {[-p <password>] | --apiKey <api_key> --apiIssuer <issuer_id>} [--asc-provider <provider_shortname>]
altool --list-apps -u <username> {[-p <password>] | --apiKey <api_key> --apiIssuer <issuer_id>}
altool --store-password-in-keychain-item <name_for_keychain_item> -u <username> -p <password>

Authentication: Most commands require authorization.
There are two methods available: user name with password, and apiKey with apiIssuer.

-u, --username <username> Username. Required to connect for validation, upload, and notarization.
-p, --password <password> Password. Required if username specified and apiKey/apiIssuer are not.
If this argument is not supplied on the command line, it will be read from stdin.
Alternatively to entering <password> in plaintext, it may also be specified using a '@keychain:'
or '@env:' prefix followed by a keychain password item name or environment variable name.
Example: '-p @keychain:<name>' uses the password stored in the keychain password item named <name>.
You can create and update keychain items with the
--store-password-in-keychain-item command.
Example: '-p @env:<variable>' uses the value in the environment variable named <variable>

--apiKey <api_key> apiKey. Required for JWT authentication while using validation, upload, and notarization.
This option will search the following directories in sequence for a private key file
with the name of 'AuthKey_<api_key>.p8': './private_keys', '~/private_keys', '~/.private_keys',
and '~/.appstoreconnect/private_keys'.
--apiIssuer <issuer_id> Issuer ID. Required if --apiKey is specified.

-f, --file <file> <file> specifies the path to the file to process.
-t, --type {osx | ios | appletvos} Specify the platform of the file.

--primary-bundle-id <bundle_id> Used with --notarize-app to uniquely identify a package.

--asc-provider <provider_shortname> Required with --notarize-app and --notarization-history when a user account is associated with multiple
providers.

-v, --validate-app Validates an app archive for the App Store. Authentication and -f are required.
--upload-app Uploads the given app archive to the App Store. Authentication and -f are required.
--list-apps Display all apps associated with your account(s).

--notarize-app Uploads the given app package, dmg or zip file for notarization. Authentication, -f,
and --primary-bundle-id are required. --asc-provider is required for an account associated with multiple providers.
If successful, the UUID associated with the upload is returned.

--notarization-info <uuid> Returns the status and log file URL of a package previously uploaded for notarization with the specified <uuid>.
Authentication is required. The log file can be retrieved with 'curl <log_file_url>'.

--notarization-history <page> Returns a list of all uploads submitted for notarization. <page> specifies a range of entries where 0
returns the most recent number of entries. A new page value will be returned which can be used as the
<page> value to the next use of --notarization-history and so forth until no more items are returned.
Authentication is required. --asc-provider is required for an account associated with multiple providers.

--store-password-in-keychain-item <name_for_keychain_item> -u <username> -p <password>
Stores the password <password> in the keychain item named <name_for_keychain_item> associated with the account <username>.
If an item with that name and account already exists in the keychain, its password will be updated. Otherwise a new item
is created with that name. You can use this keychain item with the -p option to mask your password with other commands.
Example: altool --store-password-in-keychain-item MY_SECRET -u jappleseed@apple.com -p "MyP@ssw0rd!@78"
altool --notarize-app -u jappleseed@apple.com -p @keychain:MY_SECRET [...]

--output-format {xml | normal} Specifies how the output is formatted. 'xml' displays the output in a structured format; 'normal' displays in
an unstructured format (default).

--verbose Enable logging output.

-h, --help Display this output.

2、查看ipa包验证和上传使用的xcrun altool命令

我们主要看两个命令:

1
2
Usage: altool --validate-app -f <file> -t <platform> -u <username> {[-p <password>] | --apiKey <api_key> --apiIssuer <issuer_id>}
altool --upload-app -f <file> -t <platform> -u <username> {[-p <password>] | --apiKey <api_key> --apiIssuer <issuer_id>}

三、xcrun altool验证上传(方式1:username+password方式)

将我们查看到的两个命令:

1
2
Usage: altool --validate-app -f <file> -t <platform> -u <username> {[-p <password>] | --apiKey <api_key> --apiIssuer <issuer_id>}
altool --upload-app -f <file> -t <platform> -u <username> {[-p <password>] | --apiKey <api_key> --apiIssuer <issuer_id>}

使用 username+password 方式 改为最终的形如:

1
2
xcrun altool --validate-app -f ../output/Debug-iphoneos/Runner/Runner.ipa -t ios --verbose -u 账号 -p 密码
xcrun altool --validate-app -f ../output/Debug-iphoneos/Runner/Runner.ipa -t ios --verbose -u 账号 -p 专用密码

1、问题1Please sign in with an app-specific password

1.1、错误详情及分析

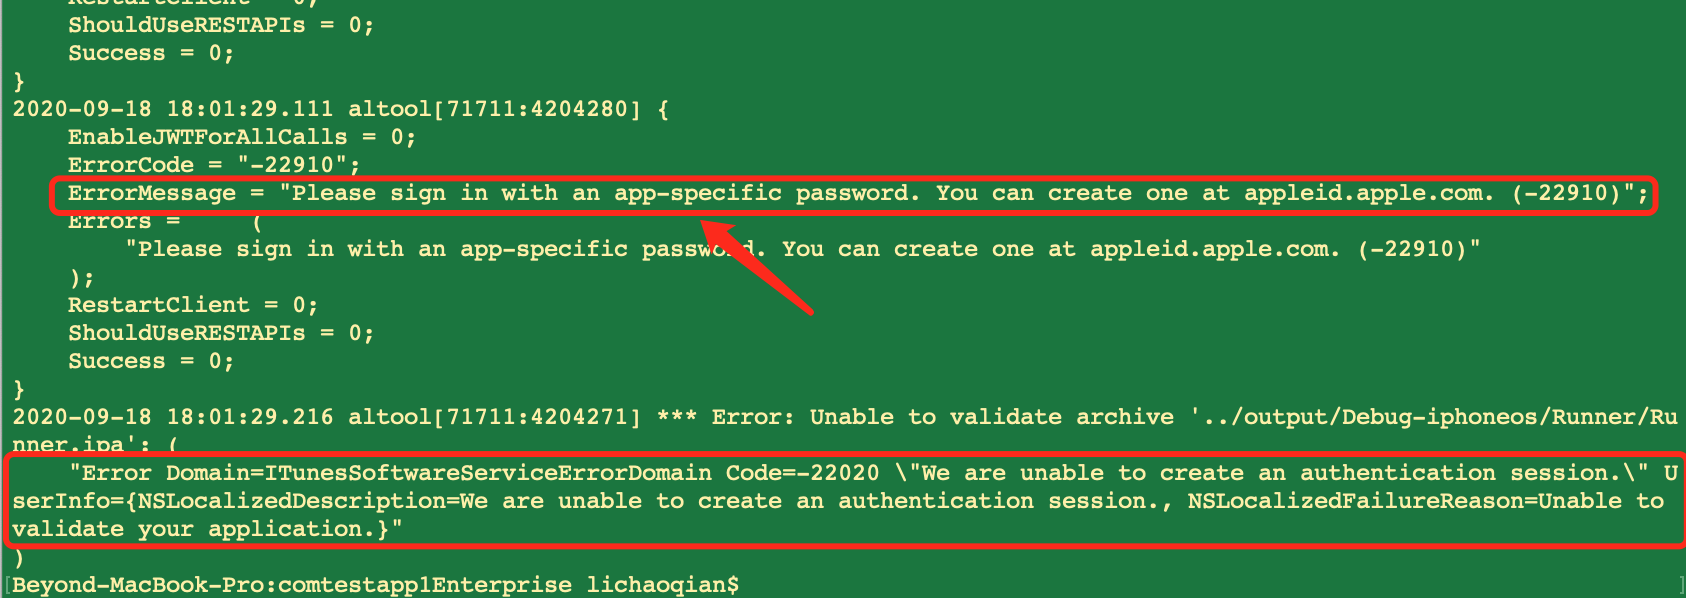
使用非专用密码时候的错误截图如下: image-20200918190110153

提示信息:Please sign in with an app-specific password. You can create one at appleid.apple.com 。这是因为自己账号开启了二重验证,所以这里的密码不能使用原始的明文密码,而应该使用专用密码。

1.2、创建生成专用密码

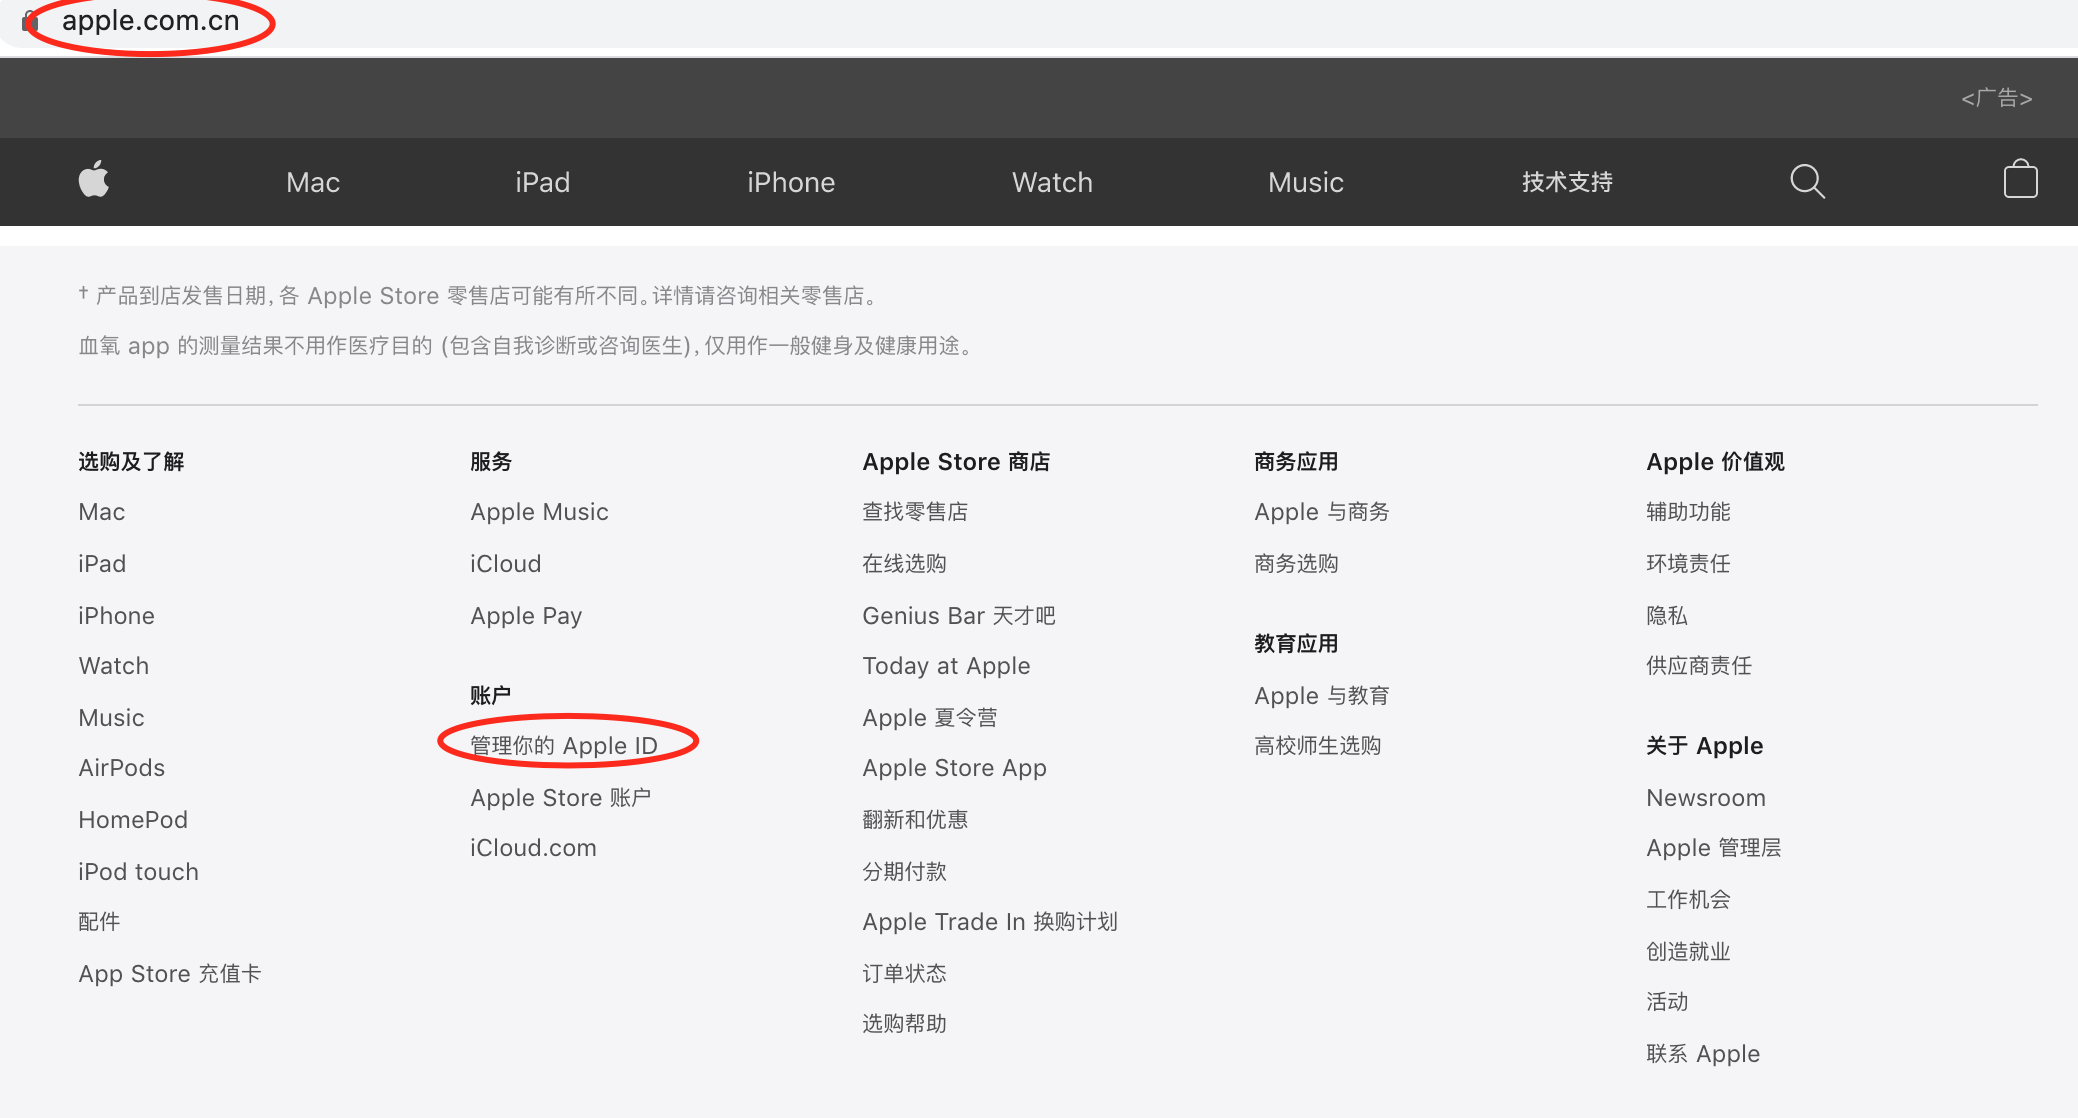
解决办法:在Apple官网https://www.apple.com.cn/登陆你的账号,并进入”管理你的Apple ID“。

image-20200918185022063

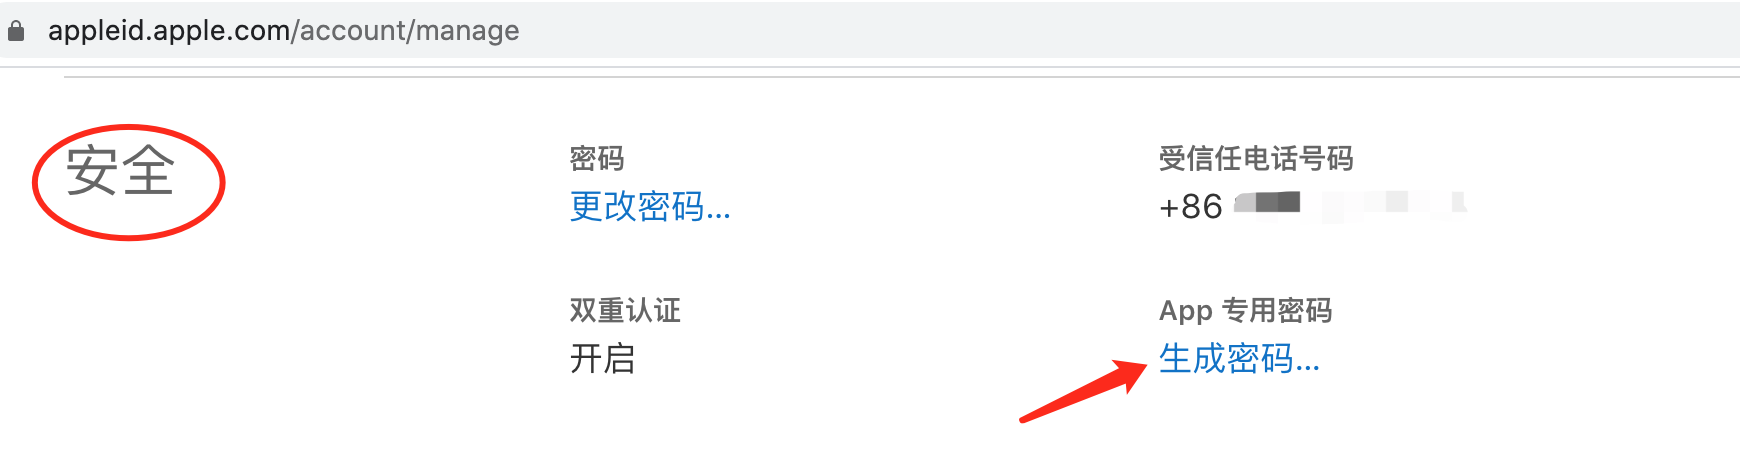
在管理密码的地方有一个App专用密码,点击Generate an App-Specific Password,生成专用密码。

image-20200918185328249

1.3、管理生成的专用密码

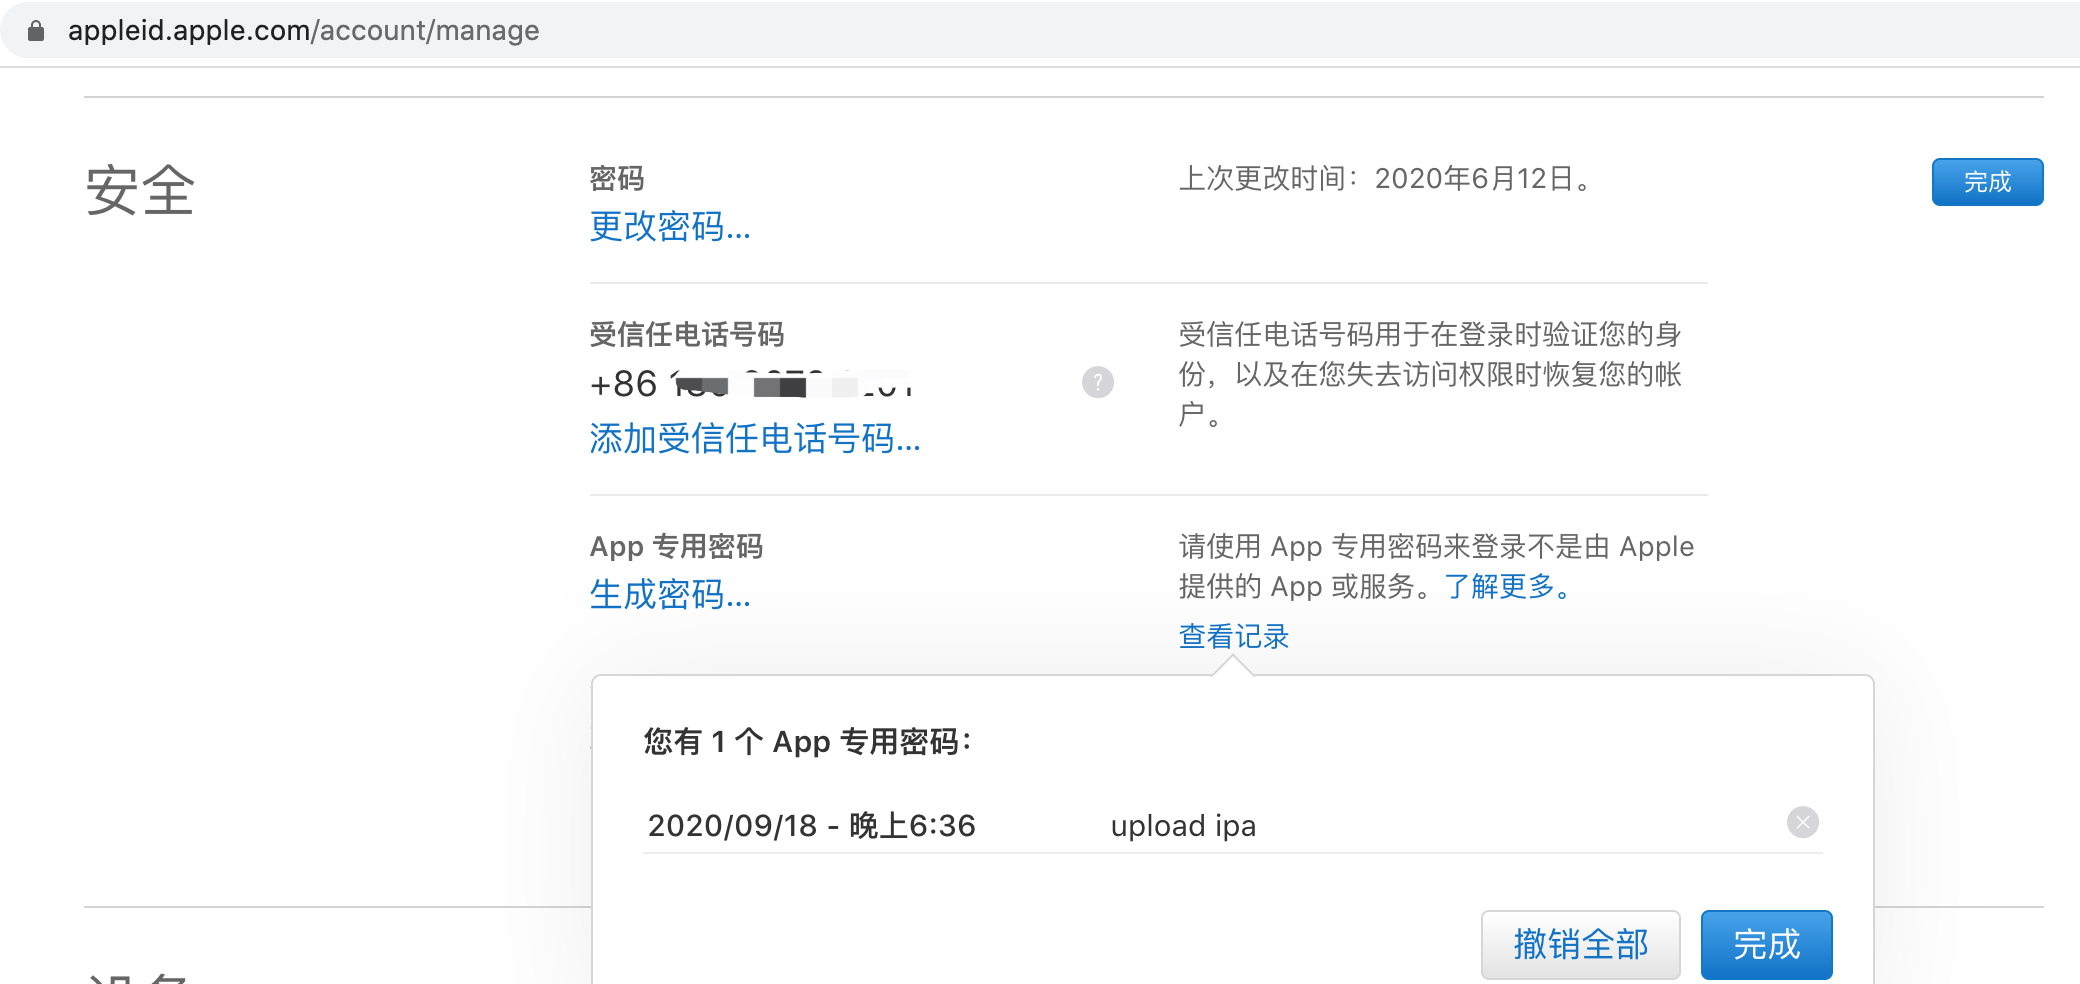
点击”查看记录“,可查看管理过往专用密码。

image-20200918185521612

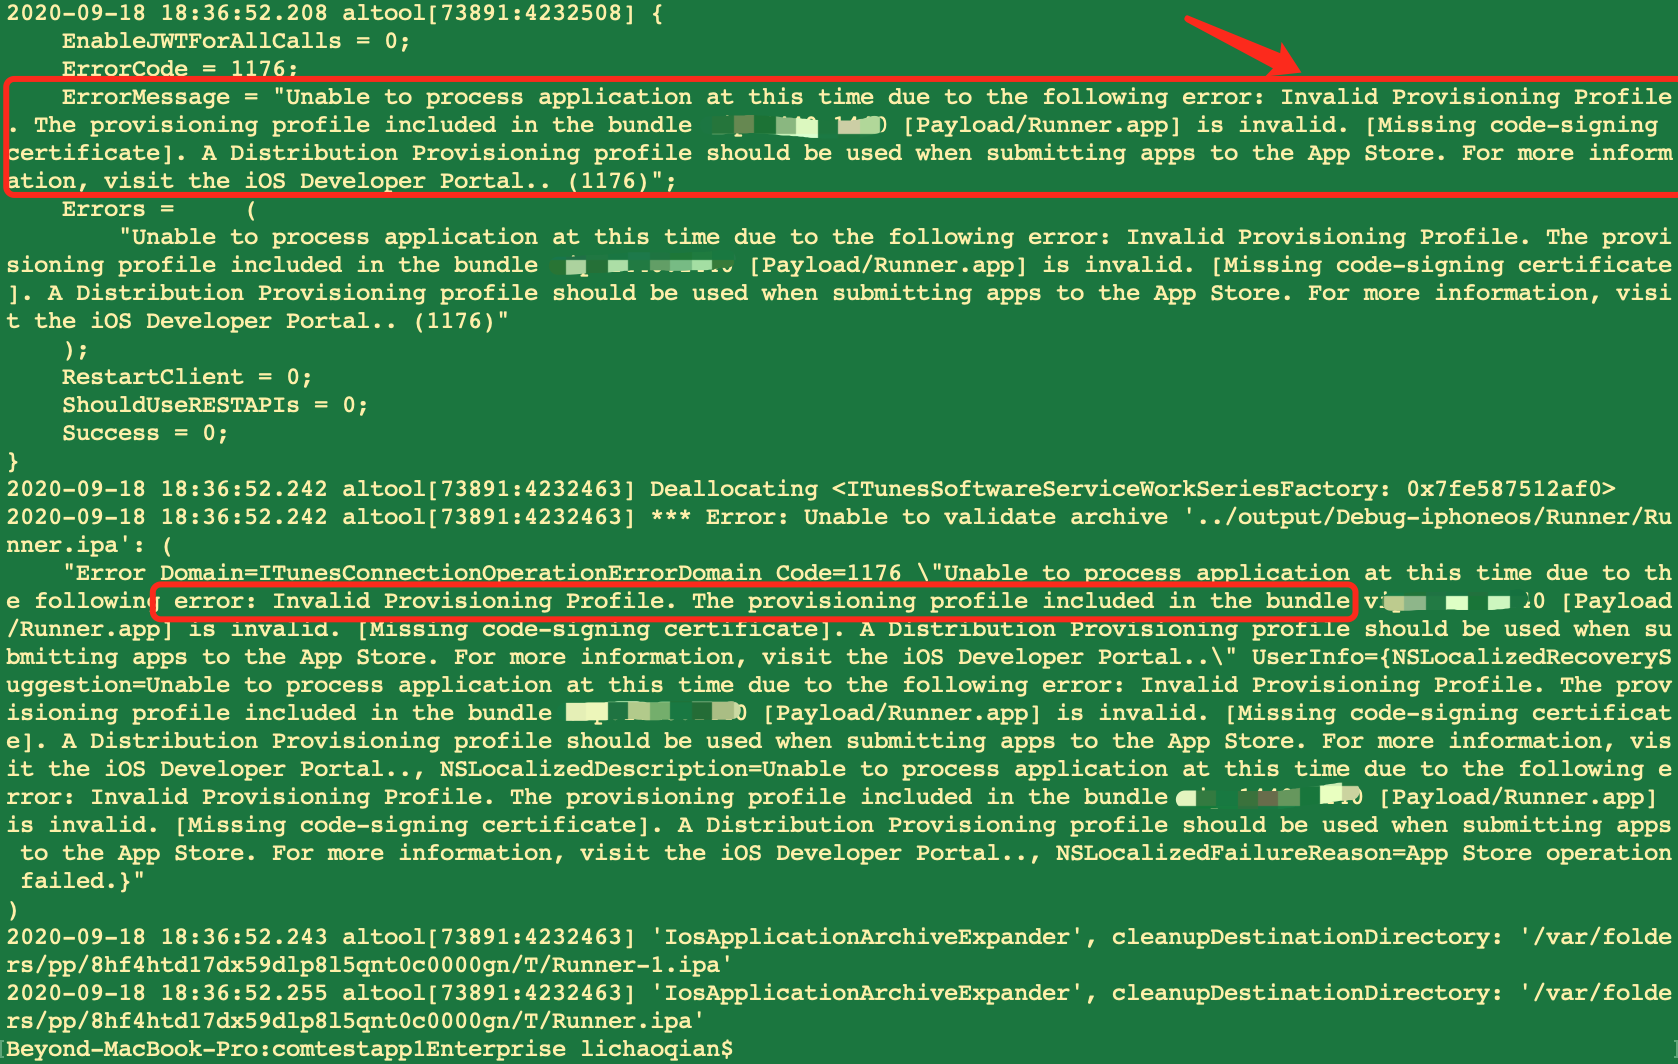
2、问题2Invalid Provisioning Profile. The provisioning profile included in the bundle com.dvlproad.autopackage [Payload/Runner.app] is invalid.

使用专用密码,进行

1
xcrun altool --validate-app -f ../output/Debug-iphoneos/Runner/Runner.ipa -t ios --verbose -u 12345678@qq.com -p lnaa-xxxx-yyyy-zzzz

出现了新错误,新错误截图如下: image-20200918190727435

原因:

1、你打出来的包不是生产环境,比如你打的是dev环境

2、

四、xcrun altool验证上传(方式2:apiKey+apiIssuer方式)

xcrun altool有双重认证限制后,不能直接使用账号密码了,只能使用新的-apiKey 、–apiIssuer。

所以,最终的验证、上传的两个命令形如:

1
2
3
xcrun altool --validate-app -f xxx/xxx/xxx.ipa -t ios --apiKey xxxxxxxx --apiIssuer xxxxxx --verbose  --output-format xml

xcrun altool --upload-app -f xxx/xxx/xxx.ipa -t ios --apiKey xxxxxxxx --apiIssuer xxxxxx --verbose --output-format xml

2个命令分别对应 验证IPA 和 上传IPA,都需要使用3个参数ipa路径apiKeyapiIssuer

①、ipa路径:用xcodebuild打包或用OrganizerExport导出的App store包。

②、apiKeyapiIssuer需要去开发者官网-用户和访问-密钥-去新增。

1、准备xcrun altool上传参数中的apiKey和apiIssuer

1.1、创建生成apiKey和apiIssuer

apiKeyapiIssuer需要去开发者官网-用户和访问-密钥-去新增。如下图流程

新增一个密钥,名称和访问者可以自由填写

img

生成完成后,IssuerID就是apiIssuer,密钥ID就是apiKey,并且还有一个API密钥可以下载。注意此秘钥文件只能下载一次,请妥善保存

img

1.2、下载保存apiKey和apiIssuer

创建生成apiKey和apiIssuer后,按照我们之前在终端执行的xcrun altool命令提示有如下说明:

1
2
3
4
5
--apiKey <api_key>        apiKey. Required for JWT authentication while using validation, upload, and notarization.
This option will search the following directories in sequence for a private key file
with the name of 'AuthKey_<api_key>.p8': './private_keys', '~/private_keys', '~/.private_keys',
and '~/.appstoreconnect/private_keys'.
--apiIssuer <issuer_id> Issuer ID. Required if --apiKey is specified.

即:我们需要把刚才下载好的密钥文件放到这里面的其中一个文件夹里,它会按顺序去查找。

这里我们就选择~/private_keys这个位置吧,即在自己用户目录下/Users/xxx/private_keys新建了个private_keys文件夹,并把密钥文件放进去的。

2、使用xcrun altool验证上传

在确定完ipa包验证和上传使用的xcrun altool命令和上传参数中的apiKey和apiIssuer后,我们就可以开始使用xcrun altool验证上传了。

2.1、xcrun altool验证

验证结果

1
2
3
4
5
6
7
8
9
10
11
12
13
14
15
16
2019-11-13 11:36:56.773 altool[3970:100440] Deallocating <ITunesSoftwareServiceWorkSeriesFactory: 0x7fa5d6d06610>
<?xml version="1.0" encoding="UTF-8"?>
<!DOCTYPE plist PUBLIC "-//Apple//DTD PLIST 1.0//EN" "http://www.apple.com/DTDs/PropertyList-1.0.dtd">
<plist version="1.0">
<dict>
<key>os-version</key>
<string>10.14.6</string>
<key>success-message</key>
<string>No errors validating archive at '/Users/xxx/Desktop/altools.ipa'</string>
<key>tool-path</key>
<string>/Applications/Xcode.app/Contents/SharedFrameworks/ContentDeliveryServices.framework/Versions/A/Frameworks/AppStoreService.framework</string>
<key>tool-version</key>
<string>4.00.1181</string>
</dict>
</plist>
2019-11-13 11:36:

等到提示No errors validating archive at xxx时就代表验证成功了,可以上传了。

4.2、xcrun altool上传

上传结果

1
2
3
4
5
6
7
8
9
10
11
12
13
14
15
2019-11-13 11:49:55.382 altool[4093:102055] [2019-11-13 11:49:55 CST] <main> DBG-X: Returning 0
<?xml version="1.0" encoding="UTF-8"?>
<!DOCTYPE plist PUBLIC "-//Apple//DTD PLIST 1.0//EN" "http://www.apple.com/DTDs/PropertyList-1.0.dtd">
<plist version="1.0">
<dict>
<key>os-version</key>
<string>10.14.6</string>
<key>success-message</key>
<string>No errors uploading '/Users/xxx/Desktop/altools.ipa'</string>
<key>tool-path</key>
<string>/Applications/Xcode.app/Contents/SharedFrameworks/ContentDeliveryServices.framework/Versions/A/Frameworks/AppStoreService.framework</string>
<key>tool-version</key>
<string>4.00.1181</string>
</dict>
</plist>

等到提示No errors uploading时就代表上传成功了。

五、上传结果的查看

可以去开发者中心-活动里面查看一下是否有构建版本
img

Flutter:面试

Flutter面试

自动打包

浏览器缓存、分段、

拉前端代码?+正常的环境的切换+通知

没网?数据?

h5请求,app拦截,自动更新

h5调用插件

多渠道打包

Cordova、

安全

支付:

架构 MVP

代码层面 hashMap 16大小、本地化存储 mmkv 门面模式

性能优化 线上oom、bugly、图片过大

Viewmodel 数据持久

不同客户不同包

网络框架 重试、日志

权限管理

离线缓存?

日历视图 七八层嵌套-> 1层

通知、插件、路由

插入视图

安卓自启动问题

本地化/国际化-

框架-getX

webView-flutter 白屏

扫码

设计模式?策略模式?单例?通知?几个原则。

  • 谈谈对项目做过的优化(历史存在什么问题,你的解决方式。)?
  • 谈谈你做过的框架(侧重非UI部分)
  • 谈谈埋点?

搜索逻辑?冒泡排序?

封装

看过什么书,什么三方库?

  • 图片缓存?

  • 性能优化(webView 优化)?

    • 内存优化、泄漏,检测?
    • 启动优化
    • 安装包大小优化
  • 应用在后台长时间执行(service 保活)

  • 怎么区分不同平台的安装包?

  • 同一应用多端,项目上怎么开发(司机端、乘客端)。

  • 路由设计 scheme://path?argument

app中核心的非数据组件()

图片处理、网络库、路由

线程同步

掌握 RxJava + Retrofit + OkHttp 的⽹络底层框架,并结合 MVP、MVC、MVVM 三种架构模式编写出⽹络底 层框架,已应⽤于项⽬中,底层稳定性强

了解LiveData,Viewmodel,DataBinding等新框架,且结合RxJava 使⽤MVVM架构应⽤在项⽬中

理解内存泄露的原理,编写代码过程中能避免常⻅内存泄露。使⽤Memory Profiler 和 Memory Analyzer等 ⼯具检测内存泄露问题

了解App启动速度优化,内存,以及APK 瘦身等优化

理解 Android 适配原理,能够做到适配各类常⽤机型

理解Android触摸事件传递机制,⾃定义View和动画机制 理解 Handle 消息处理机制

理解多个设计模式的使⽤。如单例设计模式,观察者模式,建造者模式,装饰者设计模式等 独⽴编写多个lib库,如图库,列表适配库,⼴告库,分享库(QQ,微信,微博,Facebook等第三⽅),均采⽤ 组件化开发⽅式,可快速移植其他项⽬中

Flutter

状态管理 setState\Provider

网络拦截器、

图片缓存

请求

苹果设备注册管理

一、无法安装告知

各位需要安装app的苹果手机用户们,晚上好。如您在通过如下地址:
https://www.pgyer.com/xxxx
下载app的时候,发现无法安装,则可能是您的设备未进行证书注册(如果您可以安装则证明已注册,请忽略本消息)。
如您对安装有需求,则可通过如下地址
https://www.pgyer.com/tools/udid
将您的苹果手机udid告知我们,我们为您添加后。当我们打新包的时候,就可以安装上app啦。
特别注意:因证书注册设备只能添加100台,故即使添加上去之后,再删除也算是一台。所以如果您非必要安装,请忽略本消息。
最后,提前祝大家节日快乐!

二、设备管理列表

1、规则

1.1、备注规则

序号 类型 简写
1 产品
2 测试
3 后台
4 iOS开发 i
5 Android开发 A

1.2、用途示例

序号 类型 场景
1 开发 开发必须
2 测试 测试测试与回归需求
3 验收 产品验收版本功能
4 体验 其他用户提前体验

2、列表示例:

序号 备注 用途 UUID 是否必须 申请时间
1 产-张三-iPhone8 功能验收

End

设计模式-①概览

设计模式三大分类以及六大原则

  1. 设计模式三大分类

设计模式分为三种类型,共23类。

(1)创建型模式:单例模式抽象工厂模式、建造者模式、工厂模式、原型模式。

(2)结构型模式:适配器模式、桥接模式、装饰模式、组合模式、外观模式、享元模式、代理模式

(3)行为型模式:模版方法模式、命令模式、迭代器模式、观察者模式、中介者模式、备忘录模式、解释器模式、状态模式、策略模式职责链模式、访问者模式。

一、设计模式的六大原则/SOLID原则

使用设计模式的目的:为了代码可重用性、让代码更容易被他人理解、保证代码可靠性。

开闭原则可以认为是总则,依赖倒置原则的使用是实现开闭的一个手段。在依赖倒置的实现上,需要单一职责接口隔离来保证接口和实现的处理质量。在实现中,通过合成复用迪米特法法则来降低耦合度,提高灵活性。在实现过程中,如果使用了继承,那么必须遵循里氏替换原则来保证系统的可扩展性。

六大原则在代码中的设计体现

1
2
3
4
5
6
7
8
9
10
11
12
13
14
15
16
17
18
19
20
21
22
23
24
25
26
27
28
29
30
31
32
33
34
35
36
37
38
// 里氏替换原则:应用程序中任何父类对象出现的地方,我们都可以用其子类的对象来替换,并且可以保证原有程序的逻辑行为和正确性。因为这里父类是抽象类,所以肯定遵守里氏替换原则。
abstract class ICacheStore {
ICacheStore();

Future<CacheObj?> getCacheObj(String key, {String? subKey});
Future<bool> setCacheObj(CacheObj obj); // 接口隔离原则:告诉我们在设计接口的时候要精简单一; get set分为两个接口,不要一个接口用type
Future<bool> delete(String key, {String? subKey});
Future<bool> clearExpired();
Future<bool> clearAll();
}


class CacheManager {
CacheConfig _config;
ICacheStore? _diskCacheStore; // 依赖倒置原则:CacheManager高层模块依赖于cache抽象(接口或抽象类),而不是具体实现
ICacheStore? _memoryCacheStore; // 单一职责原则

// 迪米特法则(又叫做最少知识原则)中的第2点减少对朋友的了解,即尽量减少一个类对外暴露的方法。
Future<bool> pushToCache(CacheObj obj) {
return _getCacheFutureResult(_memoryCacheStore, _diskCacheStore,
_memoryCacheStore?.setCacheObj(obj), _diskCacheStore?.setCacheObj(obj));
}

Future<bool> _getCacheFutureResult(
ICacheStore? memoryCacheStore, // 开闭原则:对扩展开放,对修改封闭. 不同的保存用不同的store,不影响原本的store。实施开放封闭原则的基本思路:让类xxxStore依赖于固定的抽象ICacheStore,所以对修改是封闭的;而通过面向对象的继承和多态机制,可以实现对抽象体的继承,通过覆写其方法来改变固有行为,实现新的扩展方法,所以对于扩展就是开放的。
ICacheStore? diskCacheStore,
Future<bool>? memoryCacheFuture,
Future<bool>? diskCacheFuture) async {
var result1 = (null == memoryCacheStore) ? true : (await memoryCacheFuture!);
var result2 = (null == diskCacheStore) ? true : (await diskCacheFuture!);
return result1 && result2;
}
}

class CacheNetworkClient extends NetworkClient {
// 迪米特法则(又叫做最少知识原则)中的第1点只和直接的朋友交流
DioCacheManager? _dioCacheManager;
}
1
2
3
4
5
6
7
8
9
10
11
12
13
14
15
16
17
18
19
20
21
22
23
24
25
26
27
28
29
30
31
```


[设计模式六大原则(五)----迪米特法则](https://cloud.tencent.com/developer/article/1836752)

实施迪米特法则:做到两点就足够了: 1.只和直接的朋友交流; 2.减少对朋友的了解。

什么是直接的朋友呢?出现在**成员变量**、**方法的输入输出参数**中的类就是直接的朋友。

减少对朋友的了解:**换作在一个类中,就是尽量减少一个类对外暴露的方法。**

CacheManager是NetworkClient的好友,CacheManager只需提供pushToCache公共方法,不用提供pushToDiskCache、pushToMemoryCache这两个私有方法。


### 1、开闭原则(O:Open Close Principle)-- 总则

开闭原则是总纲,他告诉我们要对扩展开放,对修改关闭。
eg:在你有新的需求的时候,最好不要轻易修改老功能,你应当增加新的对象来实现,而不是修改原来的对象

开闭原则:对扩展开发,对修改关闭。

在代码层面而言就是**在你有新的需求的时候,你应当增加新的对象来实现,而不是修改原来的对象。**

设计模式六大原则(6):开闭原则
定义:一个软件实体如类、模块和函数应该对扩展开放,对修改关闭。

问题由来:在软件的生命周期内,因为变化、升级和维护等原因需要对软件原有代码进行修改时,可能会给旧代码中引入错误,也可能会使我们不得不对整个功能进行重构,并且需要原有代码经过重新测试。
解决方案:当软件需要变化时,尽量通过扩展软件实体的行为来实现变化,而不是通过修改已有的代码来实现变化。
举例:
当有新需求时,如果增加功能涉及老功能点某些地方,最好不要轻易修改老功能,最好重新新增相应的功能,不然一些忽略的细节可能就会造成隐患。

1
2
3
4
5
6
7
8
9
10
11
12
13
14
15
16
17
18
19
20
21
22
23
24
25
26
27
28
29
30
31
32
33
34
35
36
37
38
39
40
41
42
43
44
45
46
47
48
49
50
51
52
53
54
55
56
57
58
59
60
61
62
63
64
65
66
67
68
69
70
71
72
73
74
75

[设计模式六大原则(六)----开闭原则](https://cloud.tencent.com/developer/article/1836753)

实施开放封闭原则的基本思路:让类xxxStore依赖于固定的抽象ICacheStore,所以对修改是封闭的;而通过面向对象的继承和多态机制,可以实现对抽象体的继承,通过覆写其方法来改变固有行为,实现新的扩展方法,所以对于扩展就是开放的。


### 2、依赖倒置原则(D:Dependence Inversion Principle)-- 手段

**原则定义:** 要依赖抽象(接口),不要依赖具体实现(类)。

依赖倒置原则告诉我们要面向接口编程;通过抽象(接口或抽象类)使各个类或模块实现彼此独立,互不影响,实现模块间的松耦合。

定义: 高层模块不应该依赖低层模块,二者都应该依赖其抽象;抽象不应该依赖细节;细节应该依赖抽象。//“抽象”指“接口或抽象类”,“细节”指“实现类”

eg:Driver开车,依赖的是Driver.drive(BaseCar)。而不能是没有基类的BenchiCar、BMWCar。

[依赖倒置原则(设计模式原则)](https://blog.csdn.net/u013862108/article/details/79054620)


### 3.1、单一职责原则(S:Single Responsibility Principle)-- 类质量

单一职责原则告诉我们实现类要职责单一;
eg:UserService专做用户相关,OrderService专做订单相关

### 3.2、接口隔离原则(I:Interface Segregation Principle)-- 类质量

“隔离”指的是**“客户端的角色”**

接口隔离原则告诉我们在设计接口的时候要精简单一;

通俗讲:不要把一大堆方法塞进一个接口里,导致这个接口变得臃肿无比。应该要根据实际需要,让接口中只有用得上的方法,**也就是说要细化我们的接口**。

定义为:

> 1. Clients should not be forced to depend upon interfaces that they don’t use. (客户端不应该依赖它不需要的接口。)
> 2. The dependency of one class to another one should depend on the smallest possible interface. (类间的依赖关系应该建立在最小的接口上。)它要求“最小的接口”,也就是该接口中没有多余的方法,所以**这里的隔离是指和多余的方法隔离。**

管理员只关心‘用户管理’,普通用户只关心‘登录’,游客只关心‘注册’。如果你把这三个方法塞到一个接口里,所有客户端都得依赖另外两个不需要的方法。”


### 4.1、迪米特法则(最少知道原则)-- 低藕

⑥迪米特法则(最少知道原则),告诉我们要尽量降低类与类之间的耦合;
eg:UserService与OrderService之间要降低耦合

### 4.2、组合复用 -- 低藕

[设计模式之七大原则-合成复用原则(Composite Reuse Principle)](https://juejin.cn/post/6978277541861654558)

- 原则是尽量使用合成/聚合的方式,而不是使用继承

该原则是在一个新的对象里面使用一些已有的对象, 使之成为新对象的一部分,新的对象通过向这些对象的委派达到复用已有功能的目的


### 5、里氏替换原则(L:Liskov Substitution Principle)--继承

**里氏替换原则:子类可以扩展父类的方法,但不应该复写父类的方法。不要破坏继承体系;**

> ③里氏替换原则告诉我们不要破坏继承体系;
> eg:子类可以扩展父类的方法(扩展出一个showSpeed方法),但不应该复写父类的方法。不要破坏继承体系;

假设有父类如下:

```swift
import Foundation

class Car {
func run() {
print("汽车跑起来了")
}
}

1
2
3
4
5
6
7
8
9
10
11
12
13
14
15
// 错误
class BaoMaCar: Car {
override func run() {
super.run()

print("当前行驶速度是80Km/h")
}
}

// 正确:子类可以扩展父类的方法(扩展出一个showSpeed方法),但不应该复写父类的方法。不要破坏继承体系;
class BaoMaCar: Car {
func showSpeed() {
print("当前行驶速度是80Km/h")
}
}

设计模式六大原则(二)—-里式替换原则

里氏替换原则主要阐述了有关继承的一些原则,即什么时候应该使用继承,什么时候不应该使用继承,以及其中蕴含的原理。里氏替换原是继承复用的基础,它反映了基类与子类之间的关系,是对开闭原则的补充,是对实现抽象化的具体步骤的规范

实现里氏替换原则通俗来讲就是:子类可以扩展父类的功能,但不能改变父类原有的功能。也就是说:子类继承父类时,除添加新的方法完成新增功能外,尽量不要重写父类的方法。

里氏替换原则是针对继承而言的。其至少有两种含义:
1、如果继承是为了实现代码重用,也就是为了共享方法,那么共享的父类方法就应该保持不变,不能被子类重新定义。子类只能通过新添加方法来扩展功能,父类和子类都可以实例化,而子类继承的方法和父类是一样的,父类调用方法的地方,子类也可以调用同一个继承得来的,逻辑和父类一致的方法,这时用子类对象将父类对象替换掉时,当然逻辑一致,相安无事。
2、如果继承的目的是为了多态,。。。。

二、常见的设计模式及其应用场景

< 返回目录

MVC是模型、视图、控制器开发模式,对于iOS SDK,所有的View都是视图层的,它应该独立于模型层,由视图器来控制。所有的用户数据都是模型层,它应该独立于视图。所有的ViewController都是视图器,由它负责控制视图,访问模型数据。

1
2
3
4
5
6
7
8
9
10
11
12
13
14
15
16
17
18
19
20
21
22
23
24
25
26
27
28
class CacheManager {	// 单例模式
CacheConfig _config;
ICacheStore? _diskCacheStore;
ICacheStore? _memoryCacheStore;

late StreamSubscription? _xxxSubscription;
CacheManager(this._config) {
......
_xxxSubscription = eventBus.on<MemoryReleaseEvent>().listen((event) { // 观察者模式

});
}

Future<bool> pushToCache(CacheObj obj) {
return _getCacheFutureResult(_memoryCacheStore, _diskCacheStore,
_memoryCacheStore?.setCacheObj(obj), _diskCacheStore?.setCacheObj(obj));
}

Future<bool> _getCacheFutureResult(
ICacheStore? memoryCacheStore, // 策略模式
ICacheStore? diskCacheStore,
Future<bool>? memoryCacheFuture,
Future<bool>? diskCacheFuture) async {
var result1 = (null == memoryCacheStore) ? true : (await memoryCacheFuture!);
var result2 = (null == diskCacheStore) ? true : (await diskCacheFuture!);
return result1 && result2;
}
}

22种设计模式

1、创建型模式

1.1、单例模式

应用场景:确保程序运行期间,某个类只有一份实例,常用于进行资源共享控制

实例:[UIApplication sharedApplication]。

注意事项:确保使用者只能通过 getInstance方法才能获得,单例类的唯一实例。
返回的也只是此单例类的唯一静态变量。

1.2、工厂模式

应用场景:工厂方式创建类的实例,多与proxy模式配合,创建可替换代理类。
优势:易于替换,面向抽象编程,application只与抽象工厂和易变类的共性抽象类发生调用关系。
敏捷原则:DIP依赖倒置原则
实例:项目部署环境中依赖多个不同类型的数据库时,需要使用工厂配合proxy完成易用性替换
注意事项:项目初期,软件结构和需求都没有稳定下来时,不建议使用此模式,因为其劣势也很明显,
增 加了代码的复杂度,增加了调用层次,增加了内存负担。所以要注意防止模式的滥用。

iOS 设计模式之工厂模式
工厂模式我的理解是:他就是为了创建对象的

创建对象的时候,我们一般是alloc一个对象,如果需要创建100个这样的对象,如果是在一个for循环中还好说,直接一句alloc就行了,但是事实并不那么如意,我们可能会在不同的地方去创建这个对象,那么我们可能需要写100句alloc 了,但是如果我们在创建对象的时候,需要在这些对象创建完之后,为它的一个属性添加一个固定的值,比方说都是某某学校的学生,那么可能有需要多些100行重复的代码了,那么,如果写一个-(void)createObj方法,把创建对象和为对象设置初始的属性值(比如学校属性)写在这个方法里边,那么就是会省事很多,也就是说我们可以alloc 创建对象封装到一个方法里边,直接调用这个方法就可以了,这就是简单工厂方法

如果一个工厂里有两个create创建方法,比如PeopleFactory类工厂同时有createTeacher和createStudent两个方法,现在假设原本创建100个老师的写法是如下所示:

1
2
3
4
5
PeopleFactory *factory = [PeopleFactory alloc] init];
People *people1 = [factory createTeacher];
People *people2 = [factory createTeacher];
People *people3 = [factory createTeacher];
People *people4 = [factory createTeacher];

现在突然想让创建出来的对象是student,而不是老师teacher,那么这时候我们就不得不一个个的把createTeacher替换成createStudent方法了。

1
2
3
4
5
PeopleFactory *factory = [PeopleFactory alloc] init];
People *people1 = [factory createStudent];
People *people2 = [factory createStudent];
People *people3 = [factory createStudent];
People *people4 = [factory createStudent];

但是如果利用工厂模式,我们为每一个要创建的对象所在的类都相应地创建一个工厂,则我们的写法将会变成

1
2
3
4
5
6
7
8
9
10
11
12
13
//创建老师
TeacherFactory *factory = [TeacherFactory alloc] init];
People *people1 = [factory createPeople];
People *people2 = [factory createPeople];
People *people3 = [factory createPeople];
People *people4 = [factory createPeople];

//创建学生
StudentFactory *factory = [StudentFactory alloc] init];
People *people1 = [factory createPeople];
People *people2 = [factory createPeople];
People *people3 = [factory createPeople];
People *people4 = [factory createPeople];

显然上面这种方法,在我们需要不同对象时,修改起来更方便点。

工厂方法模式是为每一个要创建的对象所在的类都相应地创建一个工厂

2、结构型模式

2.1、代理模式

应用场景:当一个类的某些功能需要由别的类来实现,但是又不确定具体会是哪个类实现。

实例:tableview的datasource和delegate

2.2、适配器模式

设计模式-④适配器、策略、责任链模式.md

3、行为模式

3.1、观察者模式

应用场景:一般为model层对,controller和view进行的通知方式,不关心谁去接收,只负责发布信息。

实例:
①Notification通知中心,注册通知中心,任何位置可以发送消息,注册观察者的对象可以接收。
②KVO,键值对改变通知的观察者。

模式 iOS 中的应用 订阅方式
观察者模式 KVO(Key-Value Observing)、
Delegate(代理模式也是观察者的一种特殊情况)
观察者直接注册到被观察者/ 被观察者直接注册给观察者
发布-订阅模式 NotificationCenter、Combine、RxSwift 订阅者向事件中心注册

3.2、策略模式

应用场景:定义算法族,封装起来,使他们之间可以相互替换。
优势:使算法的变化独立于使用算法的用户
敏捷原则:接口隔离原则;多用组合,少用继承;针对接口编程,而非实现。
实例:排序算法,NSArray的sortedArrayUsingSelector;经典的鸭子会叫,会飞案例。
注意事项:1,剥离类中易于变化的行为,通过组合的方式嵌入抽象基类
2,变化的行为抽象基类为,所有可变变化的父类
3,用户类的最终实例,通过注入行为实例的方式,设定易变行为
防止了继承行为方式,导致无关行为污染子类。完成了策略封装和可替换性。

附:Objective C中数组排序几种情况的总结

OC中常用的数组排序有以下几种方法:

①、sortedArrayUsingSelector:;

②、sortedArrayUsingComparator:;

③、sortedArrayUsingDescriptors:

1
2
3
4
5
6
//简单排序
- (void)sortArray() {
NSArray *array = [NSArray arrayWithObjects:@"abc",@"456",@"123",@"789",@"ef", nil];
NSArray *sortedArray = [array sortedArrayUsingSelector:@selector(compare:)];
NSLog(@"排序后:%@",sortedArray);
}

策略模式的其他例子:

3.3、责任链模式

设计模式-④适配器、策略、责任链模式.md

END

版本检查

一、App的版本检查

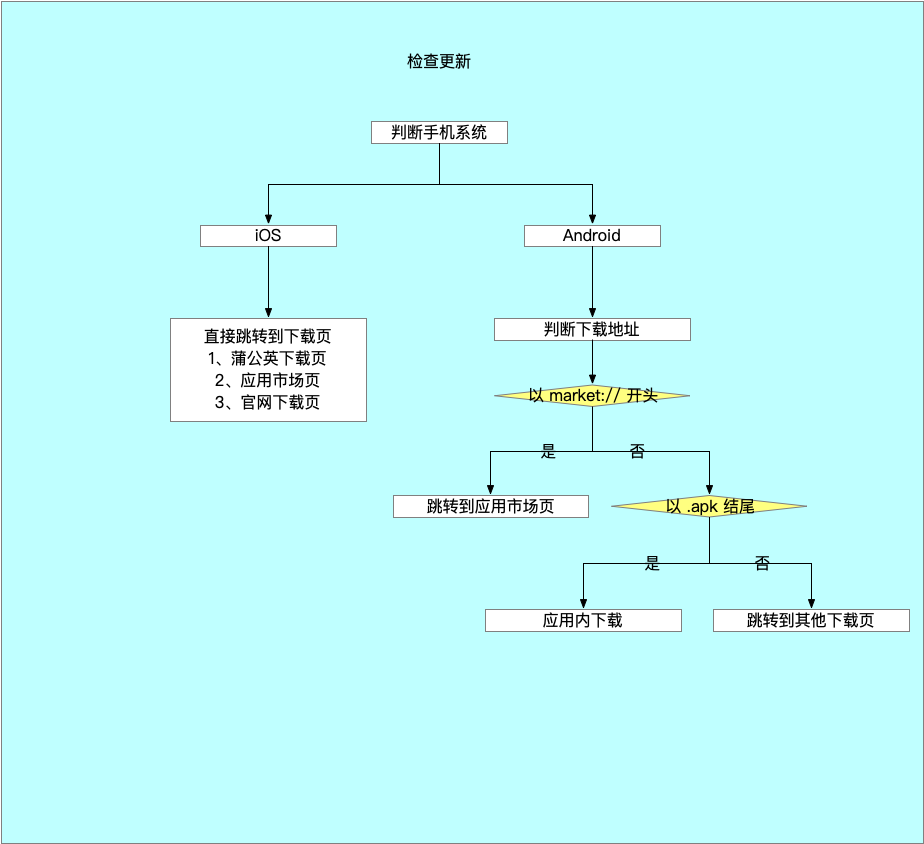
1、流程图

版本检查

图片来源于 版本检查.graffle

二、接口设计

公共参数详见:《基础规范-请求规范》 中的request公共入参保持一致

序号 标识 示例 描述 必传 用途
1 isManualCheck true/false 是否是手动检查更新 避免关闭后无法弹出
2 callOwner app、h5 调用者 不同调用者版本提示语可能不一致

三、JS方法提供

背景:一些新活动需要触发弹出新版本

序号 js接口 描述 场景
1 h5CallBridgeAction_checkVersion 检查更新
2 h5CallBridgeAction_updateVersion 马上更新 更新弹窗h5游戏自定义不同的风格

二、版本修改

1、iOS版本设置

2、Android版本修改

进入bulid.gradle文件,修改如下:

1
2
3
flutterVersionName  ="1."+new Date().format("MM.dd", TimeZone.getTimeZone("GMT+8:00"))

flutterVersionCode = new Date().format("MMddHHmm", TimeZone.getTimeZone("GMT+8:00")) // 需要versionCode每次都要比上次大,与版本无关

3、Jenkins中的版本设置

进入Jenkins指定iOS项目的配置,修改

1
2
3
4
VERSION=$(date "+%y.%m.%d") # 19.02.21 小y是19,大Y是2019
BUILD=$(date "+%y%m%d%H%M") # 1902211506
echo "------VERSION:${VERSION}"
echo "------BUILD:${BUILD}"

二、网页的版本检查/版本更新

https://www.google.com 为例,即访问google的时候,想要访问到最新的版本内容。

其他参考文章:

一、直接版本地址方案

有版本更新时候,接口直接返回最终的访问地址。形如:https://www.google.com/v10201000

缺点:

  • 返回给app的地址得一直变化。

  • app中历史记录得做映射,不能直接保存网页地址。否则会出现点击了一个历史记录,发现之前的地址无法访问的问题。(为此,app就得通过类似id的方式,每次去向接口取最新的值)

    退一步将每次获取改为切换前后台的时候,才去获取,也会出现有地址id,却出现通过id取接口失败的一些异常情况出现。

二、重定向方案

版本举例如下:

时间 发布的版本号 浏览器/客户端访问的【输入地址】 浏览器/客户端【访问的实际地址】
10.20 10:00 v10201000 https://www.google.com https://www.google.com/v10201000
10.24 10:00 v10241000 同上 https://www.google.com/v10241000
11.01 10:00 V11011000 同上 https://www.google.com/v10311000
11.01 12:00 V11011200 同上 https://www.google.com/v10311200

方案过程如下:

1、浏览器/客户端访问 https://www.google.com

2、https://www.google.com 所对应的网页 https://www.google.com/index.html 进行 check_version 接口请求

1
2
3
4
5
网页:https://www.google.com/index.html
请求方法:check_version
请求结果:{
"url": "https://www.google.com/v10241000/index.html"
}

3、https://www.google.com/index.html 根据所得地址重定向

4、最终即看到的是用户在浏览器/客户端访问 https://www.google.com ,但实际上会访问最新的版本 https://www.google.com/v10241000/index.html

优点:

  • 浏览器/客户端访问的【输入地址】版本变化时,也不用变化。

三、常见问题(FAQ)

问题1:访问google没看到变化的内容

1、无重定向时,即访问的地址是 https://www.google.com/v10201000

可能原因为:有缓存,需要在url后加参数 来刷缓存,形如: https://www.google.com/v10201000?refresh=123

2、有重定向时,即访问的地址一直是 https://www.google.com

可能原因为:https://www.google.com/index.html 没做重定向到最新的版本地址

End