性能监控:异常与崩溃

异常与崩溃

BUGLY崩溃问题汇总.md

一、异常捕获

通过三方捕获的方式,可以选择 Buly 友盟 等。详细的不展开,下面我们只讲底层自己进行异常捕获。

1、iOS异常捕获

iOS异常捕获

iOS上获取崩溃日志的N+1种方法

开发iOS应用,解决Crash问题始终是一个难题。Crash分为两种,

一种是由EXC_BAD_ACCESS引起的,原因是访问了不属于本进程的内存地址,有可能是访问已被释放的内存;

另一种是未被捕获的Objective-C异常(NSException),导致程序向自身发送了SIGABRT信号而崩溃。其实对于未捕获的Objective-C异常,我们是有办法将它记录下来的,如果日志记录得当,能够解决绝大部分崩溃的问题。

UncaughtExceptionHandler

2、Flutter异常捕获

系统已在performRebuild中异常捕获 FlutterError.onError = (FlutterErrorDetails details) { };

runZoned 中 handleUncaughtError 拦截未处理的异步错误

文档:《Flutter实战第二版:Flutter异常捕获:最终的错误上报代码

flutter_error_catch

点击查看源码

如果我想在应用程序退出时执行一些清理工作,我应该在 RunLoop 的哪个阶段进行操作?

1
2
3
4
// 程序被手动杀死。即将终止,可以在这里执行一些必要的清理工作
- (void)applicationWillTerminate:(UIApplication *)application {

}

applicationWillTerminate:这个方法并不总是可靠的,因为它的调用取决于多种因素,包括用户如何退出应用(例如,通过按 Home 键或通过系统设置)和系统状态。相比之下,RunLoop Observer 提供了一种更为可靠的方法来监听应用生命周期的特定阶段。通过在 RunLoop 的退出阶段添加一个 Observer,你可以确保在 RunLoop 即将退出时执行一些操作,这通常意味着应用即将进入后台或者终止。(还未亲自验证!!!)

1
2
3
4
5
6
7
8
9
10
11
12
13
14
15
16
17
18
19
20
// 在 AppDelegate.m 文件中
- (BOOL)application:(UIApplication *)application didFinishLaunchingWithOptions:(NSDictionary *)launchOptions {
// 创建 RunLoop Observer,并将 Observer 添加到主线程的 RunLoop
CFRunLoopObserverRef observer = CFRunLoopObserverCreateWithHandler(kCFAllocatorDefault, kCFRunLoopExit, TRUE, 0,&exitRunLoopCallback);
CFRunLoopAddObserver(CFRunLoopGetMain(), observer, kCFRunLoopCommonModes);
// 由于这是一个全局的 Observer,我们不需要在这里释放它。它会在应用退出时自动释放。

// 其他初始化代码...
return YES;
}

// Observer 的回调函数
void exitRunLoopCallback(CFRunLoopObserverRef observer, CFRunLoopActivity activity, void *info) {
if (activity == kCFRunLoopExit) {
// 执行清理工作
NSLog(@"Performing cleanup work before the application exits.");

// 这里添加你的清理代码
}
}

二、如何追踪app

iOS 如何追踪app

三、起死回生/回光返照

1、iOS 使用Runloop实现起死回生/回光返照

核心:创建一个Runloop,将主线程的所有Runmode都拿过来跑,作为应用程序主Runloop的替代。

但是:这样固然可以实现我们想要做的事情,但是会带来一个问题:因为我们为了继续执行程序而没有将控制权返回给导致崩溃的调用函数,并且我们启动了自己的Runloop,所以永远不会返回到原始的Runloop中去了,这将意味着导致异常的线程使用的堆栈内存将永久泄漏。因此这种类型的方法应被视为调试工具或最后手段,所以,不要在Debug以外的环境使用它。本段摘自:线程保活提醒

视频:“Runloop起死回生/回光返照” 见 00:57:55–01:03:00 的视频 2021-08-21_Crash分析.wmv

文档:RunLoop总结:RunLoop的应用场景(五)阻止App崩溃一次

示例代码:https://github.com/Haley-Wong/RunLoopDemos

网络库接口文档

前言

本文为规范网络请求的编码文件位置和规范调用的方法。

一、网络请求接口使用简版

这里只介绍接口使用。详细的接口设计,详见下文。

1、基础请求接口(post/get)

1.1、不需要缓存 AppNetworkRequestUtil

1
2
3
4
5
// post 请求
AppNetworkRequestUtil.post

// get 请求
AppNetworkRequestUtil.get

1.2、需要缓存 AppNetworkCacheUtil(默认一级缓存)

1
2
3
4
5
// post 请求
AppNetworkCacheUtil.post

// get 请求
AppNetworkCacheUtil.get

2、列表请求接口

1.2、需要缓存 AppNetworkListCacheUtil(post)

1
AppNetworkListCacheUtil.post

底层会调用 postListWithCallback

①、不需要特殊的pageSize时候,请求参数里无需设置 pageSize=20 ,底层会自动为你自动补上。

②、自动提取参数中的 pageNum,当发现pageNum为第一页的时候,底层会自动为你做第一页的缓存,且其他页不会做缓存。

二、接口使用规范+示例

1、接口使用规范

接口请求,统一写在每个模块的Request下。

附:已在前文《 项目目录结构规范 见《架构模式-①概览》 》 里的【7、服务类Service】中规范的Service结构如下:

7、服务类service

1
2
3
4
5
6
7
8
9
10
11
12
13
14
15
│  ├─ service
│ │ ├─ global_config
│ │ │ ├─ manager
│ │ │ │ └─ global_config_service.dart
│ │ │ ├─ request
│ │ │ │ └─ global_config_request.dart
│ │ │ └─ cache
│ │ │ └─ global_config_cache.dart
│ │ └─ user
│ │ ├─ manager
│ │ │ └─ user_service.dart
│ │ ├─ request
│ │ │ └─ user_info_request.dart
│ │ └─ cache
│ │ └─ user_info_cache.dart

services/:包含应用程序的服务类或者管理中心,例如用户信息中心、配置信息中心等。

——-manager: 管理中心

——-request: 管理中心会需要的请求功能

——-cache: 管理中心可能需要的存储功能

2、示例

1
2
3
4
5
6
7
8
9
10
11
12
13
14
15
16
17
18
19
20
21
22
23
24
25
26
27
28
29
30
class UserRequest {
// 登录-普通
static login_normal({
String mobile,
String smsCode,
void Function(UserModel userModel) completeBlock,
}) {
return AppNetworkRequestUtil.post(
UrlPath.doLogin,
params: {
"mobile": mobile,
"smsCode": smsCode,
"grantType": "sms_code",
},
).then((ResponseModel responseModel) {
if (responseModel.isSuccess != true) {
completeBlock(null);
return;
}

User_manager_bean baseUserModel;
if (responseModel.result != null) {
baseUserModel = UserModel.fromJson(responseModel.result);
} else {
baseUserModel = null;
}
completeBlock(baseUserModel);
});
}
}

三、网络请求机制设计

本点只介绍机制,请求的属性介绍,详见下文。

1、重试机制设计

接口:requestWithRetry –> requestUrl

1
2
3
4
5
6
7
8
9
10
11
12
13
14
15
16
17
18
19
20
21
22
23
24
25
26
27
28
29
30
31
32
33
34
35
36
37
38
39
40
41
42
43
44
45
46
47
48
49
50
51
52
53
54
55
56
57
58
59
60
61
62
63
Future<ResponseModel> requestWithRetry(
String api, {
RequestMethod requestMethod = RequestMethod.post,
Map<String, dynamic>? customParams,
int retryCount = 0, // 轮询次数,最后一次不管成功与否都要返回
Duration retryDuration = const Duration(milliseconds: 1000), // 轮询间隔
bool Function(ResponseModel responseModel)?
retryStopConditionConfigBlock, // 是否请求停止的判断条件(为空时候,默认请求成功即停止)
Options? options,
bool withLoading = false,
bool?
toastIfMayNeed, // 应该弹出toast的地方是否要弹出toast(如网络code为500的时候),必须可为空是,不为空的时候无法实现修改

ResponseModel? beforeResponseModel, // 上一次请求时候得到的值(重试\缓存)
}) async {
return requestUrl(
api,
requestMethod: requestMethod,
customParams: customParams,
options: options,
withLoading: withLoading,
toastIfMayNeed: toastIfMayNeed,
).then((ResponseModel responseModel) {
if (beforeResponseModel != null) {
if (responseModel.isEqualToResponse(beforeResponseModel)) {
responseModel.isSameToBefore = true;
}
}

bool allowRetryIfFailure = retryCount > 1;
if (allowRetryIfFailure != true) {
// 重试次数用完的话,最后一次不管成功与否都要返回
return responseModel;
}

// 如果实际的请求成功,则直接返回
bool noneedRetry = responseModel.isSuccess;
if (retryStopConditionConfigBlock != null) {
noneedRetry = retryStopConditionConfigBlock(responseModel);
}
if (noneedRetry) {
return responseModel;
} else {
// 如果实际的请求失败,则尝试再进行请求
retryCount--;

return Future.delayed(retryDuration).then((value) {
return requestWithRetry(
api,
requestMethod: requestMethod,
customParams: customParams,
retryCount: retryCount,
retryDuration: retryDuration,
retryStopConditionConfigBlock: retryStopConditionConfigBlock,
options: options,
withLoading: withLoading,
toastIfMayNeed: toastIfMayNeed,
beforeResponseModel: responseModel,
);
});
}
});
}

2、缓存机制设计

2.1、在重试基础上+缓存

接口:cache_requestWithCallback –> requestWithRetry –> requestUrl

1
2
3
4
5
6
7
8
9
10
11
12
13
14
15
16
17
18
19
20
21
22
23
24
25
26
27
28
29
30
31
32
33
34
35
36
37
38
39
40
41
42
43
44
45
46
47
48
49
50
51
52
53
54
55
56
57
58
59
60
61
62
63
64
65
66
67
68
69
70
71
72
73
74
75
76
77
78
79
80
81
82
83
/// 可进行缓存的请求(需要多次返回结果)
// ignore: non_constant_identifier_names
void cache_requestWithCallback(
String api, {
RequestMethod requestMethod = RequestMethod.post,
Map<String, dynamic>? customParams,
bool? ifNoAuthorizationForceGiveUpRequest, // 没有 Authorization 的时候是否强制放弃请求
int retryCount = 0,
NetworkCacheLevel cacheLevel = NetworkCacheLevel.none,
required void Function(ResponseModel responseModel) completeCallBack,
ResponseModel? cacheResponseModel,
}) async {
/*
bool shouldGiveUp = await super.shouldGiveUpRequest(api);
// 此时可能网络初始化还没完成(PS:初始化操作在base_requestUrl中 await _initCompleter.future;)
if (shouldGiveUp) {
LogApiUtil.logCancelApi(api);
return;
}
*/

if (ifNoAuthorizationForceGiveUpRequest == true) {
if (await existAuthorization() == false) {
return;
}
}

ResponseModel responseModel = await requestWithRetry(
api,
requestMethod: requestMethod,
customParams: customParams,
retryCount: retryCount,
options: CacheHelper.buildOptions(cacheLevel),
beforeResponseModel: cacheResponseModel,
);

// 不是真正的网络请求返回的Response\Error结果(eg:比如是取缓存的结果时候)
// bool noRealRequest = cacheLevel == NetworkCacheLevel.one;
if (responseModel.isCache != true) {
// 1、当请求结果是后台实际请求返回的时候:
if (responseModel.isSuccess) {
// ①.如果实际的请求成功,则直接返回
completeCallBack(responseModel);
} else {
// ②.如果实际的请求失败,由于 statusCode 在200到300之间的请求结果都会被保存起来,但我们此系统里他们可能是错误的。
// 如500,就不要保存起来了,防止请求的时候发现有缓存数据,使得页面使用到了保存的数据
if (cacheLevel != NetworkCacheLevel.none) {
Uri uri = getUri(api);
String requestMethodString = requestMethod.toString().split('.').last;
bool deleteSuccess = await deleteByPrimaryKeyAndSubKeyWithUri(uri,
requestMethod: requestMethodString, data: customParams);
if (deleteSuccess == false) {
_log("Warning:此份网络数据结果本不该存储,但存了,现在必须删却又没删除成功的接口");
}
}
completeCallBack(responseModel);
}
} else {
// 2、请求结果是之前缓存的数据返回的(即结果是真正的网络请求返回的Response\Error结果)的时候,
// ①先把缓存返回回去,
// ②再继续发起实际的请求,且新请求为后台实际请求并且其要会保存请求成功的数据
completeCallBack(responseModel);

late NetworkCacheLevel newCacheLevel;
if (cacheLevel == NetworkCacheLevel.one) {
newCacheLevel = NetworkCacheLevel.forceRefreshAndCacheOne;
} else {
_log(
'Error:$api判断出错啦,此结果不是缓存数据,却走到了isCache==true'); // TODO:无网络的情况下会发生此现象
newCacheLevel = NetworkCacheLevel
.none; //TODO:临时为了走下去,应该自始至终都不会走到这里,这里之后要 throw Exception
}

cache_requestWithCallback(
api,
requestMethod: requestMethod,
customParams: customParams,
cacheLevel: newCacheLevel,
completeCallBack: completeCallBack,
cacheResponseModel: responseModel, // 缓存数据
);
}
}

3、整合成app层的requestWithCallback

接口:requestWithCallback –> cache_requestWithCallback –> requestWithRetry –> requestUrl

①、加入接口模拟mock

②、加入网络判断

③、加入loading

1
2
3
4
5
6
7
8
9
10
11
12
13
14
15
16
17
18
19
20
21
22
23
24
25
26
27
28
29
30
31
32
33
34
35
36
37
38
39
40
41
42
43
44
45
46
47
48
49
50
51
52
53
54
55
56
57
58
59
60
61
void requestWithCallback(
String api, {
RequestMethod requestMethod = RequestMethod.post,
Map<String, dynamic>? customParams,
bool? ifNoAuthorizationForceGiveUpRequest, // 没有 Authorization 的时候是否强制放弃请求
int retryCount = 0,
AppNetworkCacheLevel cacheLevel = AppNetworkCacheLevel.none,
withLoading = false,
bool? showToastForNoNetwork,
required void Function(ResponseModel responseModel) completeCallBack,
}) async {
AppMockManager.tryDealApi(
api,
isGet: requestMethod == RequestMethod.get ? true : false,
);

// ignore: todo
/* ///TODO:判断不准确,临时注释起来
if (cacheLevel != NetworkCacheLevel.one) {
// 不是取缓存的请求的时候,才需要取网络
if (NetworkStatusManager().connectionStatus == NetworkType.none) {
ResponseModel newResponseModel = checkResponseModelFunction(
ResponseModel.nonetworkResponseModel(),
showToastForNoNetwork: showToastForNoNetwork,
);

if (completeCallBack != null) {
completeCallBack(newResponseModel);
}
return;
}
}
*/

if (withLoading == true) {
LoadingUtil.show();
}

cache_requestWithCallback(
api,
requestMethod: requestMethod,
customParams: customParams,
ifNoAuthorizationForceGiveUpRequest: ifNoAuthorizationForceGiveUpRequest,
retryCount: retryCount,
cacheLevel: cacheLevel == AppNetworkCacheLevel.one
? NetworkCacheLevel.one
: NetworkCacheLevel.none,
completeCallBack: (ResponseModel responseModel) {
if (withLoading == true && responseModel.isCache != true) {
LoadingUtil.dismiss();
}

ResponseModel newResponseModel = checkResponseModelFunction(
responseModel,
toastIfMayNeed: showToastForNoNetwork,
);

completeCallBack(newResponseModel);
},
);
}

4、callback转为Future的机制

接口:post/get –> requestWithCallback –> cache_requestWithCallback –> requestWithRetry –> requestUrl

1
2
3
4
5
6
7
8
9
10
11
12
13
14
15
16
17
18
19
20
21
22
23
24
25
26
27
28
29
30
31
32
33
34
35
36
37
38
39
40
41
42
43
44
45
46
47
48
49
50
51
class AppNetworkCacheUtil {
String api;
Map<String, dynamic>? params;
bool? ifNoAuthorizationForceGiveUpRequest; // 没有 Authorization 的时候是否强制放弃请求
int retryCount;
bool withLoading;
AppNetworkCacheLevel cacheLevel;
bool? showToastForNoNetwork;

RequestMethod requestMethod = RequestMethod.post;

AppNetworkCacheUtil.get(
this.api, {
this.params,
this.ifNoAuthorizationForceGiveUpRequest,
this.retryCount = 0,
this.withLoading = false,
this.cacheLevel = AppNetworkCacheLevel.one,
this.showToastForNoNetwork,
}) {
requestMethod = RequestMethod.get;
}

AppNetworkCacheUtil.post(
this.api, {
this.params,
this.ifNoAuthorizationForceGiveUpRequest,
this.retryCount = 0,
this.withLoading = false,
this.cacheLevel = AppNetworkCacheLevel.one,
this.showToastForNoNetwork,
}) {
requestMethod = RequestMethod.post;
}

void then(
void Function(ResponseModel responseModel) completeCallBack,
) async {
AppNetworkManager().requestWithCallback(
api,
requestMethod: requestMethod,
customParams: params,
ifNoAuthorizationForceGiveUpRequest: ifNoAuthorizationForceGiveUpRequest,
retryCount: retryCount,
cacheLevel: cacheLevel,
withLoading: withLoading,
showToastForNoNetwork: showToastForNoNetwork,
completeCallBack: completeCallBack,
);
}
}

四、列表接口的缓存设计

方法:postListWithCallback

①、不需要特殊的pageSize时候,请求参数里无需设置 pageSize=20 ,底层会自动为你自动补上。

②、自动提取参数中的 pageNum,当发现pageNum为第一页的时候,底层会自动为你做第一页的缓存,且其他页不会做缓存。

1
2
3
4
5
6
7
8
9
10
11
12
13
14
15
16
17
18
19
20
21
22
23
24
25
26
27
28
29
30
31
32
33
34
35
36
37

extension Cache on AppNetworkManager {
/// 列表的请求(未设置会自动补上 pageNum pageSize 参数)
void postListWithCallback(
String api, {
required Map<String, dynamic> customParams,
int retryCount = 0,
AppListCacheLevel listCacheLevel = AppListCacheLevel.one,
withLoading = false,
bool? showToastForNoNetwork,
required void Function(ResponseModel responseModel) completeCallBack,
}) async {
if (customParams['pageSize'] == null) {
customParams.addAll({"pageSize": 20});
}

AppNetworkCacheLevel cacheLevel = AppNetworkCacheLevel.none;
if (customParams['pageNum'] != null) {
int pageNum = customParams['pageNum'];
if (listCacheLevel == AppListCacheLevel.one && pageNum == 1) {
cacheLevel = AppNetworkCacheLevel.one;
}
}

requestWithCallback(
api,
requestMethod: RequestMethod.post,
customParams: customParams,
retryCount: retryCount,
cacheLevel: cacheLevel,
withLoading: withLoading,
showToastForNoNetwork: showToastForNoNetwork,
completeCallBack: completeCallBack,
);
}

}

五、接口属性介绍

1、错误toast

1
bool? toastIfMayNeed; //可空字段

1.1、默认null

按照默认的公共设置,公共设置里会指明每种code的toast显示方式。

举例:非0都要是toast就toast,不toast就不弹

详情点击:《网络设计.graffle 中的 【code的toast设计】

1
2
3
4
5
6
7
8
9
10
11
12
13
14
15
16
17
18
19
20
21
22
23
24
25
26
27
28
29
30
31
32
33
34
35
36
37
38
39
40
41
42
[
{
"code": [Unknow],
"message": "非常抱歉!服务器开小差了~",
},
{
"code": [ErrorTryCatch],
"message": "非常抱歉!系统请求发生错误了~",
},
{
"code": [NoNetwork], # -1
"message": "目前无可用网络",
},
{
"code": [ErrorTimeout],
"message": "请求超时",
},
{
"code": [ErrorDioCancel],
"message": "请求取消",
},
{
"code": [ErrorDioResponse],
"message": "非常抱歉!服务器开小差了~",
},
{
"code": [500, 503],
"message": "非常抱歉!服务器开小差了~",
},
{
"code": [401+暂未登录或token已经过期],
"message": "登录失效,请重新登录",
},
{
"code": [401+后台的其他message],
"message": "Token不能为空或Token过期,请重新登录",
},
{
"code": "ErrorTimeout",
"message": "请求超时",
},
]

1.2、!null

有任何错误都弹或者不弹

前端觉得应该弹出toast的地方是否要弹出toast(如网络code为500的时候),必须可为空,不为空的时候无法实现修改

1、null时候,即不设置true或false。

Android加固

一、360加固功能介绍

二、功能说明

1、免费版

1.1、DEX文件加密

1.2、防二次打包

2、专业防篡改版

2.1、DEX保护–字符串加密

Flutter中的字符串是否加密???

2.2、DEX保护–默认VMP保护

2.3、SO加固–SO保护

2.4、文件保护–文件完整性校验

防篡改

2.5、文件保护–资源文件保护

2.6、数据保护–防截屏

使用方法:加固时候,勾选是否需要防截屏

使用表现:如果使用,则当用户进行该操作的时候,会弹出toast提示。

2.7、Sandhook检测

功能介绍如下:

SandHook是一款开源的Android平台Hook框架,它可以用于检测应用程序是否被Hook。

Hook是指在应用程序执行期间,通过修改应用程序的代码或者内存中的数据,来改变应用程序原有的行为。

如果检测到应用程序被Hook,加固厂商会采取相应的措施,例如弹出警告框、终止应用程序等,以防止应用程序受到攻击。

问:如果Android本身有一些点击的埋点hook,那会被Sandhook检测出异常吗?

如果Android本身的点击埋点是通过Hook技术实现的,那么它们有可能被SandHook检测出异常。

2.8、环境检测–双开检测、脱壳检测

使用方法:加固时候,勾选是否需要该功能。

使用表现:如果使用,则当用户进行该操作的时候,会被检测到并进行退出。

3、高级防逆向

Dex2C

dex2c是一种工具,可以将Android应用程序的DEX文件转换成C/C++代码。DEX文件是Android应用程序的核心文件之一,包含了应用程序的字节码、类、方法等信息。通过将DEX文件转换成C/C++代码,可以使得应用程序的核心代码不再以DEX格式存储在设备上,而是以C/C++代码的形式存储在设备上,从而增强应用程序的安全性。

三、加固前后数据比较

1、基础加固服务的内容及数据对比

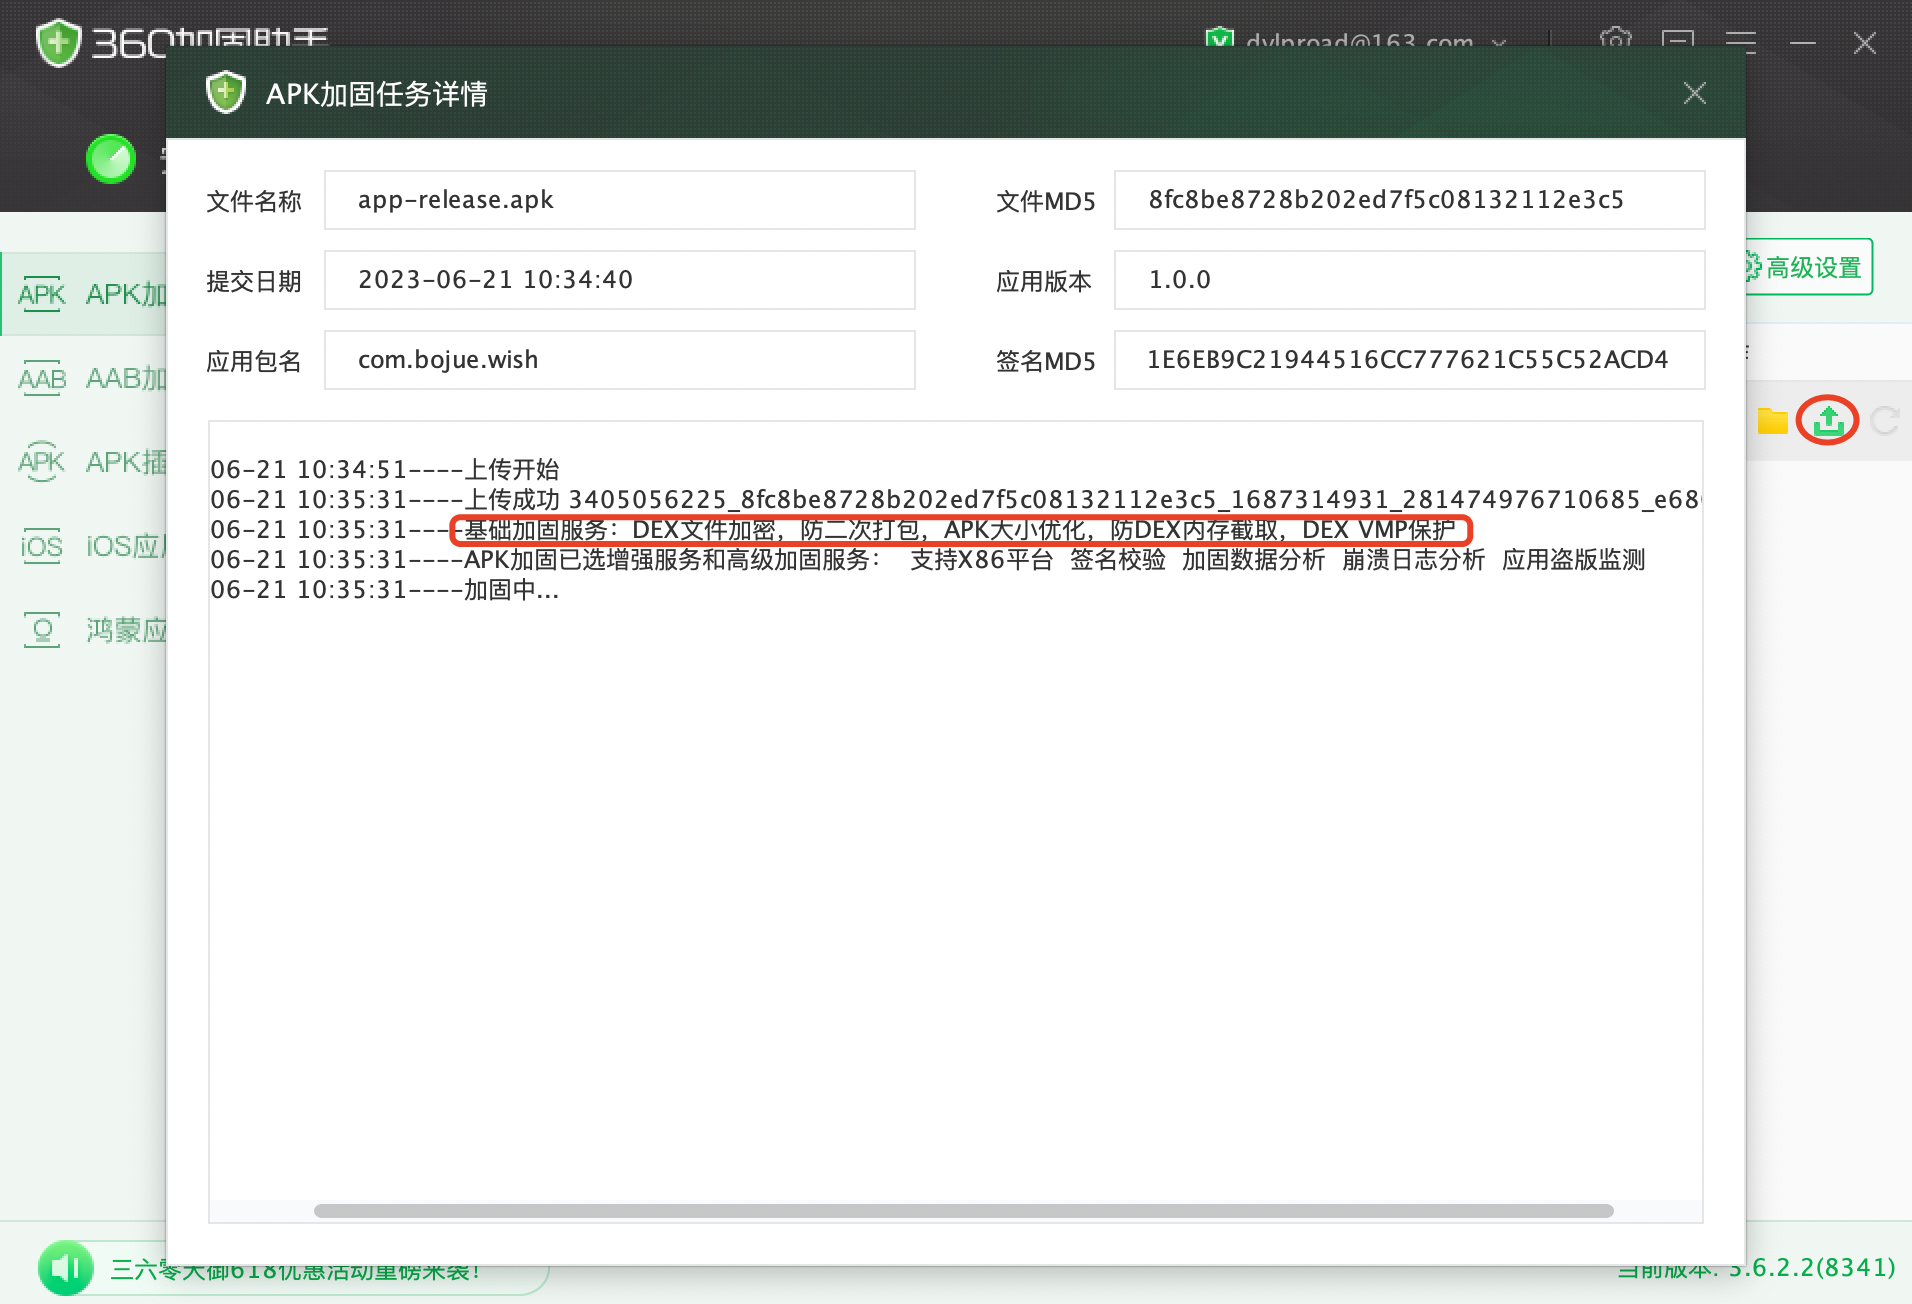
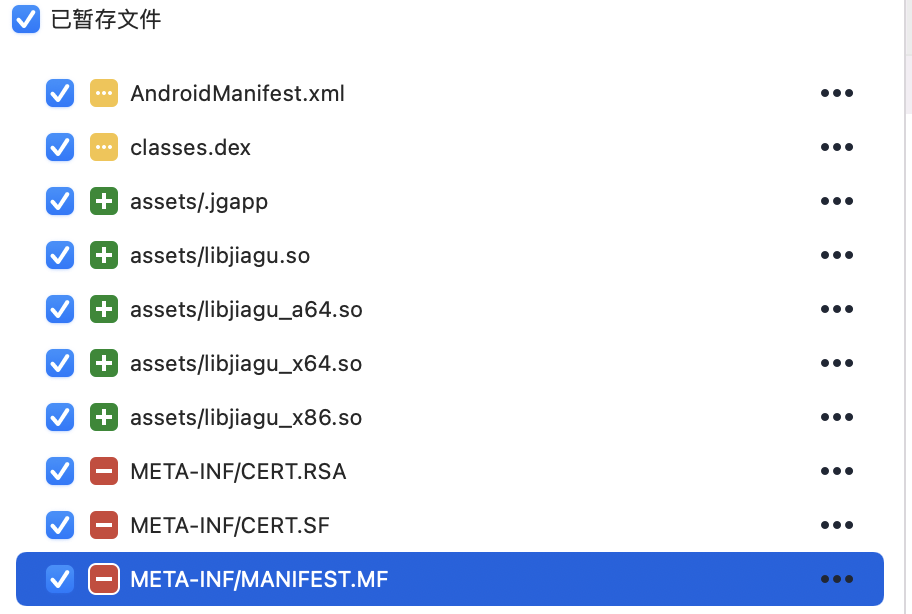
image-20230621104154335 image-20230621110245139

2、企业版与专业版加固效果对比

详见:Android合规安全

app打包保证

背景

主要处理问题:

  • 问题1:避免外部人员使用非正式包
    • 1.1、安装生产调试包
      • 途径1:下载到蒲公英生产包
        • 解决1:设置下载密码(iOS+Android)
        • 解决2:iOS限制安装设备
        • 解决3:蒲公英包通过判断标志,禁止登录(白名单除外)
      • 途径2:
    • 1.2、安装测试包
      • 使用生产功能,通过测试包切换到生产环境
        • 生产数据错误
      • 使用测试功能
    • 1.3、使用开发工具
      • 添加密码(优先级:服务端密码 –> app版本密码,跟随build号)
    • 1.4、发生之后,如何避免,版本升级的控制。
      • 优先级:
  • 避免开发人员随意打包正式包
安装生产调试包 下载到蒲公英生产包 设置下载密码(iOS+Android)
iOS限制安装设备
蒲公英包通过判断标志,禁止登录(白名单除外)
问题 限制下载 限制安装 限制使用(登录) 强制升级
蒲公英的iOS生产包 ✅添加下载密码 限制安装设备 ✅根据发布平台/版本号
蒲公英的Android生产包 ✅添加下载密码
蒲公英的iOS调试包 ✅添加下载密码 限制安装设备 白名单
蒲公英的Android调试包 ✅添加下载密码

解决

1、避免外部人员使用非正式包

1、外部禁止安装生产调试包

1.1、iOS限制安装设备

基础数据基类-②商品

一、商品种类

描述 类名
商品基类 包含必须属性 BaseGoodsBean
商城里展示的商品 有多sku SpuGoodsBean
用户想要购买的商品 SkuGoodsBean

枚举的使用

在Flutter中

packages/app_models/lib/goods/base_goods_enum.dart

1
2
3
4
5
6
7
8
9
10
11
12
13
14
15
16
17
18
19
20
21
22
23
24
25
26
27
28
29
import 'package:flutter_data_helper/flutter_data_helper.dart';

// -------------------------- 商品售卖状态 --------------------------
// 商品售卖状态(上架:up; 下架:down)
enum GoodsSaleState {
up, // 上架中
down, // 已下架
}

///string转枚举类型
GoodsSaleState goodsSaleStateFromString(String value) {
Iterable<GoodsSaleState> values = [
GoodsSaleState.up, // 上架中
GoodsSaleState.down, // 已下架
];
return EnumStringUtil.enumFromString(values, value);
}

///枚举类型转string
String goodsSaleStateStringFromEnum(o) {
return EnumStringUtil.enumToString(o);
}

// -------------------------- 商品物品类型 --------------------------
// 商品物品类型(实体商品:physical; 虚拟物品:virtual)
enum GoodsPhysicalType {
physical, // 实体商品
virtual, // 虚拟物品
}

在iOS中

1
2
3
4
5
6
7
8
9
10
11
12
13
14
15
16
17
18
19
20
// 协议定义
protocol GoodsPriceProtocol {
var marketPrice: Int? { get set }
var salePrice: Int? { get set }
}

protocol GoodsBrandProtocol {
var brandName: String? { get set }
var brandId: String? { get set }
}

// 类实现协议
class BaseGoodsBean: GoodsPriceProtocol, GoodsBrandProtocol {
var marketPrice: Int?
var salePrice: Int?
var brandName: String?
var brandId: String?

// 类的其他属性和方法
}

在Flutter中

packages/app_models/lib/goods/base_goods_bean.dart

1
2
3
4
5
6
7
8
9
10
11
12
13
14
15
16
17
18
19
20
21
22
23
24
25
26
27
28
29
30
31
32
33
34
35
36
37
38
39
40
41
42
43
44
45
46
47
48
49
50
51
52
53
54
55
56
57
58
59
60
61
// 商品价格
import 'base_goods_enum.dart';

abstract class GoodsPriceModel {
int? marketPrice; // 市场价格
int? salePrice; // 销售价格
}

// 商品品牌
abstract class GoodsBrandModel {
String? brandId; // 品牌id
String? brandName; // 品牌名称
}

// 商品门店
abstract class GoodsShopModel {
String? shopId; // 门店id
String? shopName; // 门店名称
}

// 商品基类
class BaseGoodsBean implements GoodsPriceModel, GoodsBrandModel, GoodsShopModel {
// 商品必备属性
final String id; // 商品id
final String name; // 商品名称
final String imageOrVideoUrl; // 商品主图图片/视频
final GoodsSaleState goodsSaleState; // 商品售卖状态(上架up; 下架down)
final GoodsPhysicalType physicalType; // 商品物品类型(实体商品:physical; 虚拟物品:virtual)

// 商品价格
@override
int? marketPrice;
@override
int? salePrice;

// 商品品牌
@override
String? brandId;
@override
String? brandName;

// 商品门店
@override
String? shopId;
@override
String? shopName;

BaseGoodsBean({
required this.id,
required this.name,
required this.imageOrVideoUrl,
required this.goodsSaleState,
required this.physicalType,
this.marketPrice,
this.salePrice,
this.brandId,
this.brandName,
this.shopId,
this.shopName,
});
}

展示的商品

选中的商品

packages/app_models/lib/goods/selected_goods_bean.dart

1

End

基础数据整合方案

原则

1、属性

序号 方案 使用平台 推荐星数 其他
1 继承 iOS、Android、Flutter
2 组合 iOS、Android、Flutter
3 协议 iOS
4 抽象类 Flutter

1.1、继承

1.2、组合

1.3、协议(iOS)

在iOS开发中,除了使用Swift语言创建基类和组合属性的方式之外,还可以考虑使用协议(Protocol)来实现类似的效果。协议可以定义一组属性和方法的要求,然后其他类可以遵循该协议并提供相应的实现。

1
2
3
4
5
6
7
8
9
10
11
12
13
14
15
16
17
18
19
// 商品价格
protocol GoodsPriceProtocol {
var marketPrice: Int? { get set } // 市场价格
var salePrice: Int? { get set } // 销售价格
}

// 商品品牌
protocol GoodsBrandProtocol {
var brandName: String? { get set } // 品牌名
var brandId: String? { get set } // 品牌id
}

// 商品基类
class BaseGoodsBean: GoodsPriceProtocol, GoodsBrandProtocol {
var marketPrice: Int?
var salePrice: Int?
var brandName: String?
var brandId: String?
}

1.4、抽象类

在Flutter中,没有与iOS中的协议(Protocol)直接对应的语言特性。然而,您可以使用抽象类(Abstract Class)来实现类似的效果。抽象类可以定义一组抽象方法和属性,然后其他类可以继承该抽象类并提供相应的实现。

1
2
3
4
5
6
7
8
9
10
11
12
13
14
15
16
17
18
19
20
21
22
23
24
25
26
// 商品价格
abstract class GoodsPriceModel {
int? marketPrice; // 市场价格
int? salePrice; // 销售价格
}

// 商品品牌
abstract class GoodsBrandModel {
String? brandName; // 品牌名称
String? brandId; // 品牌id
}

// 商品基类
class BaseGoodsBean implements GoodsPriceModel, GoodsBrandModel {
// 商品价格
@override
int? marketPrice;
@override
int? salePrice;

// 商品品牌
@override
String? brandName;
@override
String? brandId;
}

End

高磁盘占用的排查与优化

图片缓存区太大的案例

1、案例描述

在我们的Flutter打包的app上,出现测试人员对首页的无限列表疯狂频繁刷,冷启动刷的时候还好,越刷越后面越卡。

2、案例分析过程

经测试验证在其他机器上无法重现。后通过观察应用的磁盘占比,发现出现崩溃的该设备该应用的磁盘占比巨大,达好几G(只要占用有网络点播视频缓存、打赏动画视频、图片)。进一步观察发现在图片不大的情况下,其中图片的占比竟然也能接近上G,说明图片数量巨大。由此猜测是图片数量太多导致。随后通过高磁盘占用环境模拟,确实也出现了同样的情况。由此我们开始设想磁盘对应用性能的影响 的几种原因,并进行对应修复。经过代码排查图片库内部的同步、阻塞问题,发现了一个潜在的同步危险。

1
if (cacheFlie.existsSync()) {  /// existsSync是一个同步方法,用于检查具有该路径的文件系统实体是否存在。

3、为什么原生iOS上没发现类似问题/微信为什么没出现类似问题?

可能原因:①之前原图相同的图片显示在不同地方,也只是原图和缩略图两套而已,而不像图片万象这样,可能会存在好多套。②原生的SDWebImage在监测到内存不足的时候会自动进行清除。

图片缓存(无、太小、太大)的问题

小结:

图片缓冲区默认太小时(一定有问题) 图片缓冲区设大后(可能有问题)
出现的平台 Flutter上默认的缓存上限1000个图片或者100MB内。
原生iOS的SDWebImage一般不设大小,只根据maxCacheAge
Flutter上extended_image判断图片是否已缓存时候有性能问题,而导致卡顿。
原因滑动列表会进行很多图片的获取,从而由于任务过多,对性能产生影响,例如增加CPU使用率,导致电池消耗加快,进而可能引发崩溃。
后果 加载过的图片很容易再次出现。 可能:存的图片数量太大。影响图片存取,而崩溃。
出现的案例 ①列表划过之后再回来;
②列表页面离开后再回来。
测试人员频繁刷,导致刷满图片缓冲区后,图片数量太大,影响图片存取,从而崩溃。
解决方案 图片存储进行分区。对 url 进行 md5 取值,对 md5 取前两个字母为新文件夹。

1、图片缓冲区默认太小时

在Flutter中加载图片(一般是网络图片),我们常常会遇到下面几个问题:Flutter 图片缓存问题分析

  1. 同页面内,加载过的图片,再次出现的时候,会重新加载,特别是列表的图片;

    根源:Flutter 内置的缓存机制 PaintingBinding.instance.imageCache 的 maximumSizemaximumSizeBytes 属性默认的缓存上限1000个图片或者100MB内。

    1
    2
    const int _kDefaultSize = 1000;
    const int _kDefaultSizeBytes = 100 << 20; // 100 MiB

    即图片没有加载到100MB,加载到1000个图片,也会开始根据LRU的规则清理释放缓存。在某些情况下,比如电商,一整个页面80%的元素都用图片占满,小到图标,大到广告banner,个数很容易就到1000了,但是经过压缩剪裁,图片普遍都控制在几十kb甚至10kb以下,即使1000张也远远达不到内存的上限,并且100MB的上限对于某些机型来讲也相对较小了。

    解决:设置大一点

    1
    2
    PaintingBinding.instance.imageCache.maximumSize = 10000;
    PaintingBinding.instance.imageCache.maximumSizeBytes = 800 << 20; // 800 MiB

    附:除了 Flutter 内置的缓存机制外,还有第三方库如 cached_network_image 提供了更丰富的图片缓存功能,包括硬盘缓存等 。如果需要更复杂的图片缓存策略,可以考虑使用这类第三方库来扩展 Flutter 的图片加载和缓存能力。

    附2:extended_image 提供了一套完整的图片加载和缓存解决方案,其缓存的控制也还是通过修改 ImageCache 的配置来控制内存缓存的大小和数量。

    附2:SDWebImage 默认情况下会缓存图片一周(maxCacheAge 的默认值),并且没有对缓存空间大小设置限制(maxCacheSize 默认值未设定),这意味着理论上应用中的图片缓存可以占满整个设备存储空间。

    1
    [SDImageCache sharedImageCache].maxCacheSize = 50 * 1024 * 1024; *// 50MB*
  2. 列表快速滑动时,加载完成再往回滑动,之前的图片还是需要重新加载;

    根源:等同于按需加载。

    解释:加载图片时,为了避免过快滑动,使得同时加载的图片过多导致卡顿甚至崩溃。所以若是内存中已有缓存,则直接返回缓存,若是没有则判断是否在快速滑动,若是正在快速滑动,则下一帧再加入队列处理,若是图片已经被移出屏幕(即没有在tree上),可能会被跳过。

    解决:快速滑动如此,可不处理。

  3. 有时返回上一页面时,上一页面已经加载完成的图片,会重新加载,假如没有占位图会特别明显的闪动。

    同现象1一样。

2、图片缓冲区设大后

图片分区:

SDWebImage 所有的图片都放在 _diskCachePath 目录下,_diskCachePath是只有一层吗?还是里面还会再分文件目录?

SDWebImage 的 _diskCachePath 目录是 SDWebImage 用来存储磁盘缓存的根目录。在这个根目录下,SDWebImage 会进一步组织文件结构,以避免所有图片都放在单一目录下造成文件系统性能问题。具体来说,**图片文件会根据图片 URL 的 MD5 值进行散列,然后根据这个散列值来创建子目录和文件名,从而在磁盘上形成一个树状的目录结构 **。

这种目录结构的设计有助于分散文件系统操作,减少单个目录下的文件数量,从而提高文件检索和写入的性能。此外,SDWebImage 还提供了设置选项,允许开发者自定义图片的存储路径,以及通过 addReadOnlyCachePath: 方法添加额外的只读缓存路径 。

总的来说,_diskCachePath 不是单一层级,而是一个包含多个子目录的复杂结构,每个子目录下存储着根据 MD5 散列值组织好的图片文件,以此来优化磁盘缓存的性能和效率 。

一、磁盘对应用性能的影响

1、原因猜测

可能原因:应用使用过程时候,存在对磁盘中的某个文件的操作,从而导致应用性能问题。操作的可能性如下:

序号 阶段 如果 后果
1 访问 文件量太大 访问效率问题
2 读写 文件大小太大 读写问题

2、排查方案

高磁盘占用的排查与优化

图片来源于:高磁盘占用的排查与优化.graffle

二、高磁盘占用环境模拟

步骤 阶段 操作 目的
1 资源准备1 提供图片的万象接口,以通过万象能获取到各种图片地址 避免得去找非常多的图片数据源
2 资源准备2 提供下载万象图片的接口(指定宽范围),以通过万象图片能下载到很多图片 避免得去找非常多的图片数据源
3 资源下载 下载指定宽范围的万象图片,得到各种图片
每次只添加 100 张,避免模拟功能在同步状态下执行出错;
通过下载占据磁盘空间
4 数据验证1 打印磁盘(沙盒)目录,验证下载
iOS-查看沙盒文件(真机+模拟器)
验证确实磁盘空间被增加
5 数据验证2 计算磁盘大小 验证确实磁盘空间被增加

相应的代码实现,见 附1:高磁盘占用环境模拟的相关代码

三、高磁盘占用环境优化

序号 解决 方案
1 避免单文件夹太大 存储分区处理
2 单文件夹已经太大 存储空间清理

1、避免单文件夹太大—-存储分区处理

1、背景:图片文件下文件数量太多,导致搜索效率下降

1
2
3
4
5
6
7
8
9
10
final Directory _cacheImagesDirectory = Directory(
join((await getTemporaryDirectory()).path, cacheImageFolderName));

// exist, try to find cache image file
if (_cacheImagesDirectory.existsSync()) { /// existsSync是一个同步方法,用于检查具有该路径的文件系统实体是否存在。
final File cacheFlie = File(join(_cacheImagesDirectory.path, md5Key));
if (cacheFlie.existsSync()) { /// existsSync是一个同步方法,用于检查具有该路径的文件系统实体是否存在。

}
}

2、优化方案:对图片存储,进行分区存储。获取方式同理。

3、优化步骤如下

对 url 进行 md5 取值

对 md5 取首字母为新文件夹

将该url所对应的图片存储在图片存储目录下的子目录

1
2
3
4
5
6
7
8
9
10
11
12
13
14
15
16
/// get md5 from key
static String keyToMd5(String key) => md5.convert(utf8.encode(key)).toString();

/// 获取网络图片最后的本地存储文件夹路径
static Future<String> getLastDirPath(String imageUrl, {bool? useSubDir}) async {
Directory cacheDir = await getTemporaryDirectory();
String imageCacheHomeDirPath = join(cacheDir.path, cacheImageFolderName);
if (useSubDir != true) { // 不使用子目录,直接一个文件夹存放
return imageCacheHomeDirPath;
}

String subDirHome = keyToMd5(imageUrl);
String imageCacheSubDirName = subDirHome.substring(0, 1);
String lastDirPath = "$imageCacheHomeDirPath/$imageCacheSubDirName";
return lastDirPath;
}

4、优化验证

1
2
3
4
5
6
7
8
9
10
11
12
13
14
15
16
17
18
19
/// 计算图片文件的查找耗时(查找失败返回-1)
static Future<int> calculateFindDuration(String imageUrl, {bool? useSubDir}) async {
String md5Key = keyToMd5(imageUrl);
final String lastDirPath = await getLastDirPath(imageUrl, useSubDir: useSubDir);
final Directory cacheImagesDirectory = Directory(lastDirPath);

int foundStartTime = DateTime.now().millisecondsSinceEpoch;
// exist, try to find cache image file
if (cacheImagesDirectory.existsSync()) { /// existsSync同步方法,检查该路径的文件夹是否存在
final File cacheFlie = File(join(cacheImagesDirectory.path, md5Key));
if (cacheFlie.existsSync()) { /// existsSync同步方法,检查该路径的文件是否存在
int foundEndTime = DateTime.now().millisecondsSinceEpoch;
int foundDuration = foundEndTime - foundStartTime;
return foundDuration;
}
}

return -1;
}

2、单文件夹已经太大—-存储空间清理

文件的属性有创建时间、修改时间

原理:变化过期时间,遍历文件属性,删除修改时间大于该过期时间的文件

1、设置过期时间的初始值,遍历文件属性,删除修改时间大于该过期时间的文件;

2、检查清理后的大小,如果大小还不在规定大小内,则继续清理;

3、继续清理:设置每次清理的过期时间增加值,对过期时间的初始值增加,并重复以上步骤;

四、优化方案的实施

目的:避免功能异常,出现集体性问题。

灰度方案:请参照 灰度系统

五、延伸

问题:一旦修改分区规则(如原本使用url进行md5后的首位值,后面改成md5后的两位值),旧文件就得重新下载。

解决:使用一致性哈希算法。16 张图解带你掌握一致性哈希算法

1、对存储节点进行hash,创建节点和hash值的哈希映射,如 {100001: “a”, 300001: “a”, 400001: “a”}

2、对数据url进行hash寻址

  • 首先,对 key 进行哈希计算,确定此 key 在环上的位置;
  • 然后,从这个位置沿着顺时针方向走,遇到的第一节点就是存储 key 的节点。(对「数据」进行哈希映射得到一个结果要怎么找到存储该数据的节点呢?)

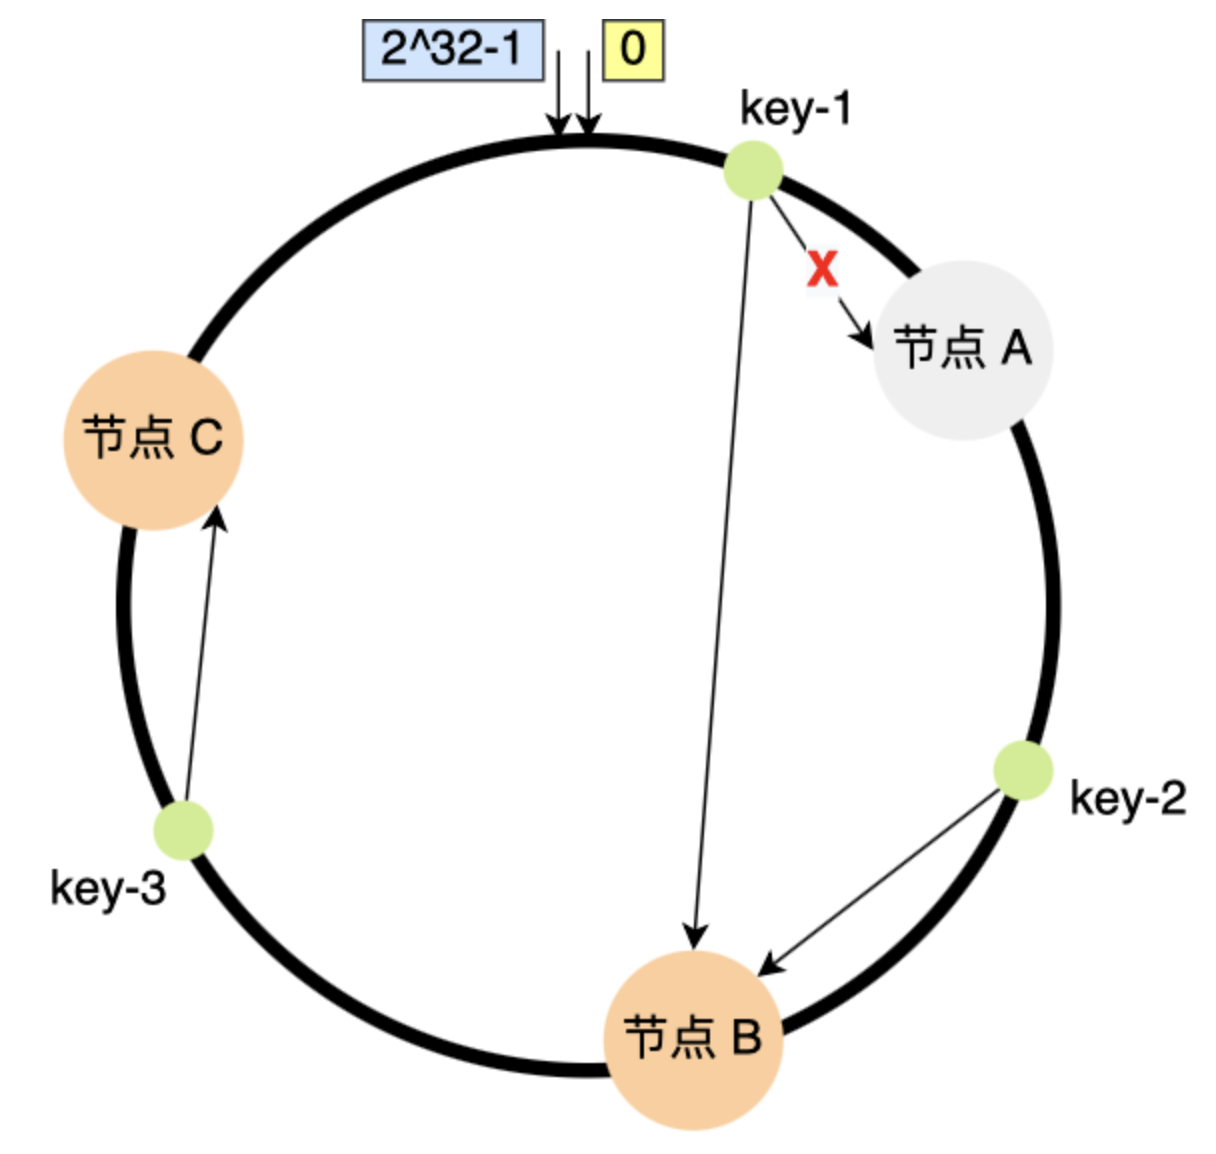
结果:在一致哈希算法中,如果增加或者移除一个节点,仅影响该节点在哈希环上顺时针相邻的后继节点,其它数据也不会受到影响

假设节点数量从 3 减少到了 2,比如将节点 A 移除:你可以看到,key-02 和 key-03 不会受到影响,只有 key-01 需要被迁移节点 B。

image-20231008173625108

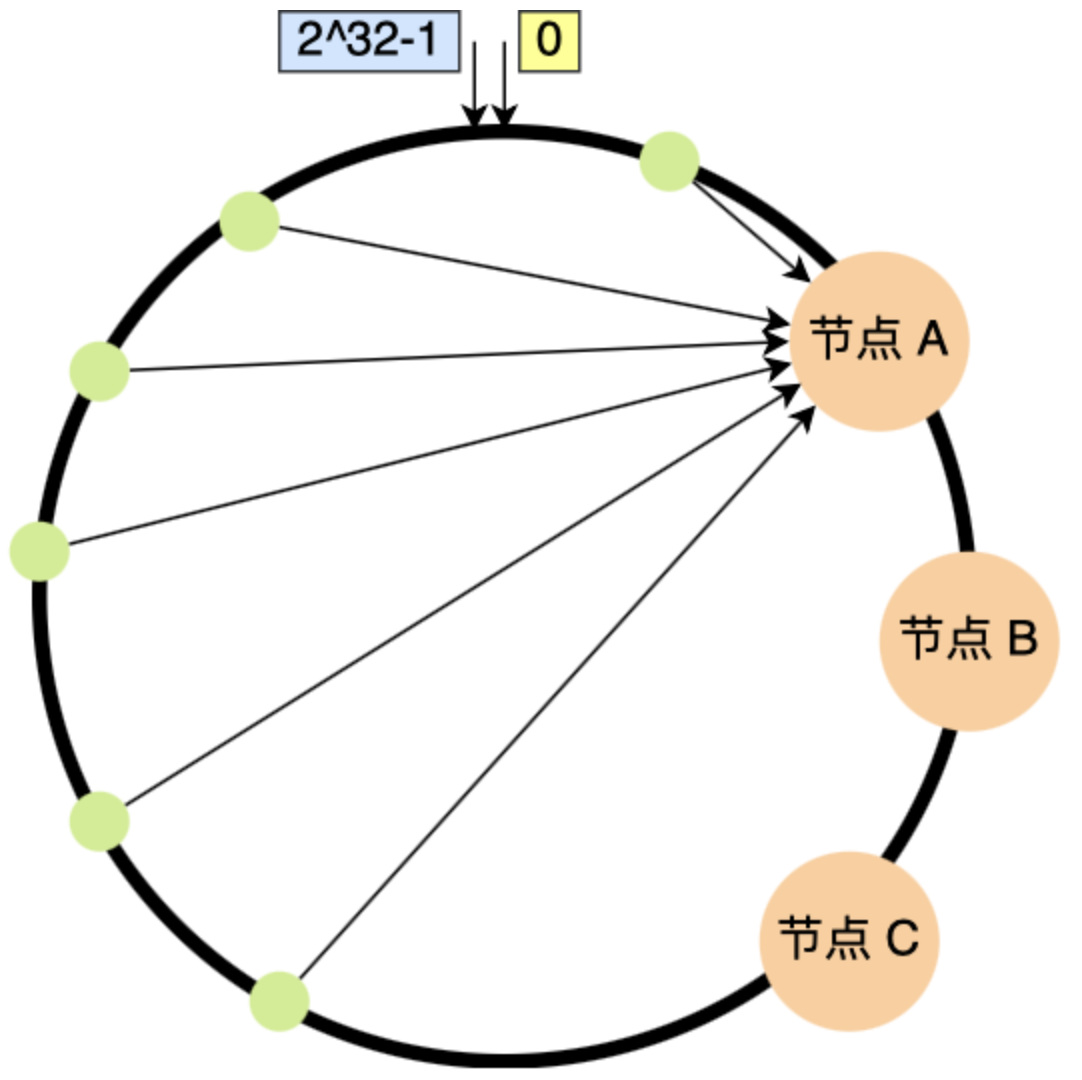
隐患:一致性哈希算法虽然减少了数据迁移量,但是存在节点分布不均匀的问题。如下:

image-20231008173700010

说明:一致哈希算法也用了取模运算,但与哈希算法不同的是,哈希算法是对节点的数量进行取模运算,而一致哈希算法是对 2^32 进行取模运算,是一个固定的值

附:hash算法

使用一致性哈希(Consistent Hashing)可以帮助您将大批图片文件分散存储到不同的文件中,其中每个文件对应一个字母或数字。一致性哈希算法能够提供高效的数据分布和负载均衡,同时允许动态添加或删除文件节点。

1
2
3
4
5
6
7
8
9
10
11
12
13
14
15
16
17
18
19
20
21
22
23
24
25
26
27
28
29
30
31
32
33
34
35
36
37
38
39
40
41
42
43
44
45
46
47
48
49
50
51
52
53
54
55
56
57
58
59
60
61
62
63
64
65
66
67
68
69
70
71
72
73
74
75
76
77
78
79
import 'dart:convert';
import 'package:crypto/crypto.dart';

class ConsistentHashing {
List<String> nodes;
Map<int, String> ring;

// 构造hash环
ConsistentHashing(List<String> nodes) {
this.nodes = nodes;
this.ring = {};

for (String node in nodes) {
addNode(node);
}
}

// ring[_hash(node + n.toString())] = node;
void addNode(String node) { // a、b...
for (int n = 0; n < 3; n++) { // 每个节点有3个虚拟节点(a0、a1、a2、b0、b1、b2...)
String virtualNode = node + n.toString();
int hashValue = _hash(virtualNode);
ring[hashValue] = node; // {hash_a0: "a", hash_a1: "a", hash_a2: "a"}
}
}

// ring.remove(_hash(node + n.toString()));
void removeNode(String node) { // a、b...
for (int n = 0; n < 3; n++) { // 每个节点有3个虚拟节点(a0、a1、a2、b0、b1、b2...)
String virtualNode = node + n.toString();
int hashValue = _hash(virtualNode);
ring.remove(hashValue);
}
}

// 从小到大排序所有虚拟节点的hash值,并进行遍历,找到最接近(第一个>=hashValue的节点)的虚拟节点。判断值应该存储的节点
String getNode(String key) {
if (ring.isEmpty) {
return null;
}

int hashValue = _hash(key);
List<int> sortedKeys = ring.keys.toList()..sort(); // [hash_a0, hash_b0, hash_a1, hash_b1, ...]
for (int ringKey in sortedKeys) {
if (hashValue <= ringKey) { // hash_xxx <= hash_a1 遍历找到第一个大于等于 hash_xxx 的节点
return ring[ringKey]; // ring[hash_a1] = "a" => 返回 "a"
}
}

return ring[sortedKeys[0]];
}

int _hash(String key) {
Digest hash = md5.convert(utf8.encode(key));
int hashValue = int.parse(hash.toString(), radix: 16);
return hashValue;
}
}

void main() {
// 创建36个文件节点,每个节点对应一个字母或数字
List<String> nodes = List.generate(26, (index) => String.fromCharCode(97 + index))
..addAll(List.generate(10, (index) => index.toString()));

// 初始化一致性哈希环
ConsistentHashing ring = ConsistentHashing(nodes);

// 假设有一批图片文件需要存储
List<String> imageFiles = ['image1.jpg', 'image2.jpg', 'image3.jpg'];

for (String imageFile in imageFiles) {
// 根据文件名获取对应的节点
String node = ring.getNode(imageFile);

// 将文件存储到对应的节点中
// 这里可以根据需要自行实现文件存储逻辑
print('Storing $imageFile to node $node');
}
}

附1:高磁盘占用环境模拟的相关代码

1、ts_toomany_image_data_vientiane.dart

1
2
3
4
5
6
7
8
9
10
11
12
13
14
/// [图片处理方式:快速缩略模板](https://cloud.tencent.com/document/product/460/6929)
/// [图片处理方式:数据万象-缩放thumbnail](https://cloud.tencent.com/document/product/460/36540)
/// [图片处理方式:数据万象-旋转rotate](https://cloud.tencent.com/document/product/460/36542)
class TSTooManyImageDataVientiane {
static String newImageUrl(String imageUrl, {required int width}) {
String thumbnail = '?imageMogr2/thumbnail/';
thumbnail += '${width}x/';
thumbnail += 'format/webp/auto-orient/quality/100';

String newImageUrl = "$imageUrl$thumbnail";
// debugPrint('newImageUrl = $newImageUrl');
return newImageUrl;
}
}

2、ts_toomany_image_download_util.dart

1
2
3
4
5
6
7
8
9
10
11
12
13
14
15
16
17
18
import 'dart:io';

import 'package:extended_image/extended_image.dart';
import 'ts_toomany_image_data_vientiane.dart';

class TSTooManyImageDownloadUtil {
static String vientianeImageUrl = "https://images.xihuanwu.com/mcms/uploads/1647604960983901.jpg";

static void simulate_download_too_many(int imageWidthStart, int imageWidthEnd) {
int imageCount = imageWidthEnd - imageWidthStart;
for (var i = 0; i < imageCount; i++) {
int iImageWidth = imageWidthStart + i;
String iImageUrl = TSTooManyImageDataVientiane.newImageUrl(vientianeImageUrl, width: iImageWidth);
getNetworkImageData(iImageUrl);
sleep(const Duration(milliseconds: 10)); // 延迟10ms,避免下载太多计算问题
}
}
}

3、ts_toomany_image_optimize_check_util.dart

1
2
3
4
5
6
7
8
9
10
11
12
13
14
15
16
17
18
19
20
21
import 'dart:convert';
import 'dart:io';
import 'package:crypto/crypto.dart';
import 'package:flutter/foundation.dart';
import 'package:path/path.dart';
import 'package:path_provider/path_provider.dart';
import 'package:extended_image_library/extended_image_library.dart';

import 'ts_toomany_image_data_vientiane.dart';
import 'ts_toomany_image_download_util.dart';

class TSTooManyImageOptimizeCheckUtil {
/// 计算图片的查找时长
static checkImageFindDuration() async {
String foundImageUrl = TSTooManyImageDataVientiane.newImageUrl(TSTooManyImageDownloadUtil.vientianeImageUrl,
width: 6600);
getNetworkImageData(foundImageUrl);
int foundDuration = await TSTooManyImageOptimizeCheckUtil.calculateFindDuration(foundImageUrl);
debugPrint("$foundImageUrl 的查找时间为:$foundDuration");
}
}

End