iOS进阶_打包脚本

一、认识Mac的keychain机制

要使用Keychain中的证书,请先unlock-keychain

完整的命令如下:

1
security unlock-keychain -p "lichaoqian" "/Users/lichaoqian/Library/Keychains/login.keychain"

**如果你是在Jenkins中执行的,请确保你的权限问题。具体的解决可进入《使用工具->Jenkins->Jenkins使用问题常见》中的”二、权限问题”**中查看解决。

其他参考文章:

二、认识几个命令

  • 查看SDK版本
1
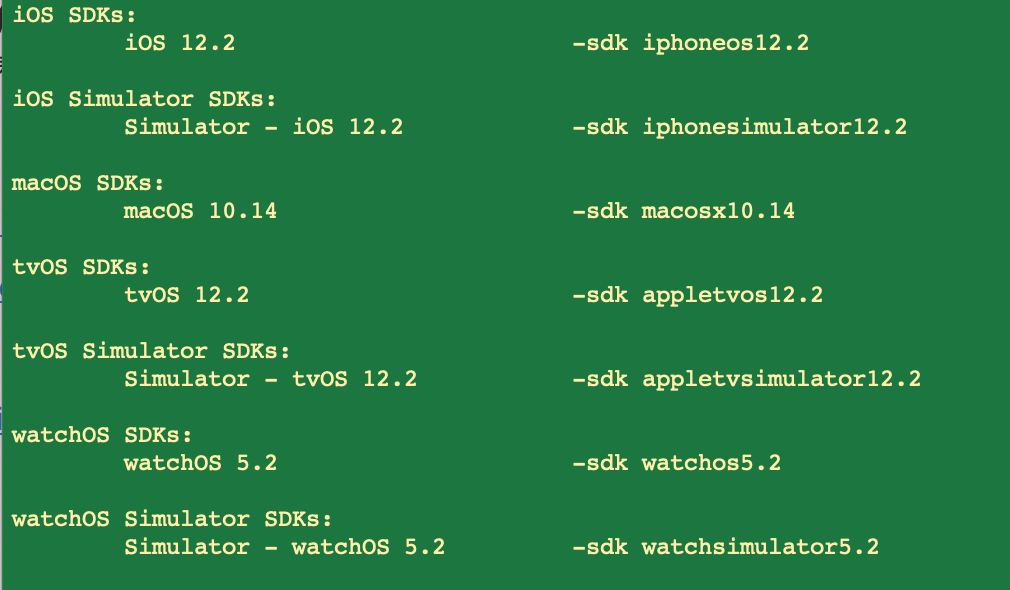
xcodebuild -showsdks

查询结果如下:

xcodebuild -showsdks的执行结果

三、认识执行命令

在终端执行xcodebuild --help

1
2
3
4
5
6
7
8
9
10
11
12
13
14
15
16
17
18
19
20
21
22
23
24
25
26
27
28
29
30
31
32
33
34
35
36
37
38
39
40
41
42
43
44
45
46
47
48
49
50
51
52
53
54
55
56
57
58
59
60
61
62
63
64
65
66
67
68
69
70
71
72
73
74
75
76
77
78
79
80
81
82
83
84
85
86
87
88
89
90
91
92
93
94
95
96
97
98
99
100
101
102
103
104
105
106
107
108
109
110
111
112
113
114
115
116
117
118
119
120
121
122
123
124
125
126
127
128
129
130
131
132
133
134
135
136
137
138
139
140
141
142
143
144
145
146
147
148
149
150
151
152
153
154
155
156
157
158
Beyond-MacBook-Pro:~ lichaoqian$ xcodebuild --help
Usage: xcodebuild [-project <projectname>] [[-target <targetname>]...|-alltargets] [-configuration <configurationname>] [-arch <architecture>]... [-sdk [<sdkname>|<sdkpath>]] [-showBuildSettings [-json]] [<buildsetting>=<value>]... [<buildaction>]...
xcodebuild [-project <projectname>] -scheme <schemeName> [-destination <destinationspecifier>]... [-configuration <configurationname>] [-arch <architecture>]... [-sdk [<sdkname>|<sdkpath>]] [-showBuildSettings [-json]] [-showdestinations] [<buildsetting>=<value>]... [<buildaction>]...
xcodebuild -workspace <workspacename> -scheme <schemeName> [-destination <destinationspecifier>]... [-configuration <configurationname>] [-arch <architecture>]... [-sdk [<sdkname>|<sdkpath>]] [-showBuildSettings] [-showdestinations] [<buildsetting>=<value>]... [<buildaction>]...
xcodebuild -version [-sdk [<sdkfullpath>|<sdkname>] [-json] [<infoitem>] ]
xcodebuild -list [[-project <projectname>]|[-workspace <workspacename>]] [-json]
xcodebuild -showsdks [-json]
xcodebuild -exportArchive -archivePath <xcarchivepath> [-exportPath <destinationpath>] -exportOptionsPlist <plistpath>
xcodebuild -exportNotarizedApp -archivePath <xcarchivepath> -exportPath <destinationpath>
xcodebuild -exportLocalizations -localizationPath <path> -project <projectname> [-exportLanguage <targetlanguage>...[-includeScreenshots]]
xcodebuild -importLocalizations -localizationPath <path> -project <projectname>
xcodebuild -resolvePackageDependencies [-project <projectname>|-workspace <workspacename>] -clonedSourcePackagesDirPath <path>
xcodebuild -create-xcframework [-help] [-framework <path>] [-library <path> [-headers <path>]] -output <path>

Options:
-usage print brief usage
-help print complete usage
-verbose provide additional status output
-license show the Xcode and SDK license agreements
-checkFirstLaunchStatus Check if any First Launch tasks need to be performed
-runFirstLaunch install packages and agree to the license
-project NAME build the project NAME
-target NAME build the target NAME
-alltargets build all targets
-workspace NAME build the workspace NAME
-scheme NAME build the scheme NAME
-configuration NAME use the build configuration NAME for building each target
-xcconfig PATH apply the build settings defined in the file at PATH as overrides
-arch ARCH build each target for the architecture ARCH; this will override architectures defined in the project
-sdk SDK use SDK as the name or path of the base SDK when building the project
-toolchain NAME use the toolchain with identifier or name NAME
-destination DESTINATIONSPECIFIER use the destination described by DESTINATIONSPECIFIER (a comma-separated set of key=value pairs describing the destination to use)
-destination-timeout TIMEOUT wait for TIMEOUT seconds while searching for the destination device
-parallelizeTargets build independent targets in parallel
-jobs NUMBER specify the maximum number of concurrent build operations
-maximum-concurrent-test-device-destinations NUMBER the maximum number of device destinations to test on concurrently
-maximum-concurrent-test-simulator-destinations NUMBER the maximum number of simulator destinations to test on concurrently
-parallel-testing-enabled YES|NO overrides the per-target setting in the scheme
-parallel-testing-worker-count NUMBER the exact number of test runners that will be spawned during parallel testing
-maximum-parallel-testing-workers NUMBER the maximum number of test runners that will be spawned during parallel testing
-dry-run do everything except actually running the commands
-quiet do not print any output except for warnings and errors
-hideShellScriptEnvironment don't show shell script environment variables in build log
-showsdks display a compact list of the installed SDKs
-showdestinations display a list of destinations
-showTestPlans display a list of test plans
-showBuildSettings display a list of build settings and values
-list lists the targets and configurations in a project, or the schemes in a workspace
-find-executable NAME display the full path to executable NAME in the provided SDK and toolchain
-find-library NAME display the full path to library NAME in the provided SDK and toolchain
-version display the version of Xcode; with -sdk will display info about one or all installed SDKs
-enableAddressSanitizer YES|NO turn the address sanitizer on or off
-enableThreadSanitizer YES|NO turn the thread sanitizer on or off
-enableUndefinedBehaviorSanitizer YES|NO turn the undefined behavior sanitizer on or off
-resultBundlePath PATH specifies the directory where a result bundle describing what occurred will be placed
-resultStreamPath PATH specifies the file where a result stream will be written to (the file must already exist)
-resultBundleVersion 3 [default] specifies which result bundle version should be used
-clonedSourcePackagesDirPath PATH specifies the directory to which remote source packages are fetch or expected to be found
-derivedDataPath PATH specifies the directory where build products and other derived data will go
-archivePath PATH specifies the directory where any created archives will be placed, or the archive that should be exported
-exportArchive specifies that an archive should be exported
-exportNotarizedApp export an archive that has been notarized by Apple
-exportOptionsPlist PATH specifies a path to a plist file that configures archive exporting
-enableCodeCoverage YES|NO turn code coverage on or off when testing
-exportPath PATH specifies the destination for the product exported from an archive
-skipUnavailableActions specifies that scheme actions that cannot be performed should be skipped instead of causing a failure
-exportLocalizations exports completed and outstanding project localizations
-importLocalizations imports localizations for a project, assuming any necessary localized resources have been created in Xcode
-localizationPath specifies a path to XLIFF localization files
-exportLanguage specifies multiple optional ISO 639-1 languages included in a localization export
-xctestrun specifies a path to a test run specification
-testPlan specifies the name of the test plan associated with the scheme to use for testing
-only-testing constrains testing by specifying tests to include, and excluding other tests
-only-testing:TEST-IDENTIFIER constrains testing by specifying tests to include, and excluding other tests
-skip-testing constrains testing by specifying tests to exclude, but including other tests
-skip-testing:TEST-IDENTIFIER constrains testing by specifying tests to exclude, but including other tests
-only-test-configuration constrains testing by specifying test configurations to include, and excluding other test configurations
-skip-test-configuration constrains testing by specifying test configurations to exclude, but including other test configurations
-testLanguage constrains testing by specifying ISO 639-1 language in which to run the tests
-testRegion constrains testing by specifying ISO 3166-1 region in which to run the tests
-resolvePackageDependencies resolves any Swift package dependencies referenced by the project or workspace
-disableAutomaticPackageResolution prevents packages from automatically being resolved to versions other than those recorded in the `Package.resolved` file
-json output as JSON (note: -json implies -quiet)
-allowProvisioningUpdates Allow xcodebuild to communicate with the Apple Developer website. For automatically signed targets, xcodebuild will create and update profiles, app IDs, and certificates. For manually signed targets, xcodebuild will download missing or updated provisioning profiles. Requires a developer account to have been added in Xcode's Accounts preference pane.
-allowProvisioningDeviceRegistration Allow xcodebuild to register your destination device on the developer portal if necessary. This flag only takes effect if -allowProvisioningUpdates is also passed.
-showBuildTimingSummary display a report of the timings of all the commands invoked during the build
-create-xcframework create an xcframework from prebuilt libraries; -help for more information.

Available keys for -exportOptionsPlist:

compileBitcode : Bool

For non-App Store exports, should Xcode re-compile the app from bitcode? Defaults to YES.

destination : String

Determines whether the app is exported locally or uploaded to Apple. Options are export or upload. The available options vary based on the selected distribution method. Defaults to export.

embedOnDemandResourcesAssetPacksInBundle : Bool

For non-App Store exports, if the app uses On Demand Resources and this is YES, asset packs are embedded in the app bundle so that the app can be tested without a server to host asset packs. Defaults to YES unless onDemandResourcesAssetPacksBaseURL is specified.

generateAppStoreInformation : Bool

For App Store exports, should Xcode generate App Store Information for uploading with iTMSTransporter? Defaults to NO.

iCloudContainerEnvironment : String

If the app is using CloudKit, this configures the "com.apple.developer.icloud-container-environment" entitlement. Available options vary depending on the type of provisioning profile used, but may include: Development and Production.

installerSigningCertificate : String

For manual signing only. Provide a certificate name, SHA-1 hash, or automatic selector to use for signing. Automatic selectors allow Xcode to pick the newest installed certificate of a particular type. The available automatic selectors are "Mac Installer Distribution" and "Developer ID Installer". Defaults to an automatic certificate selector matching the current distribution method.

manifest : Dictionary

For non-App Store exports, users can download your app over the web by opening your distribution manifest file in a web browser. To generate a distribution manifest, the value of this key should be a dictionary with three sub-keys: appURL, displayImageURL, fullSizeImageURL. The additional sub-key assetPackManifestURL is required when using on-demand resources.

method : String

Describes how Xcode should export the archive. Available options: app-store, validation, ad-hoc, package, enterprise, development, developer-id, and mac-application. The list of options varies based on the type of archive. Defaults to development.

onDemandResourcesAssetPacksBaseURL : String

For non-App Store exports, if the app uses On Demand Resources and embedOnDemandResourcesAssetPacksInBundle isn't YES, this should be a base URL specifying where asset packs are going to be hosted. This configures the app to download asset packs from the specified URL.

provisioningProfiles : Dictionary

For manual signing only. Specify the provisioning profile to use for each executable in your app. Keys in this dictionary are the bundle identifiers of executables; values are the provisioning profile name or UUID to use.

signingCertificate : String

For manual signing only. Provide a certificate name, SHA-1 hash, or automatic selector to use for signing. Automatic selectors allow Xcode to pick the newest installed certificate of a particular type. The available automatic selectors are "Mac App Distribution", "iOS Distribution", "iOS Developer", "Developer ID Application", "Apple Distribution", "Mac Developer", and "Apple Development". Defaults to an automatic certificate selector matching the current distribution method.

signingStyle : String

The signing style to use when re-signing the app for distribution. Options are manual or automatic. Apps that were automatically signed when archived can be signed manually or automatically during distribution, and default to automatic. Apps that were manually signed when archived must be manually signed during distribtion, so the value of signingStyle is ignored.

stripSwiftSymbols : Bool

Should symbols be stripped from Swift libraries in your IPA? Defaults to YES.

teamID : String

The Developer Portal team to use for this export. Defaults to the team used to build the archive.

thinning : String

For non-App Store exports, should Xcode thin the package for one or more device variants? Available options: <none> (Xcode produces a non-thinned universal app), <thin-for-all-variants> (Xcode produces a universal app and all available thinned variants), or a model identifier for a specific device (e.g. "iPhone7,1"). Defaults to <none>.

uploadBitcode : Bool

For App Store exports, should the package include bitcode? Defaults to YES.

uploadSymbols : Bool

For App Store exports, should the package include symbols? Defaults to YES.

1、cd到代码目录

2、开始打包

  • 执行命令

写在终端进行测试的命令:

1
xcodebuild -workspace CJAutoPackageDemo.xcworkspace -scheme App1Enterprise -configuration Debug -sdk iphoneos12.2 ARCHS='arm64 armv7' IOS_DEVELOPMENT_TARGET=8.0 -derivedDataPath ../output/build/Debug-iphoneos archive -archivePath ../output/Debug-iphoneos/App1Enterprise.xcarchive

写在脚本中的命令:

1
2
3
4
5
echo ""
echo ""
echo ">>>>>>>>>>>>>>>>>>>>>>>>>> step5:begin compile project >>>>>>>>>>>>>>>>>>>>>>>>>>>>>>>>>>>>>"
xcodebuild -workspace ${PROJECT_DIR}/${APPPROJECT_NAME}.xcworkspace -scheme ${APPTARGET_NAME} -configuration ${BUILD_CONFIGURATION_NAME} -sdk ${SIMULATOR_OR_IOS_SDK}${SDK_VERSION} ARCHS='arm64 armv7' IOS_DEVELOPMENT_TARGET=${DEVELOPMENT_TARGET} -derivedDataPath ${BUILD_OUTPUT_PATH} archive -archivePath "${ARCHIVE_OUTPUT_PATH}/${APPTARGET_NAME}.xcarchive"
echo "<<<<<<<<<<<<<<<<<<<<<<<<<<< step5:end compile project <<<<<<<<<<<<<<<<<<<<<<<<<<<<<<<<<<<<<<"

参数介绍:

参数 含义
-workspace 工程文件名(用cocopods集成的项目,没有的话 整个改为-xcodeproj xxx.xcodeproj)
-scheme 通过scheme指定不同的target
-configuration 对应的环境配置,就是编译的时候执行的模式
(测试Debug、预生产PreRelease、生产Release)
-archivePath 导出的.xcarchive的路径
-sdk
-derivedDataPath
-archivePath 导出的.xcarchive的路径

3、导出ipa

  • 执行命令
1
2
3
4
5
6
7
8
9
10
11
echo ""
echo ""
echo ">>>>>>>>>>>>>>>>>>>>>>>>>> step6:begin archiving app to ipa >>>>>>>>>>>>>>>>>>>>>>>>>>>>>>>>>>>>>"
echo "PWD=$PWD"
cd ${ROOT_DIR}
echo "PWD=$PWD"
echo "archivePath ==>>> ${ARCHIVE_OUTPUT_PATH}/${APPTARGET_NAME}.xcarchive"
echo "exportPath ==>>> ${ARCHIVE_OUTPUT_PATH}/${APPTARGET_NAME}"
echo "exportOptionsPlist ==>>> ${ExportOptionsPlist_PATH}"
xcodebuild -exportArchive -archivePath "${ARCHIVE_OUTPUT_PATH}/${APPTARGET_NAME}.xcarchive" -exportPath "${ARCHIVE_OUTPUT_PATH}/${APPTARGET_NAME}" -exportOptionsPlist "${ExportOptionsPlist_PATH}" -allowProvisioningUpdates
echo "<<<<<<<<<<<<<<<<<<<<<<<<<<< step6:end archiving app to ipa <<<<<<<<<<<<<<<<<<<<<<<<<<<<<<<<<<<<<<"
  • 参数解读:
参数 含义
-archivePath .xcarchive文件的路径
-exportPath 导出的ipa的路径
-exportOptionsPlist

三、完整脚本内容(含使用Jenkins打包)

  • 测试项目工程详见:gitee中的AutoPackage-iOS工程

  • 测试Jenkins工程详见:本地Jenkins中的CJAutoPackage工程

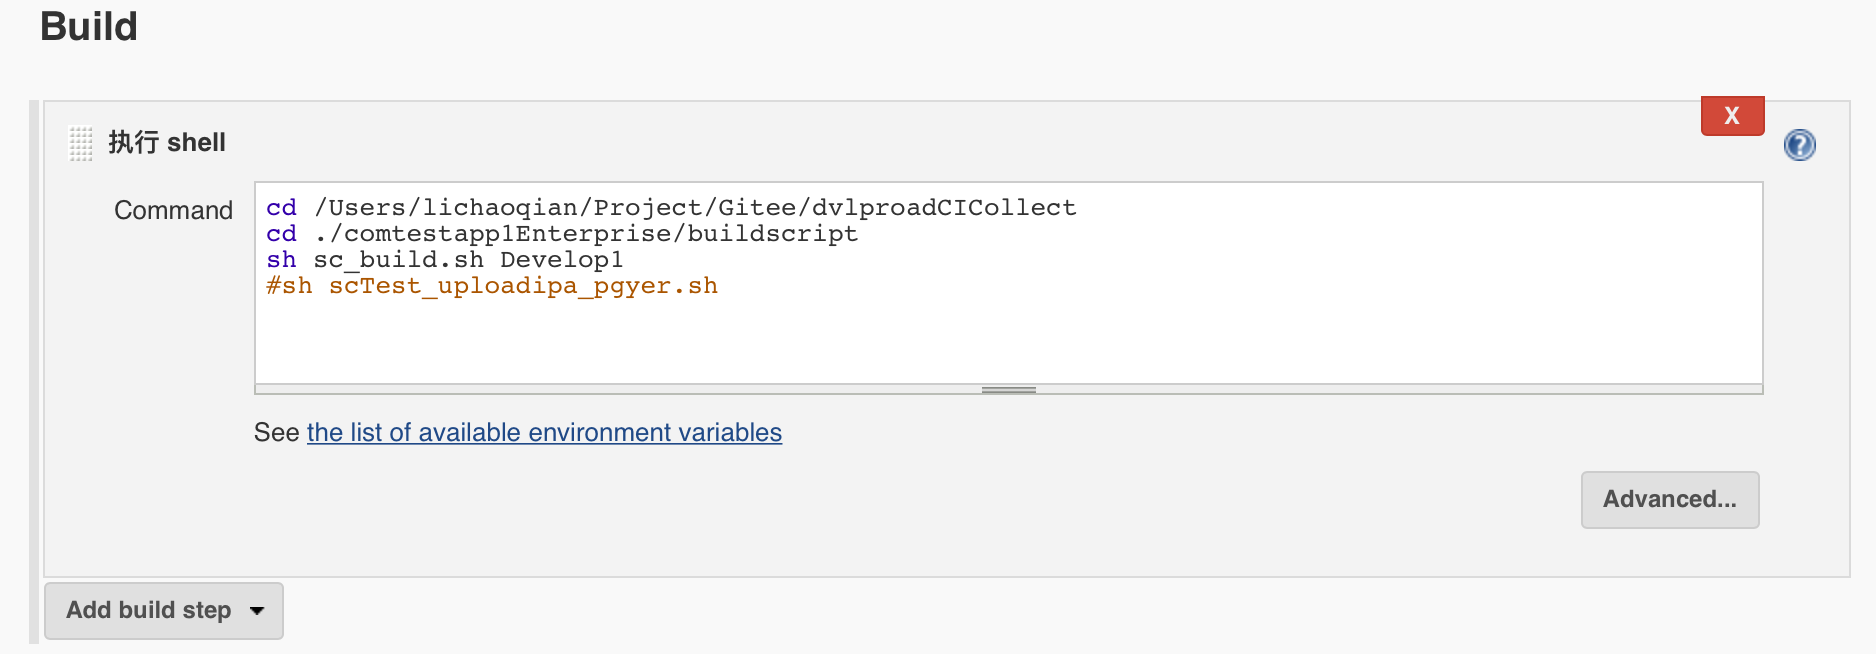
  • 最终Jenkins脚本如下图:

    iOS打包_Jenkins脚本

附:没有权限问题的Jenkins正确的启动方式如下(按下面方式打开,才不会出现权限问题):

1
2
$ sudo launchctl unload /Library/LaunchDaemons/org.jenkins-ci.plist
$ java -jar /Applications/Jenkins/jenkins.war --httpPort=8080

当你执行完这两行命令的时候,你可以在浏览器上输入http://localhost:8080来访问Jenkins了。(如果你只执行了第一行,没执行第二行,会出现无法访问)

更多Jenkins知识请查看:实用工具->Jenkins->Jenkins的安装与启动

四、注意点

1、多环境的打包

主要注意为xcodebuild -workspace中的-configuration参数即可。

2、多Target的打包注意

多Target的Podfile文件ruby脚本内容,大概如下:

1
2
3
4
5
6
7
8
9
10
11
12
13
14
15
16
17
18
19
20
21
22
23
24
25
26
27
28
29
30
31
32
33
34
35
36
37
38
39
40
41
42
43
44
45
source 'https://github.com/CocoaPods/Specs.git'
source 'https://gitee.com/dvlproad/dvlproadSpecs'

platform :ios, '8.0'
#use_frameworks!
inhibit_all_warnings!

post_install do |installer|

puts 'Determining pod project minimal deployment target'

pods_project = installer.pods_project
deployment_target_key = 'IPHONEOS_DEPLOYMENT_TARGET'
deployment_targets = pods_project.build_configurations.map{ |config| config.build_settings[deployment_target_key] }
minimal_deployment_target = deployment_targets.min_by{ |version| Gem::Version.new(version) }

puts 'Minimal deployment target is ' + minimal_deployment_target
puts 'Setting each pod deployment target to ' + minimal_deployment_target

installer.pods_project.targets.each do |target|
target.build_configurations.each do |config|
config.build_settings[deployment_target_key] = minimal_deployment_target
end
end
end


# There are no targets called "App1Common" in any Xcode projects
abstract_target 'App1Common' do
# Has its own copy of App1Common + App1Enterprise
target 'App1Enterprise' do

end

# Has its own copy of App1Common + App1AppStore
target 'App1AppStore' do

end
end


target 'CJAutoPackageDemoTests' do

end

通过脚本自动化打包的时候的注意点如下:

  1. 主要注意为xcodebuild -workspace中的-scheme参数即可。

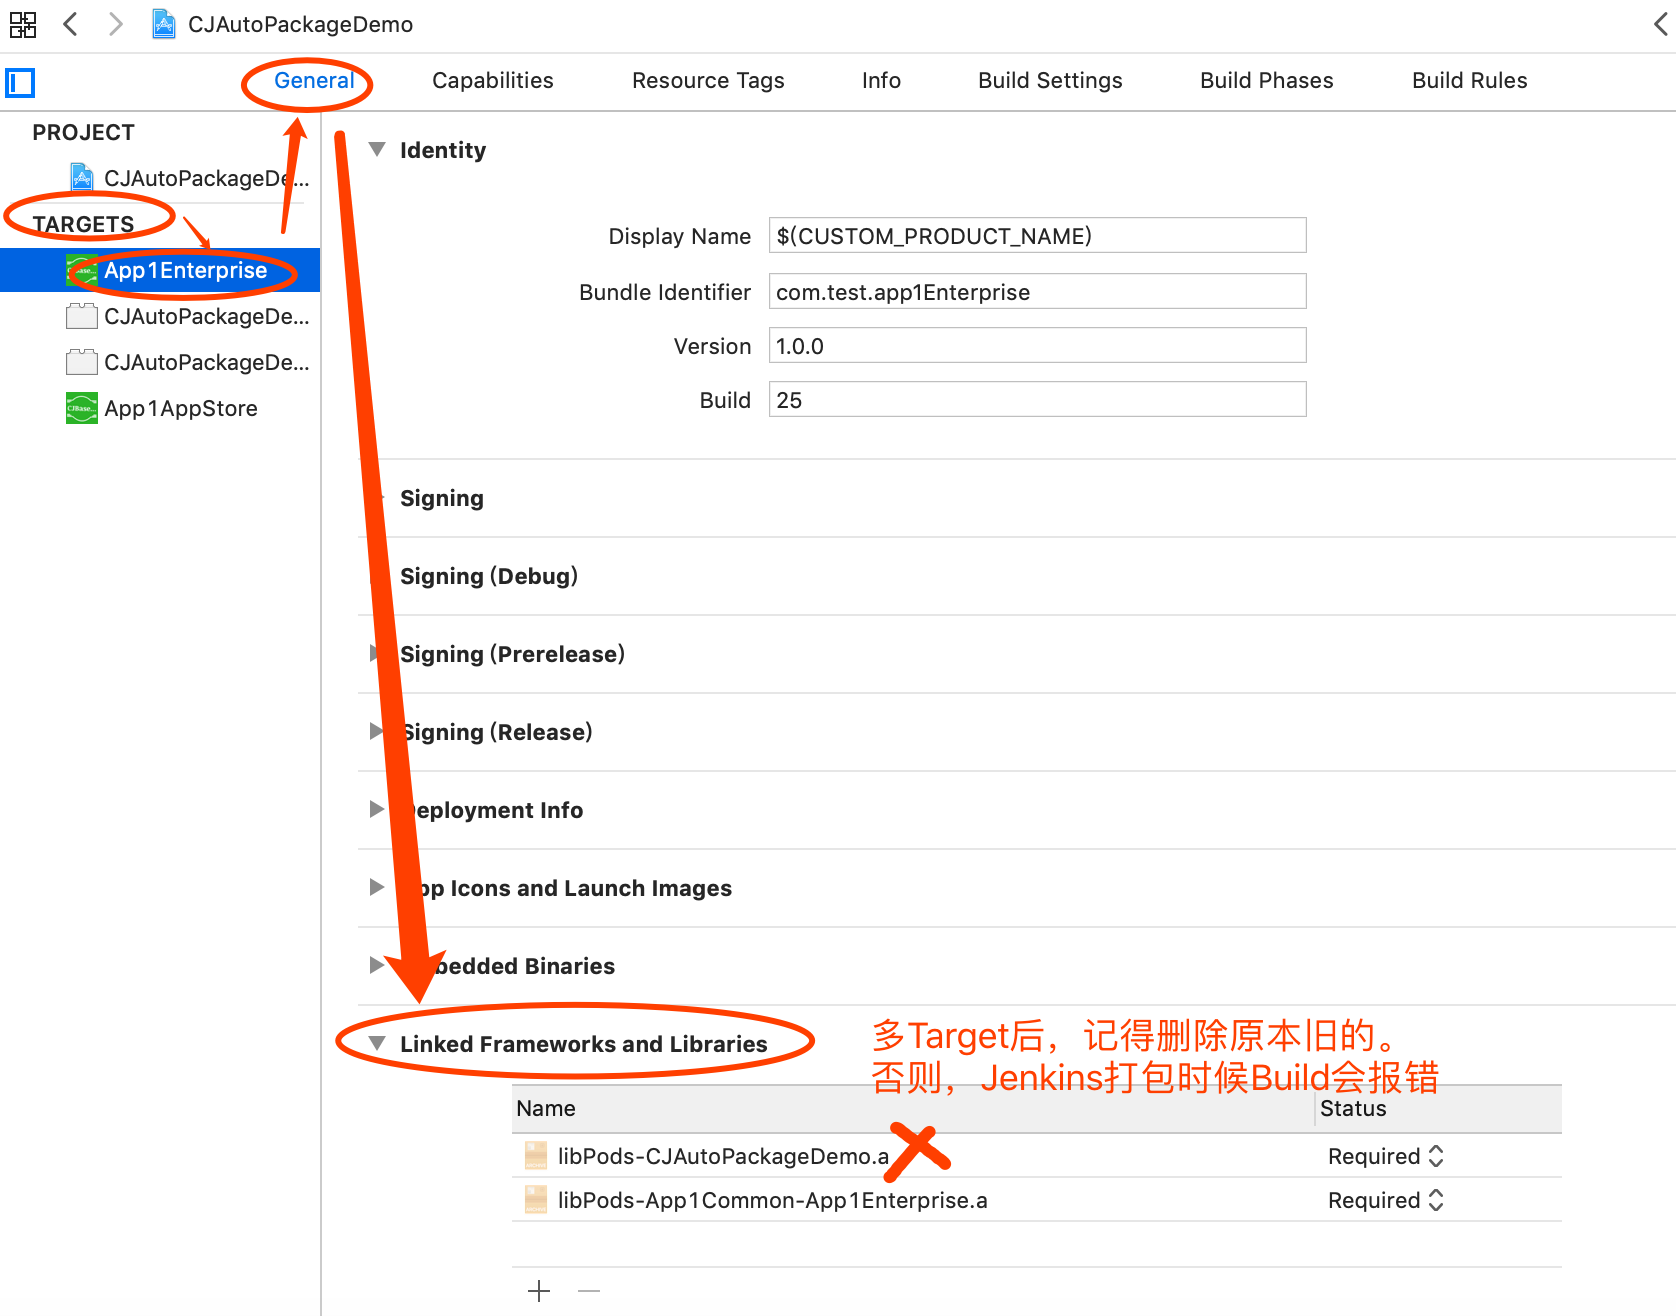
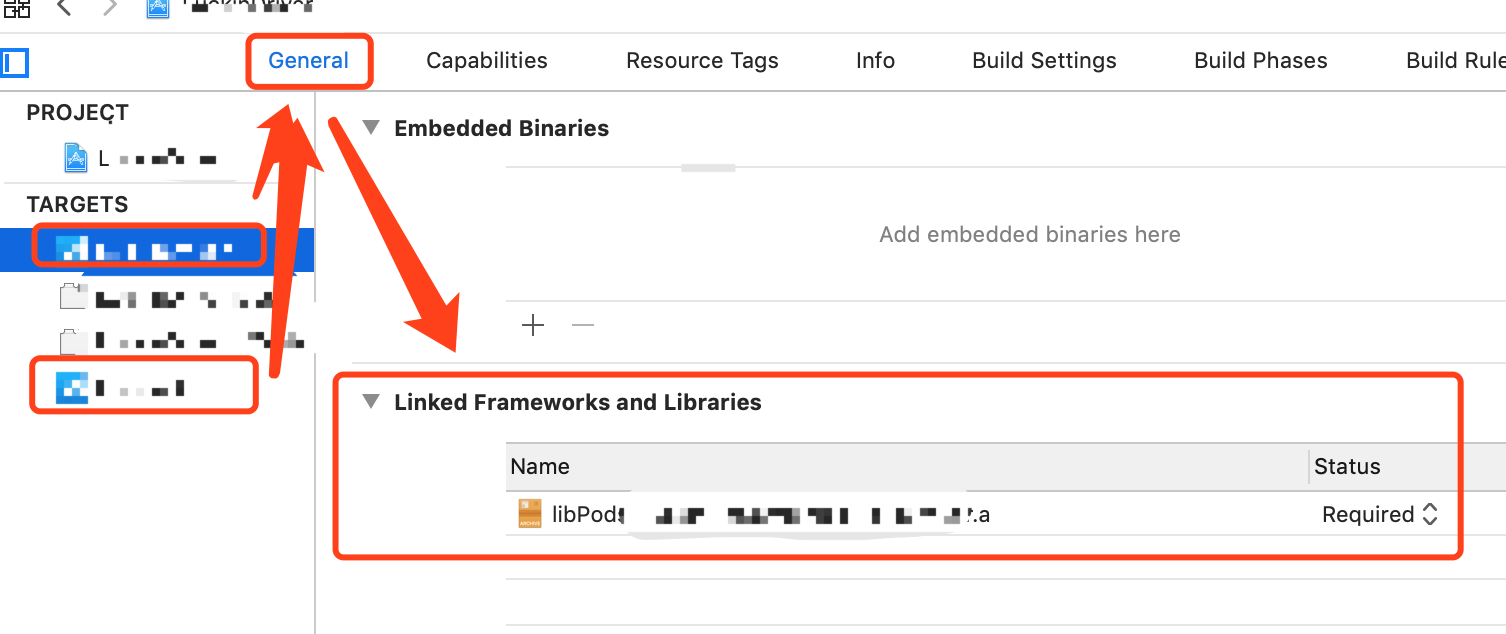
  2. 多Target后,记得在Linked Frameworks and Libraries中删除已经不存在的原本旧的libPods-xxx.a文件。否则,Jenkins脚本打包Build的时候会报错。

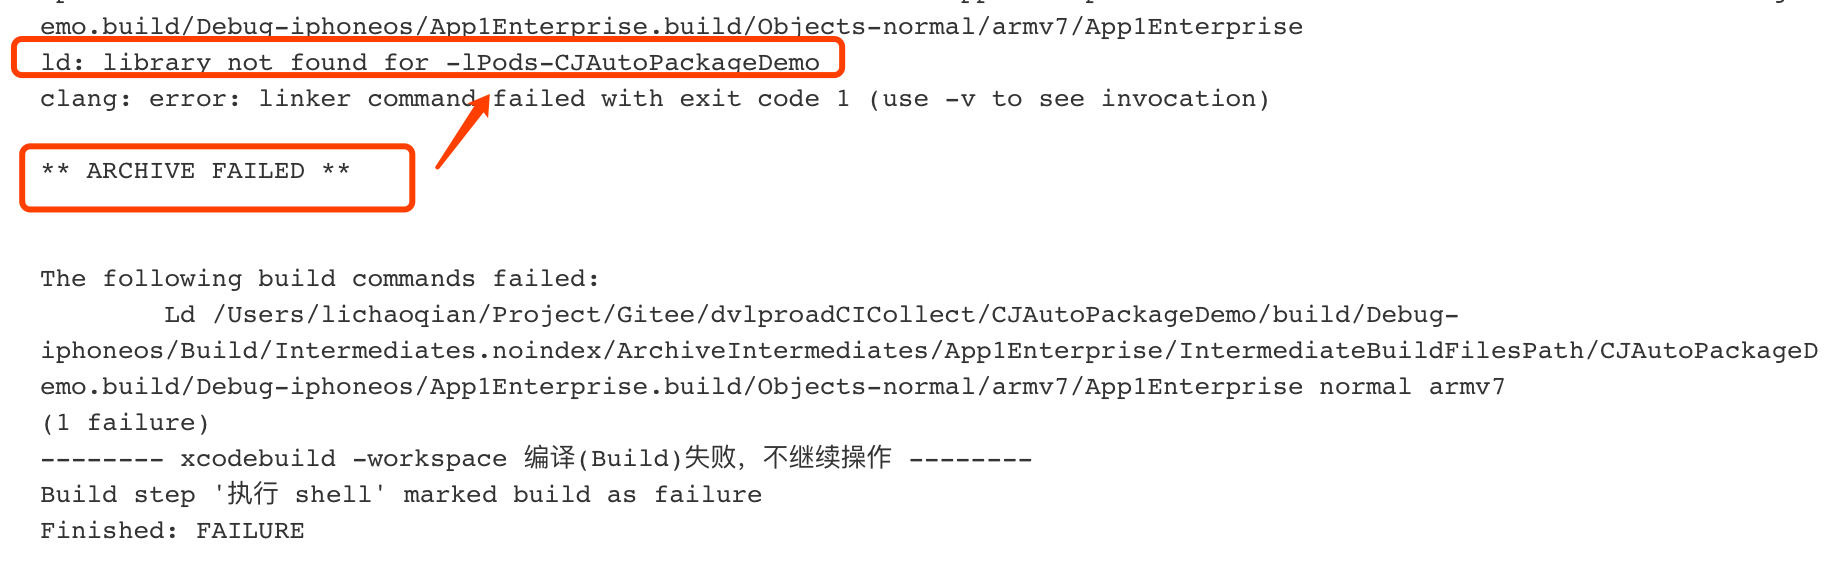
    • Jenkins脚本打包Build的时候报错的信息如下:

    Jenkins脚本打包Build的时候报错的信息

    • 多Target工程打包时候要删除的旧引用文件如下:

      多Target工程打包时候要删除的旧引用文件

iOS证书

钥匙串访问

/System/Library/CoreServices/Applications

一、证书p12

1、制作

image-20230302172748572

2、导出

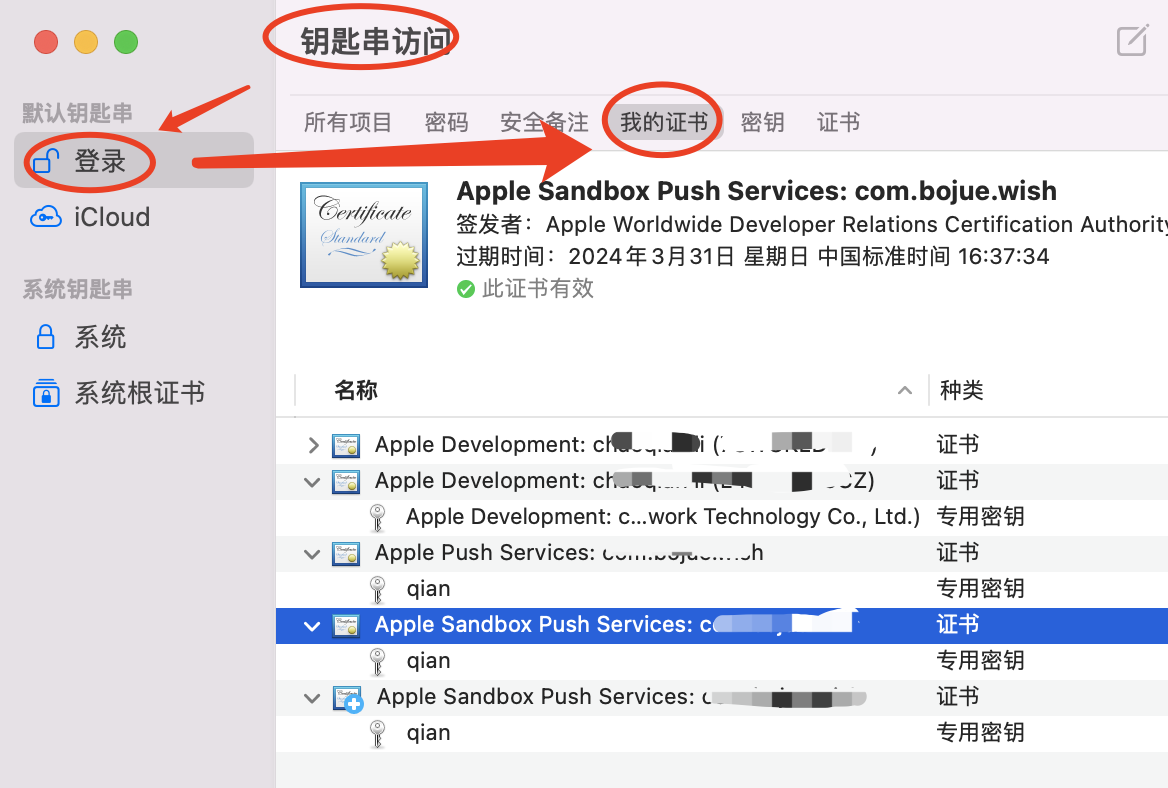
请一定要切换到**”我的证书”**目录下

image-20230302173554802

3、导入

拖动p12文件到钥匙串中的登录

问题1、iOS证书不受信任解决办法

问题如下:

image-20230302173013788

解决方法:

重新下载最新的AppleWWDR

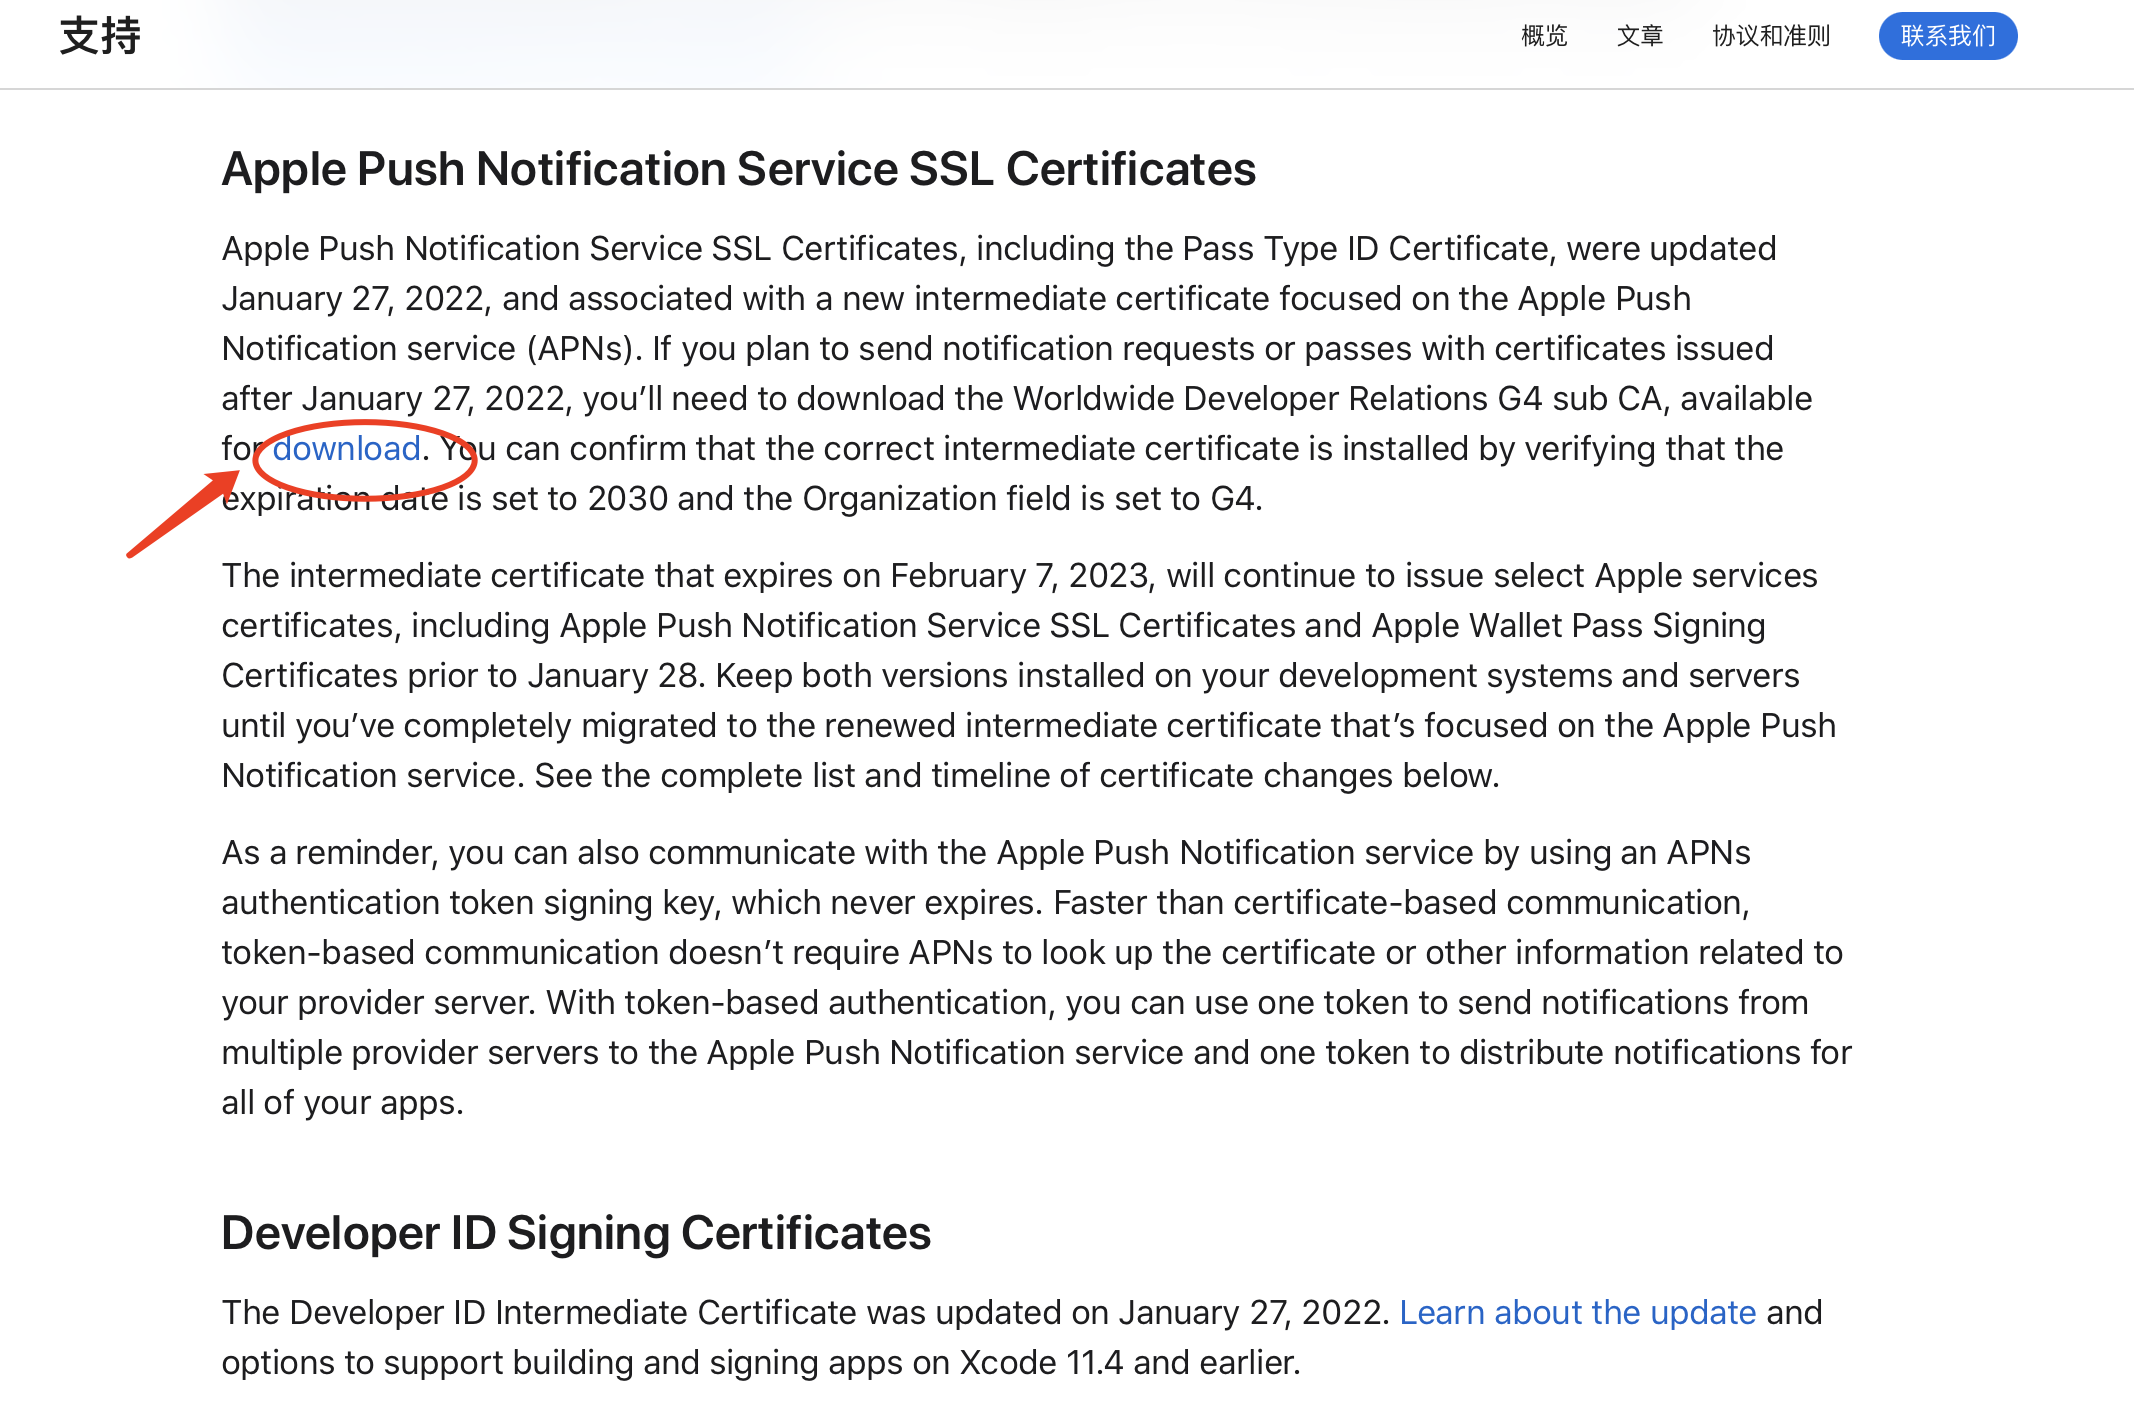
进入 https://developer.apple.com/support/expiration/

image-20230302173236106

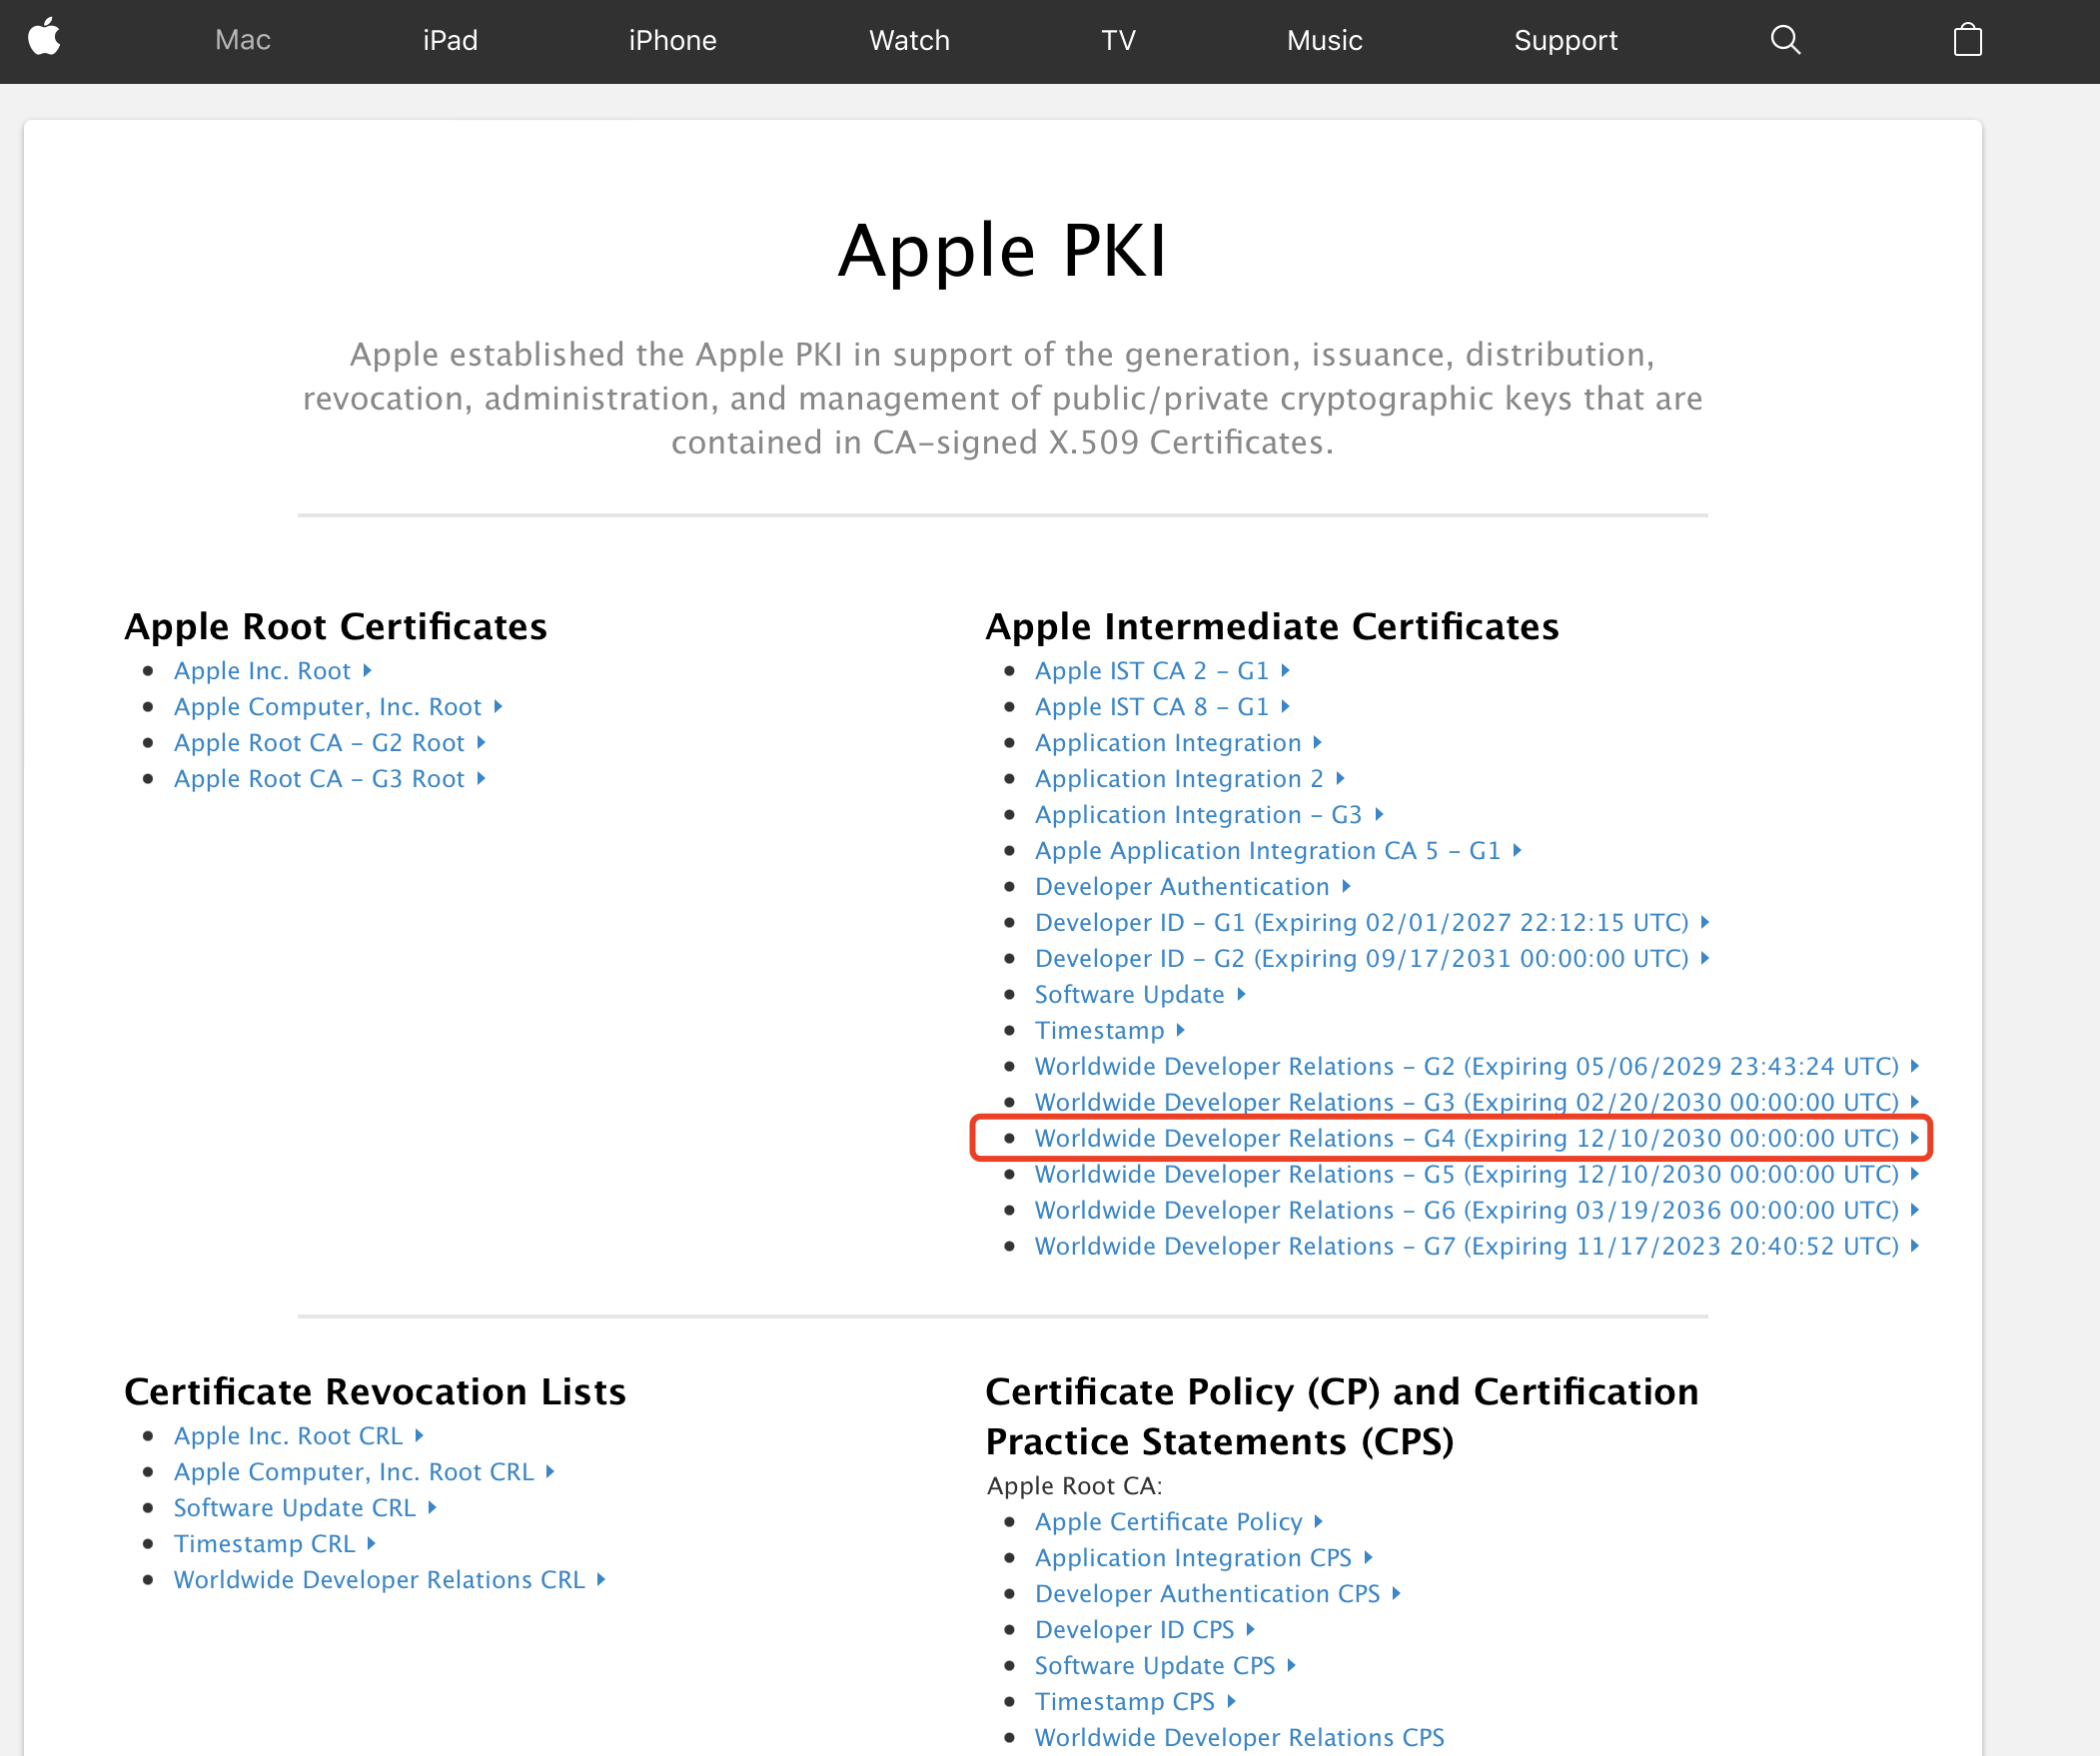
进入后 https://www.apple.com/certificateauthority/

image-20230302173318271

这里我们下载个G4就够了。

之后再对未信任的证书,右键显示简介,在简介里选中”始终信任”即可。

其他参考:iOS证书出现证书不受信任的解决方法

二、mobileprovision 文件

将 mobileprovision 文件放到以下目录

1
2
open ~/Library/MobileDevice/Provisioning\ Profiles							# Xcode 15
open ~/Library/Developer/Xcode/UserData/Provisioning\ Profiles # Xcode 16

End

数据库FMDB

一、FMDB的多线程问题

你项目用FMDB吗?你写的数据库类是线程安全的吗?如果不是,希望这篇小文章会对你有点帮助

1、FMDB如何保证多线程处理的数据安全

对于数据操作,最重要的一点就是数据安全的问题,在多线程中,线程安全是数据安全的首要前提,下面谈谈FMDB 是如何对多线程进行处理的。

详情参考:FMDB 中的多线程处理

FMDatabaseQueue为何会线程安全的一点心得

2、FMDatabaseQueue为何能保证线程安全

在做iOS项目的时候,会用到许多第三方的框架,比如用FMDB来处理数据库的东西。但是FMDatabase并不是线程安全的,当你在不同的线程里同时操作一个Database的时候,就容易产生崩溃。但是好在FMDB提供了一个解决的方法,就是FMDatabaseQueue。通过它来操作数据库就是线程安全的了。
即:FMDB是使用databaseQueue实现数据库操作线程安全

1
2
3
4
FMDatabaseQueue *queue = [FMDatabaseQueue databaseQueueWithPath:_dbPath];
[queue inDatabase:^(FMDatabase *db) {
[db executeUpdateWithFormat:@"INSERT INTO TABLENAME(id, name) VALUES (%zd, %@);", @1, @"idage"];
}];

queue inDatabase:的本质如下:

FMDB数据安全1

_queue的初始化为:

1
_queue = dispatch_queue_create([[NSString stringWithFormat:@"fmdb.%@", self] UTF8String], NULL);

FMDB是怎么处理线程安全的?

综上所述:FMDB的线程处理就是强行就所有的多线程逻辑在一个串行队列中同步处理。

二、FMDB的数据库事务(Database Transaction)

数据库事务(Database Transaction) ,是指作为单个逻辑工作单元执行的一系列操作,要么完全地执行,要么完全地不执行。 通过将一组相关操作组合为一个要么全部成功要么全部失败的单元,可以简化错误恢复并使应用程序更加可靠。简单的来说就是可以同时处理多个数据库操作,并且速度很快。

FMDB是支持数据库事务的。

1
2
3
4
5
6
[queue inTransaction:^(FMDatabase *db, BOOL *rollback) {
[db executeUpdate:@"INSERT INTO myTable VALUES (?)", @1];
[db executeUpdate:@"INSERT INTO myTable VALUES (?)", @2];
[db executeUpdate:@"INSERT INTO myTable VALUES (?)", @3];
[db executeUpdate:@"INSERT INTO myTable VALUES (?)", @4];
}];

三、为什么要从FMDB迁移到WCDB?

为什么要从FMDB迁移到WCDB?

表结构

WCDB 提供了 ORM 的功能,将类的属性绑定到数据库表的字段。在日常实践中,类的属性名和表的字段名通常不一致。因此,WCDB 提供了 WCDB_SYNTHESIZE_COLUMN(className, propertyName, columnName) 宏,用于映射属性名。

END

网络库AFNetworking

AFNetworking源码解析与面试考点思考

AFNetworking源码解析与面试考点思考

八、多线程–第三方库AFNetworking

< 返回目录

1、AFNetworking源码解析

2、AFNetworking的线程和信号量问题

AFNetworking3.0后为什么不再需要常驻线程?

AFNetworking3.0后为什么不再需要常驻线程?

B.一个请求一条线程

如果来一个请求开辟一条线程,设置runloop保活线程,等待结果回调。这种方式理论上是可行的,但是你也看到了,线程开销太大了。(PASS)

C.一条常驻线程

只开辟一条子线程,设置runloop使线程常驻。所有的请求在这个线程上发起、同时也在这个线程上处理回调

线程保活的代码

1
2
3
4
5
6
7
8
9
+ (void)aliveThread {
@autoreleasepool {
[[NSThread currentThread] setName:@"AFNetworking"];

NSRunLoop *runLoop = [NSRunLoop currentRunLoop];
[runLoop addPort:[NSMachPort port] forMode:NSDefaultRunLoopMode];
[runLoop run];
}
}

我们知道主线程一直是保活的;而新建的子线程默认是没有添加Runloop的,因此给这个线程添加了一个runloop,并且加了一个NSMachPort,来防止这个新建的线程由于没有活动直接退出。

AFNetworking一些API介绍

必知点:AFNetworking框架默认请求类型requestSerializer和响应类型responseSerializer都是JSON格式的,即默认请求类型为AFJSONRequestSerializer,默认相应类型为AFJSONResponseSerializer

1、关于请求类型及请求参数的书写

所以在进行请求时候,我们必须根据自己请求的参数类型parameters,对AFNetworking的请求类型进行设置。主要设置为:

  1. 如果请求参数是字典类型NSDictionary,则请求类型应设置AFHTTPRequestSerializer
  2. 如果请求参数是JSON类型,则请求类型应设置AFJSONRequestSerializer

因为设置的类型不同,AFNetworking会根据设置的类型执行该类型下面对应的- (NSURLRequest *)requestBySerializingRequest:(NSURLRequest *)request withParameters:(id)parameters error:(NSError *__autoreleasing *)error方法。

其中

AFHTTPRequestSerializer对参数会有如下第496行的处理query = AFQueryStringFromParameters(parameters);该处理为将字典类型转为一串请求的字符串格式。

AFJSONRequestSerializer对参数的处理主要为第1260行的
[mutableRequest setHTTPBody:[NSJSONSerialization dataWithJSONObject:parameters options:self.writingOptions error:error]];

2、关于响应类型及响应response

响应的时候,AFURLSessionManager其会调用AFURLSessionManagerTaskDelegate协议,执行该协议里第292的responseObject = [manager.responseSerializer responseObjectForResponse:task.response data:data error:&serializationError];可以看出这里会根据我们设置的不同响应类型,调用该响应类型下的

1
2
3
- (id)responseObjectForResponse:(NSURLResponse *)response
data:(NSData *)data
error:(NSError *__autoreleasing *)error

所以,这里我们衍生出一个继承自AFJSONResponseSerializer的CJJSONResponseSerializer的新响应类型,重写该方法,用来处理服务端返回的JSON不是标准的json格式的问题,即主要处理AFNetworking 3840的错误。

## END > < [返回目录](#目录)

UI提示规范

一、Toast 互斥与覆盖规则

本章覆盖原”提示语优化”的全部规则,未做删减,仅细化表述。

1.1 同类互斥

如果有一个提示语正在显示,其他同类提示语不再显示。即同一类型(如纯文本 toast)同时只会有一条。

1.2 异常持续重显

提示语消失后,如果异常仍然存在,按 1.1 规则显示第一个错误提示语。

1.3 跨类覆盖

如果两类提示语需要出现,后面的覆盖前面。任何时间,只显示一条提示语。

1.4 时长标准

提示语类型 建议时长 说明
成功反馈(纯文案) 1.5s 用户能扫读即可
错误提示(纯文案) 2.5s 需要理解错误原因
带图标的 toast 2.5-3s 用户需要同时处理图标信息
长文案或建议文案 3-4s 按 5 字/秒 估算

1.5 消失条件

  • 手动消失:用户点击 toast 区域 → 立即消失(仅限可点 toast)
  • 自动消失:倒计时结束 → 自然消失
  • 事件驱动消失:底层异常解除 → 立即移除已在显示的对应 toast

二、Loading 规范

2.1 全局 Loading

使用场景:覆盖全屏的操作(页面跳转、登录、提交表单)。

  • 进入接口请求时 → 展示全屏加载指示器
  • 接口返回后(不论成功/失败)→ 移除 Loading
  • 超时兜底:超过 10s 无响应 → 自动移除 Loading 并显示”请求超时,请重试”

2.2 局部 Loading

使用场景:非阻塞的子区域刷新(下拉刷新、列表分页、单个卡片操作)。

  • 仅在操作区域展示小 loading 指示器,不遮挡全局
  • 30s 超时兜底,超时后移除并提示错误(toast 形式)

三、Empty State 规范

场景 展示内容 操作按钮
列表无数据(首次) 插图 + “暂无内容” 可选”去发现”引导
搜索结果为空 插图 + “未找到相关结果” 无,或”换个关键词”
网络不可用 插图 + “网络开小差了” “重新加载”按钮
无权限 插图 + “暂无访问权限” 可选”联系管理员”

共性规则:

  • 一律居中展示
  • 插图风格与 App 整体视觉统一
  • 文案控制在 15 字以内

四、Error State 规范

4.1 网络错误

  • 弱网:toast “网络不太稳定”(轻量提醒,不阻断操作)
  • 断网:全屏错误页或底部 Snackbar + “重试”按钮(阻断需要网络的操作)

4.2 服务器错误(5xx)

  • 单次操作:toast “服务异常,请稍后重试”
  • 频繁触发:防抖处理,15s 内同类错误不重复弹 toast

4.3 客户端错误(4xx)

  • 401:跳转登录页
  • 403:toast “暂无权限”
  • 其他:toast 显示后端返回的 message,或兜底提示”操作失败,请重试”

五、Alert / Dialog vs Toast 选择标准

条件 推荐控件
信息量 ≤ 15 字,无需用户决策 Toast
需要用户确认/取消 Alert(双按钮)
需要用户输入 Dialog(含输入框)
需要展示详细错误信息 Sheet / 半屏弹窗
操作前需要用户知情同意 Alert(含 checkbox)
倒计时自动消失的通知 Toast 或 Snackbar

一句话原则:打扰用户的次数越少越好,能用 Toast 不用 Alert,能用 Snackbar 不用全屏弹窗。

六、提示语优先级体系

6.1 优先级矩阵(由高到低)

优先级 类型 行为
P0 强制更新 / 账号踢下线 全屏阻断弹窗,不可忽略
P1 权限获取 / 确认弹窗 Alert,用户必须决策
P2 操作错误 toast 覆盖 P3/P4,2.5s 后消失
P3 成功反馈 toast 被 P2 覆盖,1.5s 后消失
P4 信息型 toast / 弱提示 被 P2/P3 覆盖

6.2 覆盖规则(结合 1.3)

  • 高优先级出现 → 立即替换当前显示的低优先级提示语
  • 同优先级出现 → 后续替换前序(队列模式 vs 直接覆盖,由业务决定)
  • 低优先级出现时,高优先级正在显示 → 低优先级不显示,等队列

6.3 队列兜底

系统维护一个最长 5 条的提示队列。当 P2-P4 提示语因被覆盖而未展示时,按优先级 > 时间顺序暂存队列中。

七、文案规范

7.1 通用原则

  • 简洁,不带语气词(”哦”、”啦”、”呀”)
  • 统一口径:始终用”登录”而非”登入”/“登陆”
  • 错误提示告知”原因 + 建议操作”,不只有”失败”
  • 成功提示仅在用户需要确认时才展示(不做过度反馈)

7.2 常见文案模板

1
2
3
4
❌ "修改成功啦~"  →  ✅ "修改成功"
❌ "网络错误" → ✅ "网络异常,请检查后重试"
❌ "未知错误" → ✅ "服务异常,请稍后重试"
❌ "你确定要删除吗?" → ✅ "删除后将无法恢复,确定删除?"

第6节:Jenkins上显示二维码图片

Jenkins上显示二维码图片

一、在Jenkins上显示二维码图片

持续集成 从零开始在 Jenkins 上显示打包二维码

1. 安装Jenkins插件

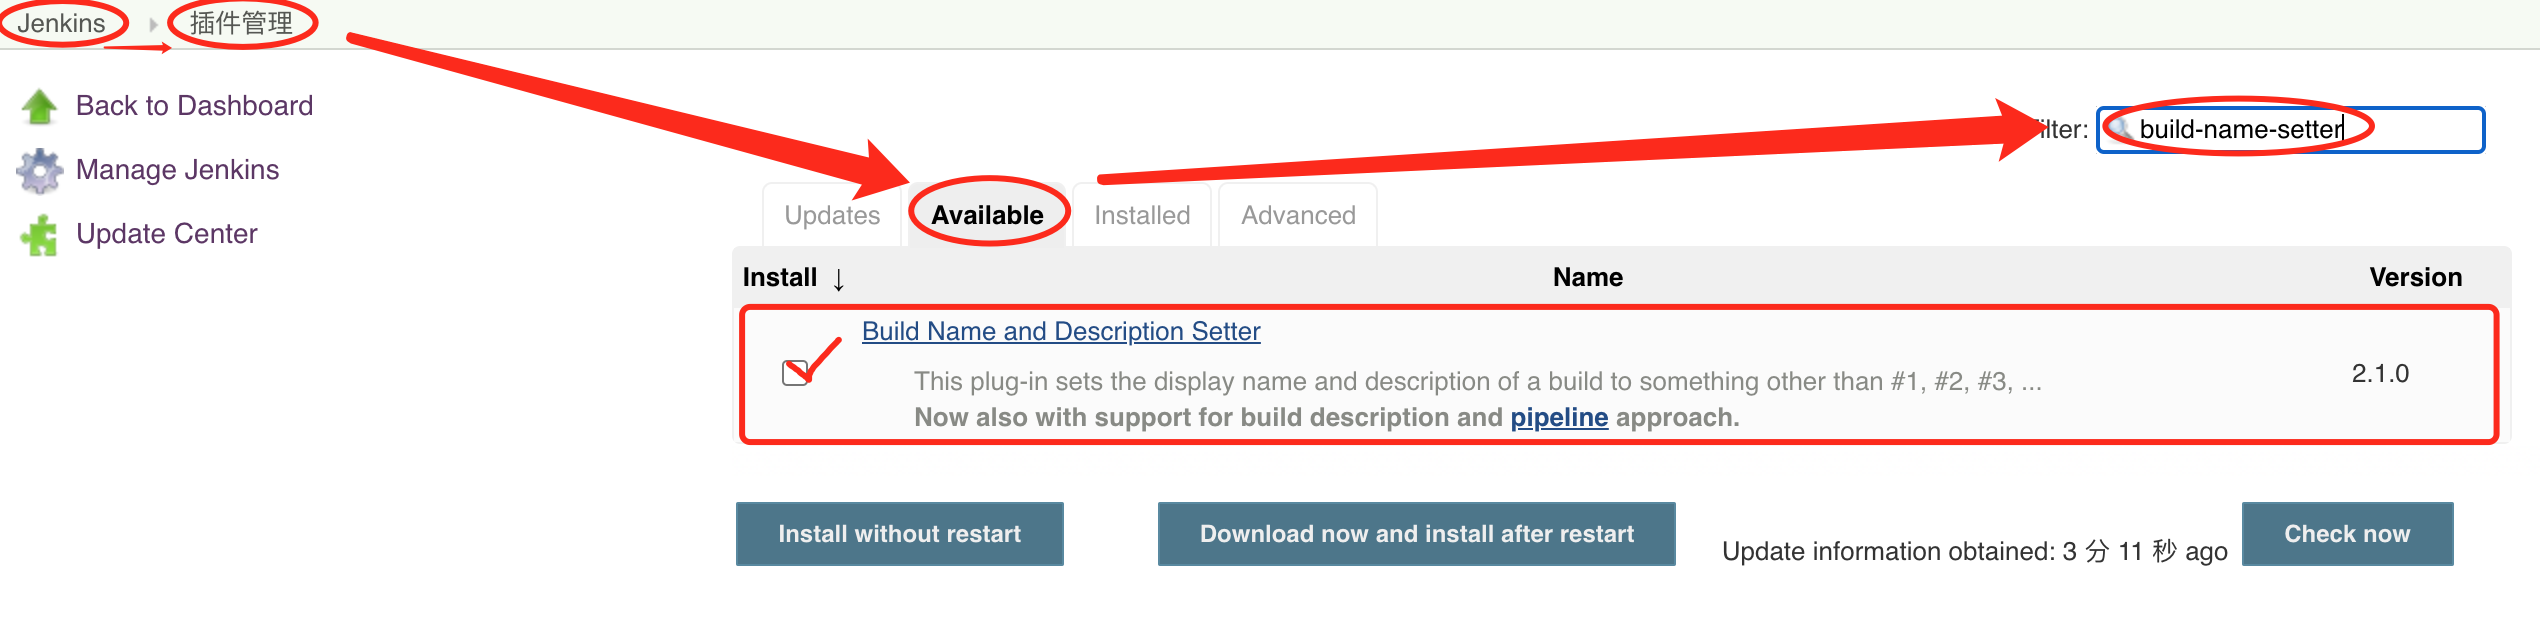
  • 进入Jenkins工作台系统管理>插件管理>可选插件>过滤>build-name-setter,勾选对应插件直接安装

    showQR1

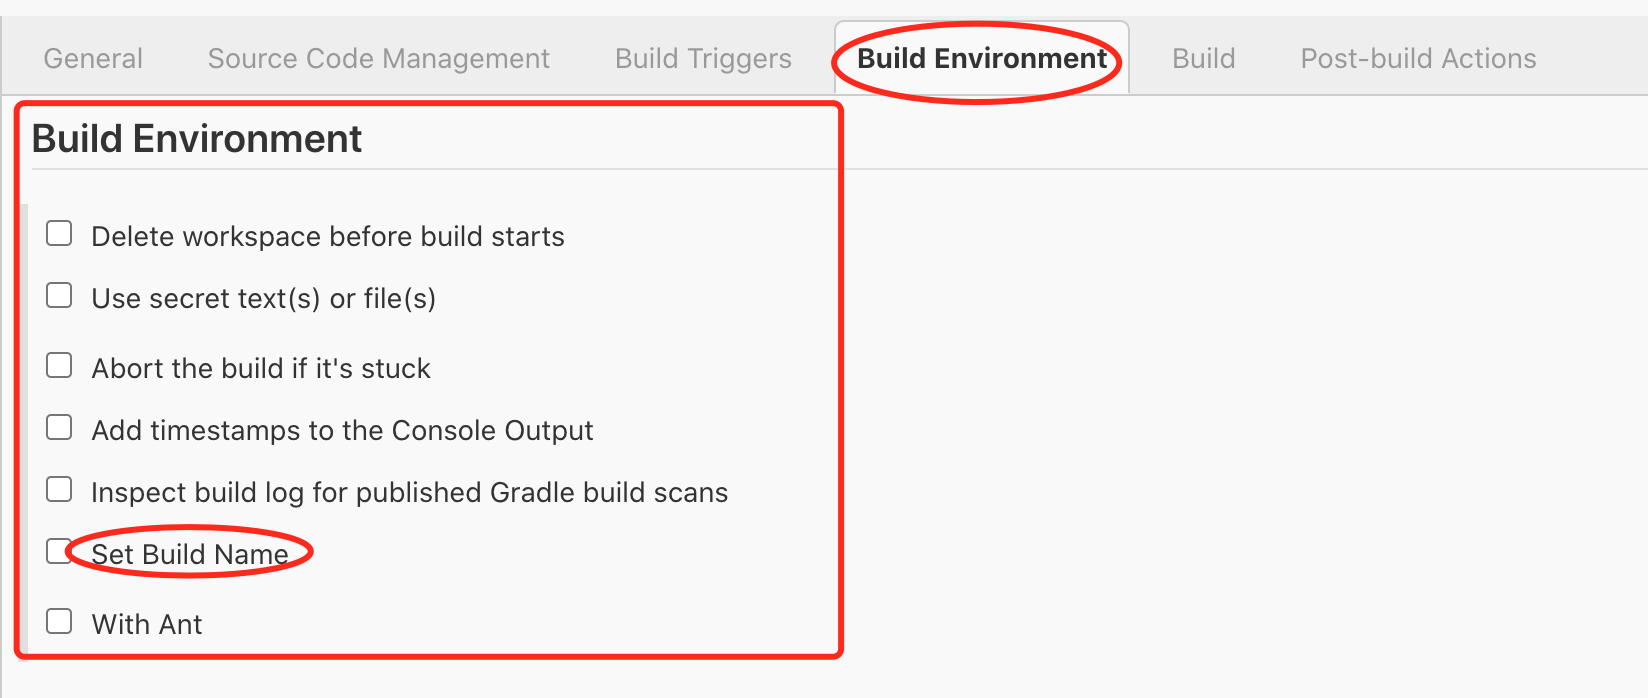
  • 返回工作台首页,选择一个Build工程>配置

  • 可以看到构建环境处多了一个Set Build Name的选项,即插件安装成功

    showQR2

2. 配置Set Build Name插件

查看Jekins的环境变量参数,我们可以看到

1
2
3
4
BUILD_NUMBER
The current build number, such as "153"
BUILD_DISPLAY_NAME
The display name of the current build, which is something like "#153" by default.
  • Set Build Name就是修改这个BUILD_DISPLAY_NAME,默认为#${BUILD_NUMBER}

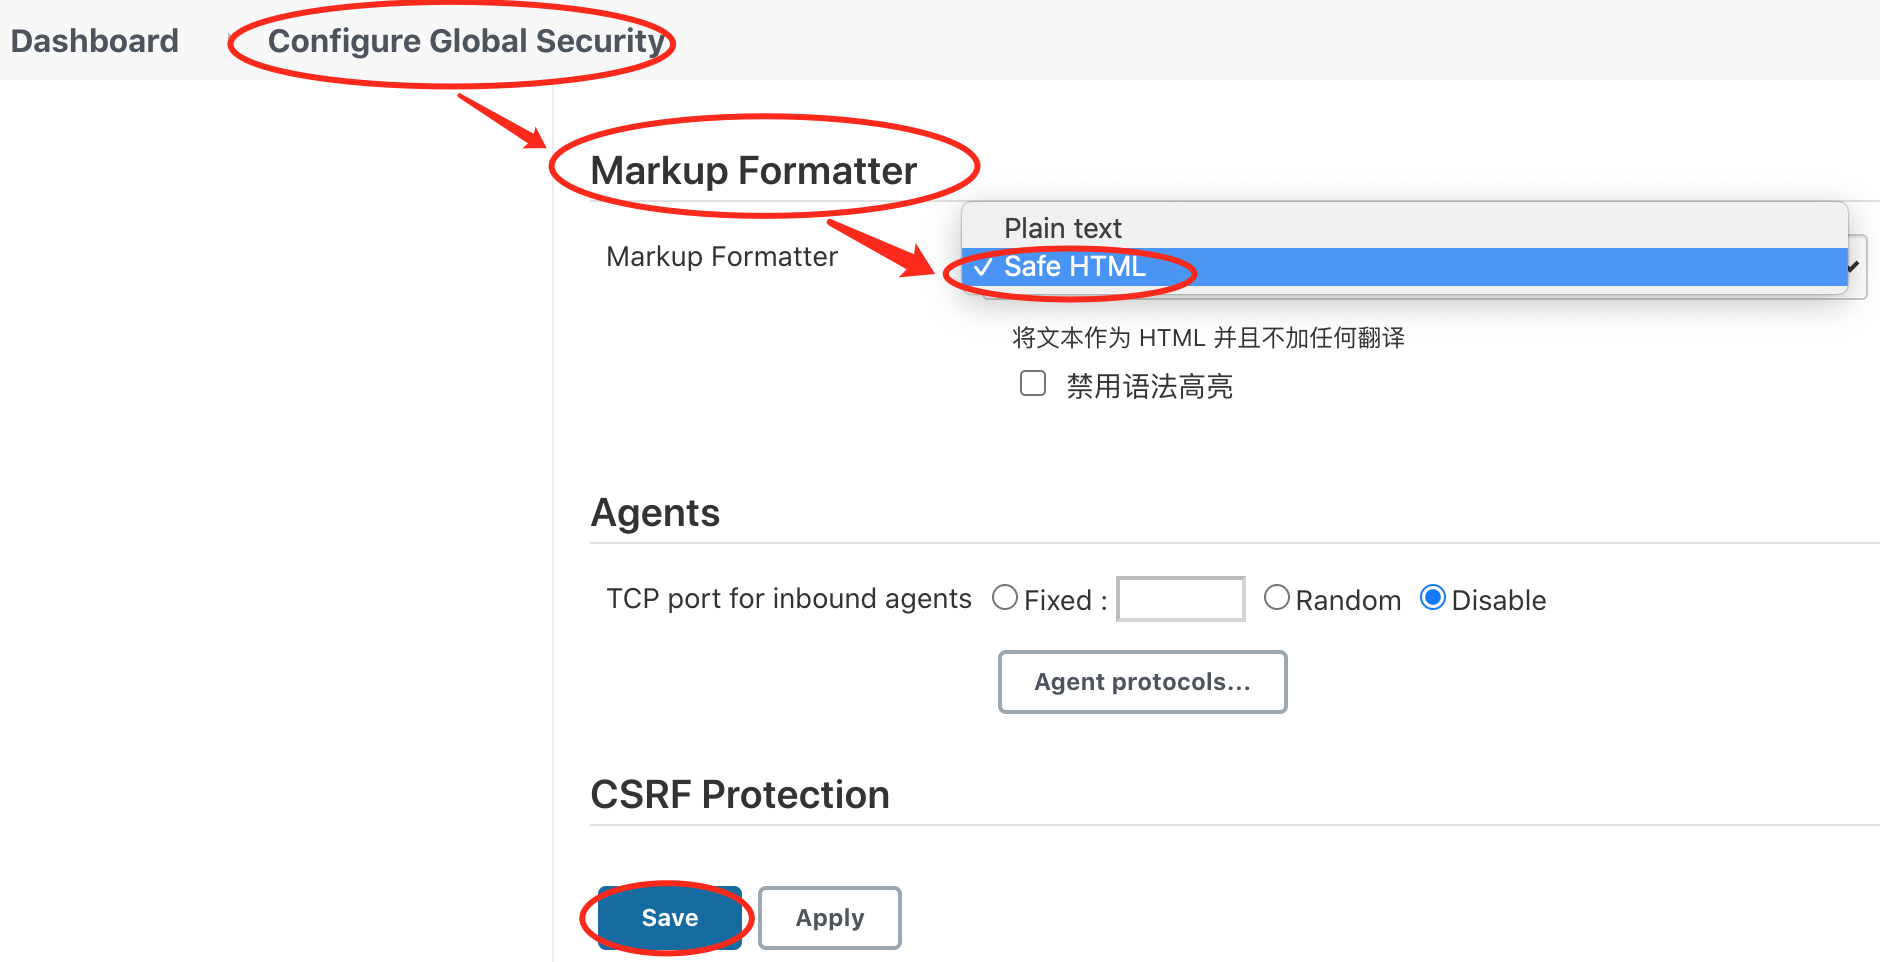
  • Jenkins的默认安全设置,会把所有的输入都当成纯文本,为了使图片链接生效,需要更改一下系统管理>全局安全配置>标记格式器,将纯文本选项改为Safe HTML,保存设置

    showQR3

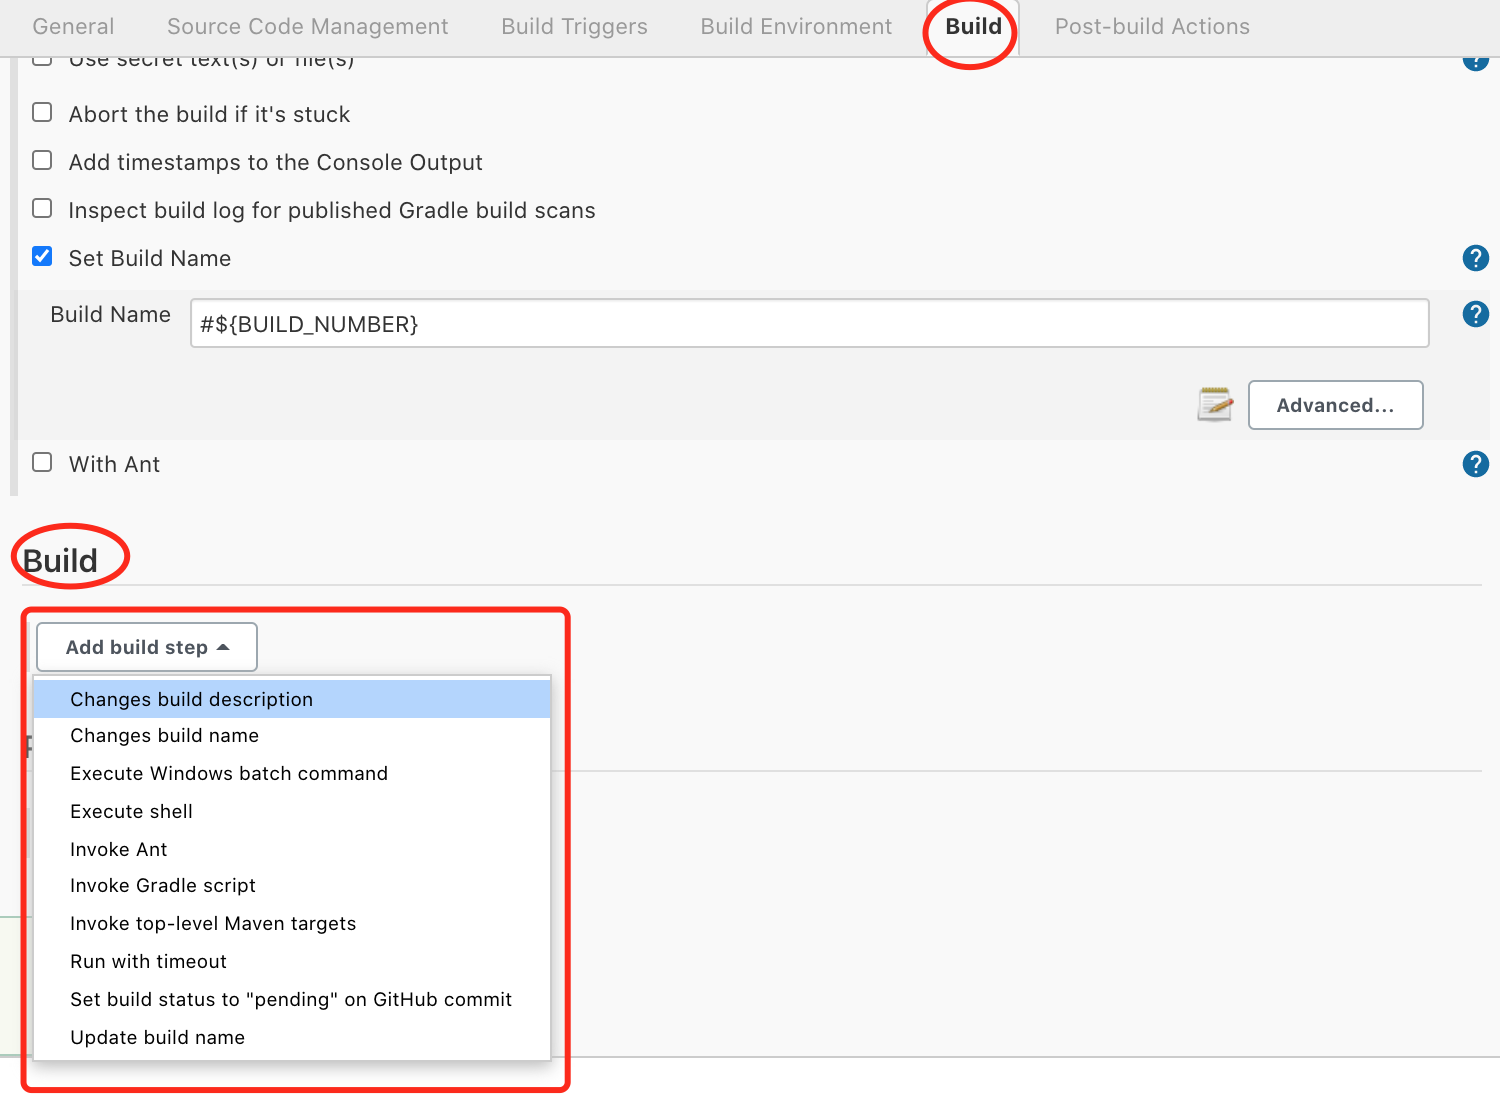
  • 点击Set Build Name的高级,会出现Build Description的设置,可以在这里写入一个图片的链接 <img src="http://ww1.sinaimg.cn/large/007x9vWyly1g2zgykchtmj30a7064dk4.jpg" height="200" width="200/>

  • Build完成之后即可在Build历史中看到对应的图片链接

    img

showQR4_update1

End

第4节:Jenkins使用问题常见

Jenkins

前言

天啊,没遇到问题之前,你永远不知道我下面要讲的这些点是多么多么的重要。你只要稍微不注意,就会导致你所有的正确操作都变成错误。

Jenkins管理员密码忘记的解决办法

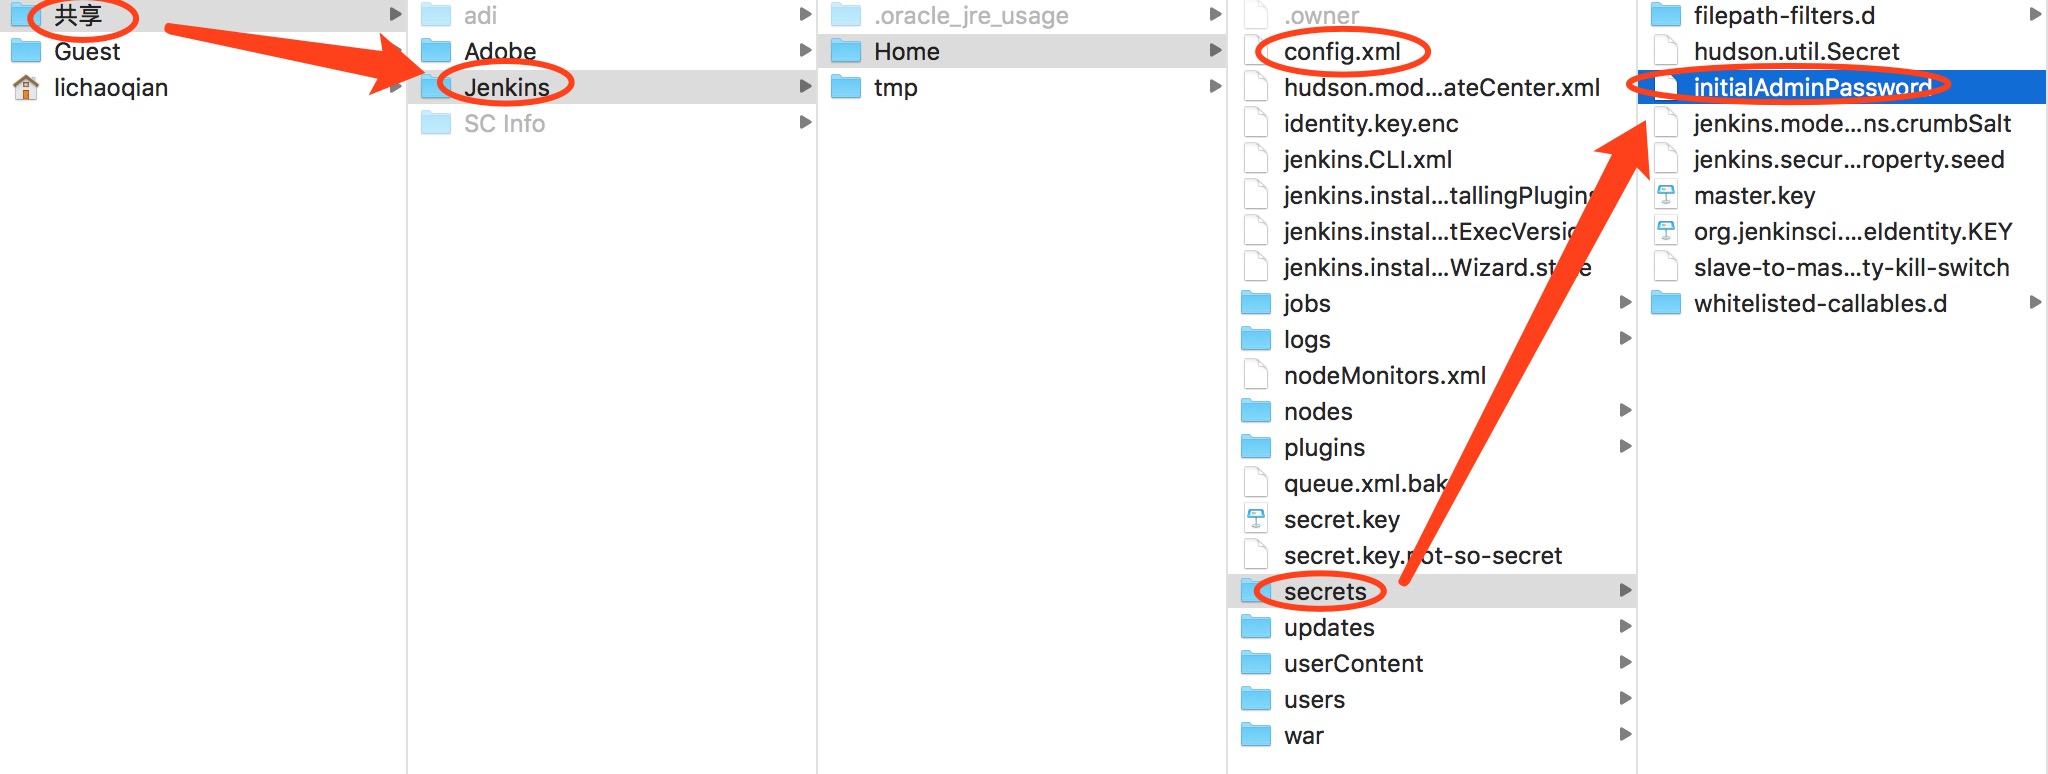
首先明确,不管是初始密码,还是找回管理员密码都是从共享--Jenkins--Home中处理,目录结果如下:
jenkins_Home

admin密码更改忘记情况

1.删除Jenkins目录下config.xml文件中下面代码,并保存文件。

1
2
3
4
5
6
7
8
<useSecurity>true</useSecurity>
<authorizationStrategy class="hudson.security.FullControlOnceLoggedInAuthorizationStrategy">
<denyAnonymousReadAccess>true</denyAnonymousReadAccess>
</authorizationStrategy>
<securityRealm class="hudson.security.HudsonPrivateSecurityRealm">
<disableSignup>true</disableSignup>
<enableCaptcha>false</enableCaptcha>
</securityRealm>

2.重启Jenkins服务 http://localhost:8080/restart

附:重新加载配置信息 http://localhost:8080/reload

3.进入首页>“系统管理”>“Configure Global Security”;

4.勾选“启用安全”;

5.点选“Jenkins专有用户数据库”,并点击“保存”;

6.重新点击首页>“系统管理”,发现此时出现“管理用户”;

7.点击进入展示“用户列表”;

8.点击右侧进入修改密码页面,修改后即可重新登录。

参考:忘记Jenkins管理员密码的解决办法

一、文件路径问题

Jenkins脚本中,不能使用桌面路径:

本地cd目录注意:

1
2
3
4
5
# 错误cd
# cd /Users/lichaoqian/Desktop/TestScript # 不能使用桌面路径,执行构建时候Jenkins会提示 `cd: /Users/lichaoqian/Desktop/TestScript: Not a directory`

# 正确cd
cd /Users/lichaoqian/Project/Test/TestScript

二、权限问题

1、问题例子

将在终端中已验证通过的如下脚本,放到Jenkins上执行。

问题例子1:文件修改
1
2
cd /Users/lichaoqian/Project/Test/TestScript
chmod -R 777 ./0000.txt

执行后,Jenkins的log如下:

Jenkins权限问题log

很显然这是个权限问题。

问题例子2:钥匙串Keychain解锁

同理的当你执行钥匙串Keychain的时候也会有权限问题

1
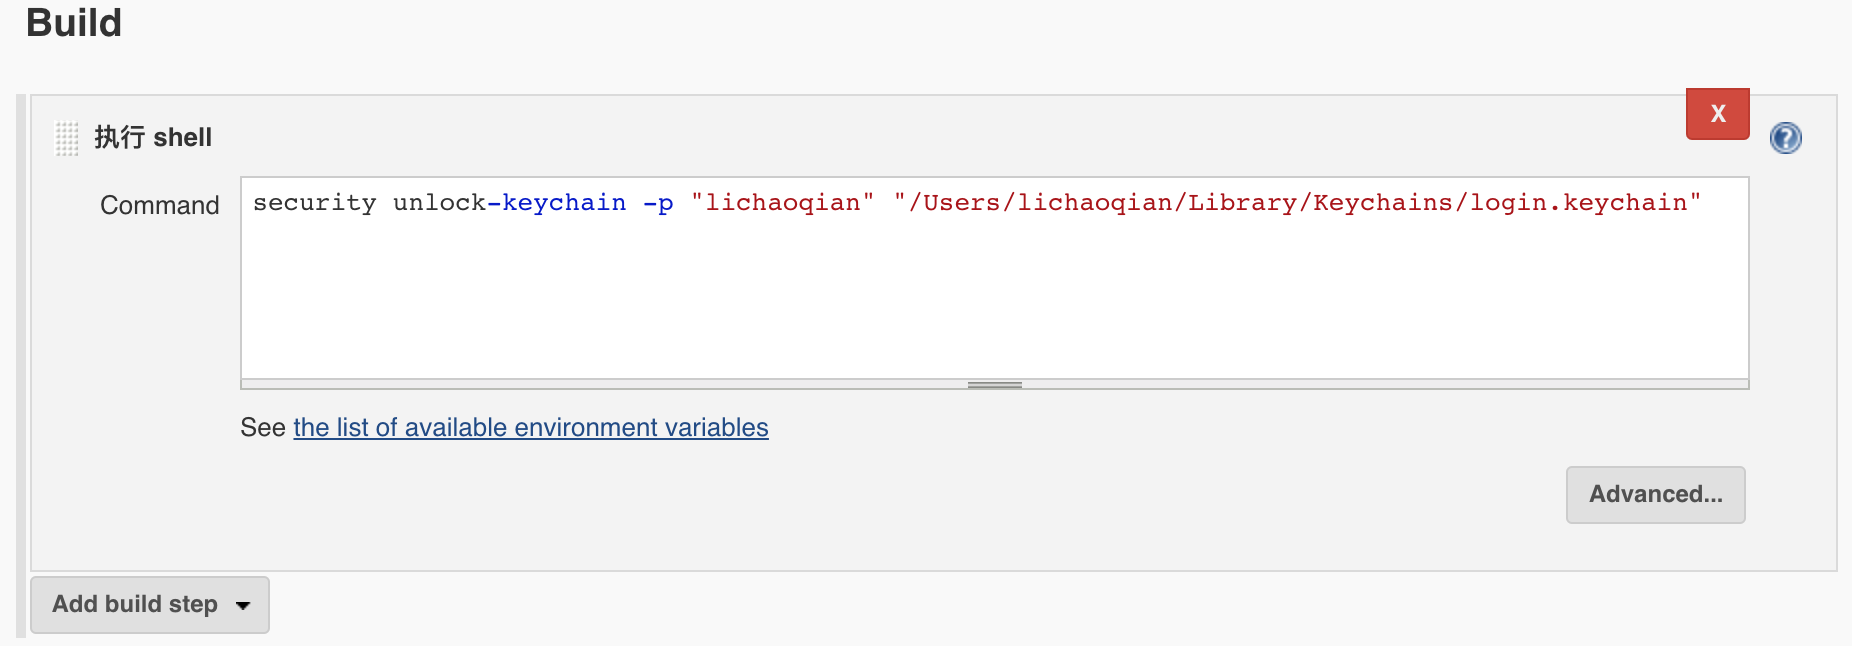
security unlock-keychain -p "lichaoqian" "/Users/lichaoqian/Library/Keychains/login.keychain"

unlock-keychain_1_JenkinsScript

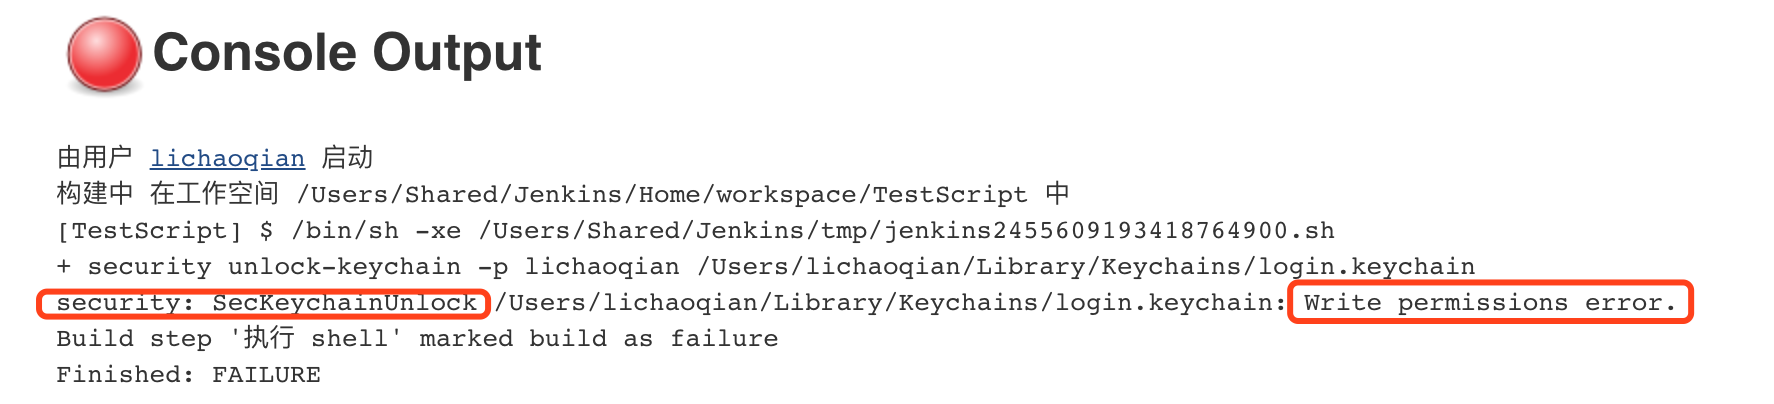
执行后,Jenkins的log如下:

unlock-keychain_1_JenkinsErrorLog.png

1
2
3
4
5
[TestScript] $ /bin/sh -xe /Users/Shared/Jenkins/tmp/jenkins2455609193418764900.sh
+ security unlock-keychain -p lichaoqian /Users/lichaoqian/Library/Keychains/login.keychain
security: SecKeychainUnlock /Users/lichaoqian/Library/Keychains/login.keychain: Write permissions error.
Build step '执行 shell' marked build as failure
Finished: FAILURE

很显然这也是个权限问题。

2、权限问题分析

参考文章:iOS开发-自动化打包Jenkins集成的文章开头就有讲到。

原因:Jenkins打开姿势不对!

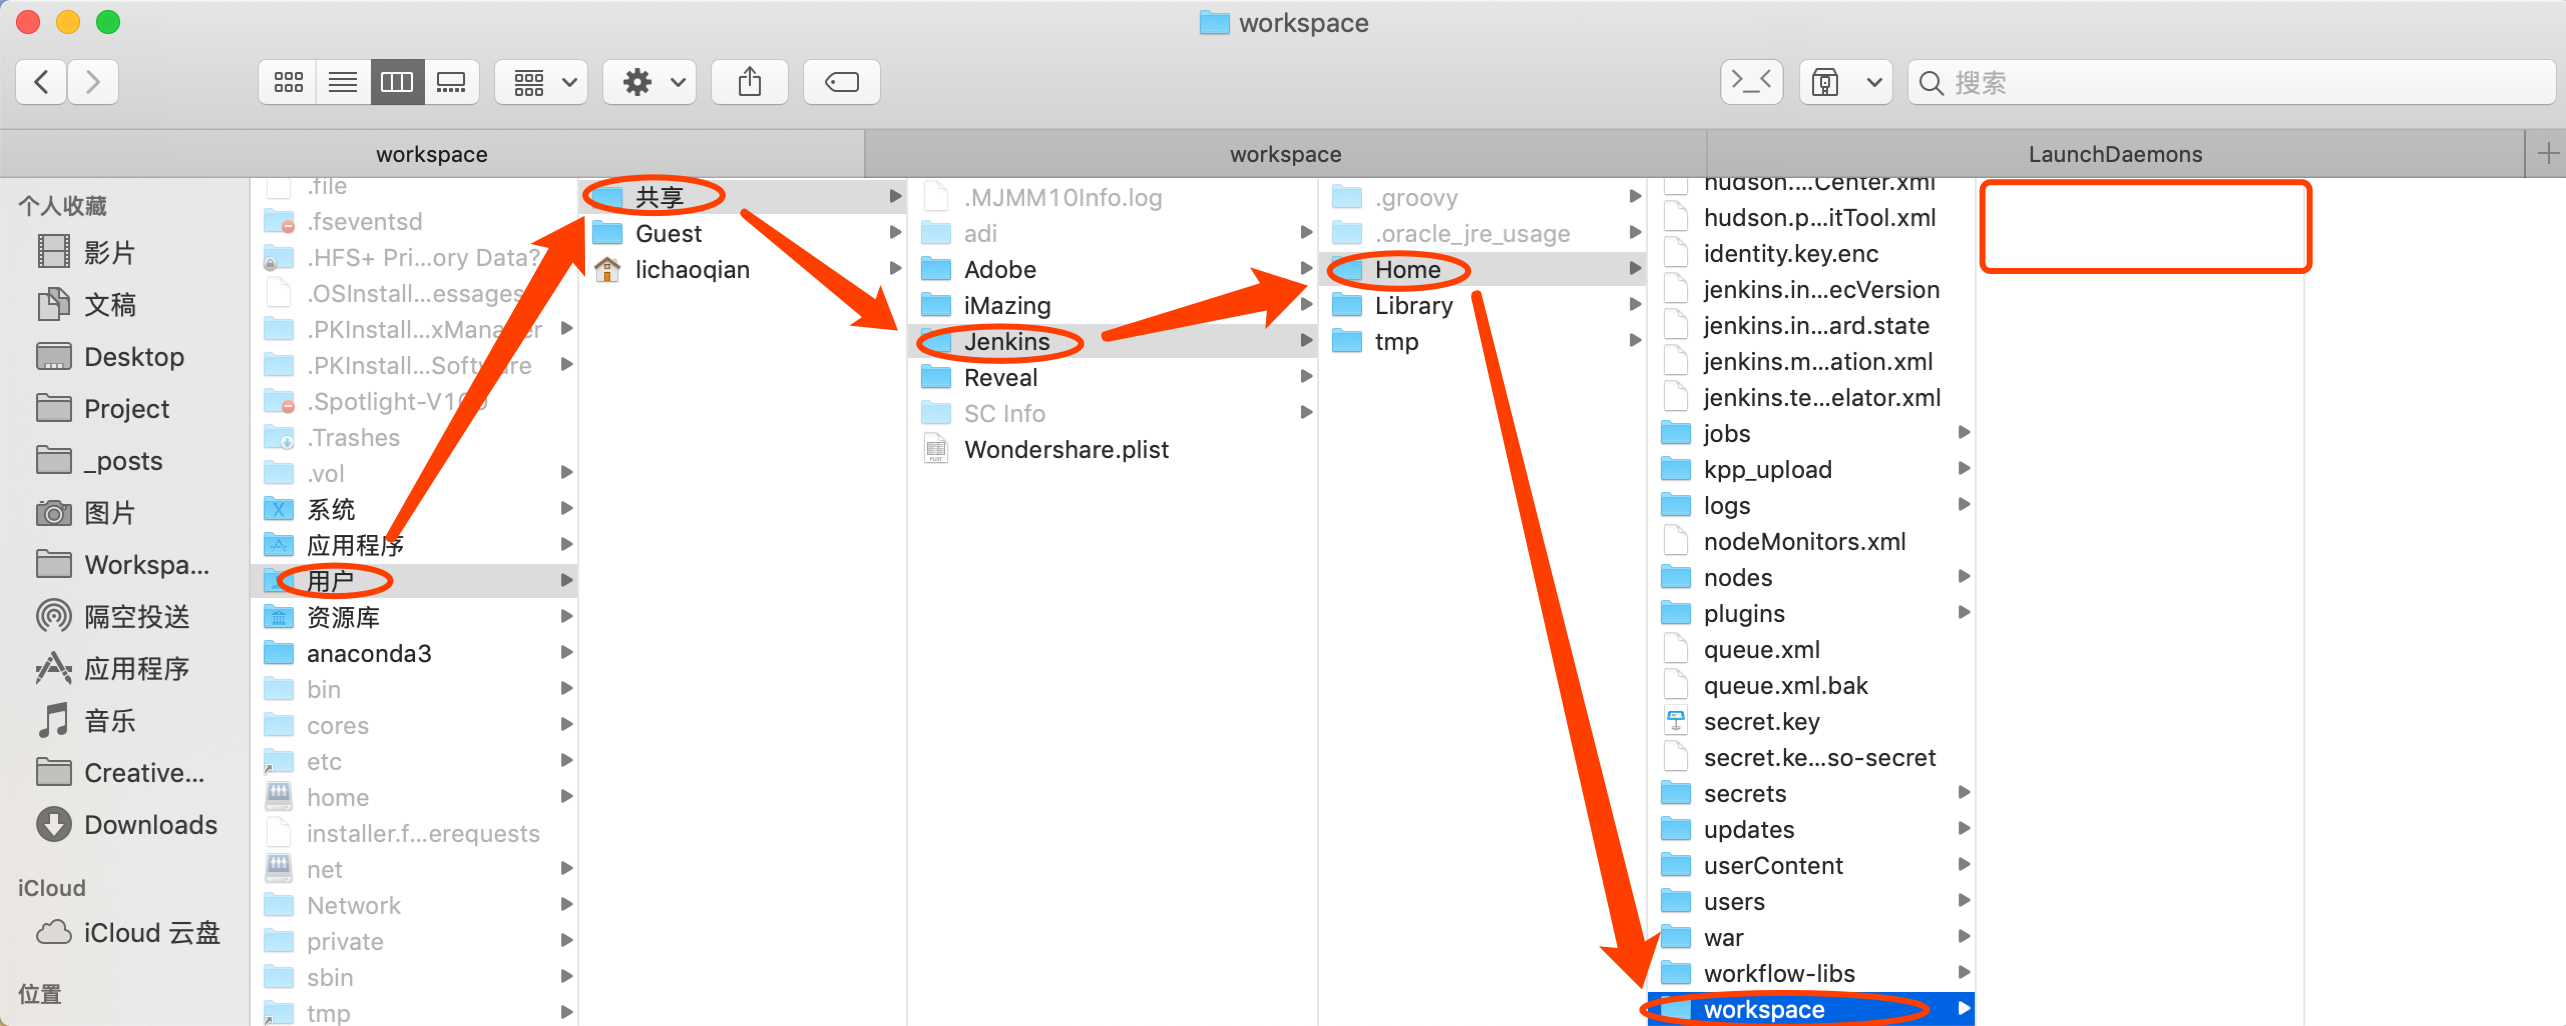
如果你构建的工程,是在**/Users/Shared/Jenkins**工作目录下,那么就会有权限问题。

如果你构建的工程,是在**/Users/[user name]/.jenkins**工作目录下,才不会有权限问题。

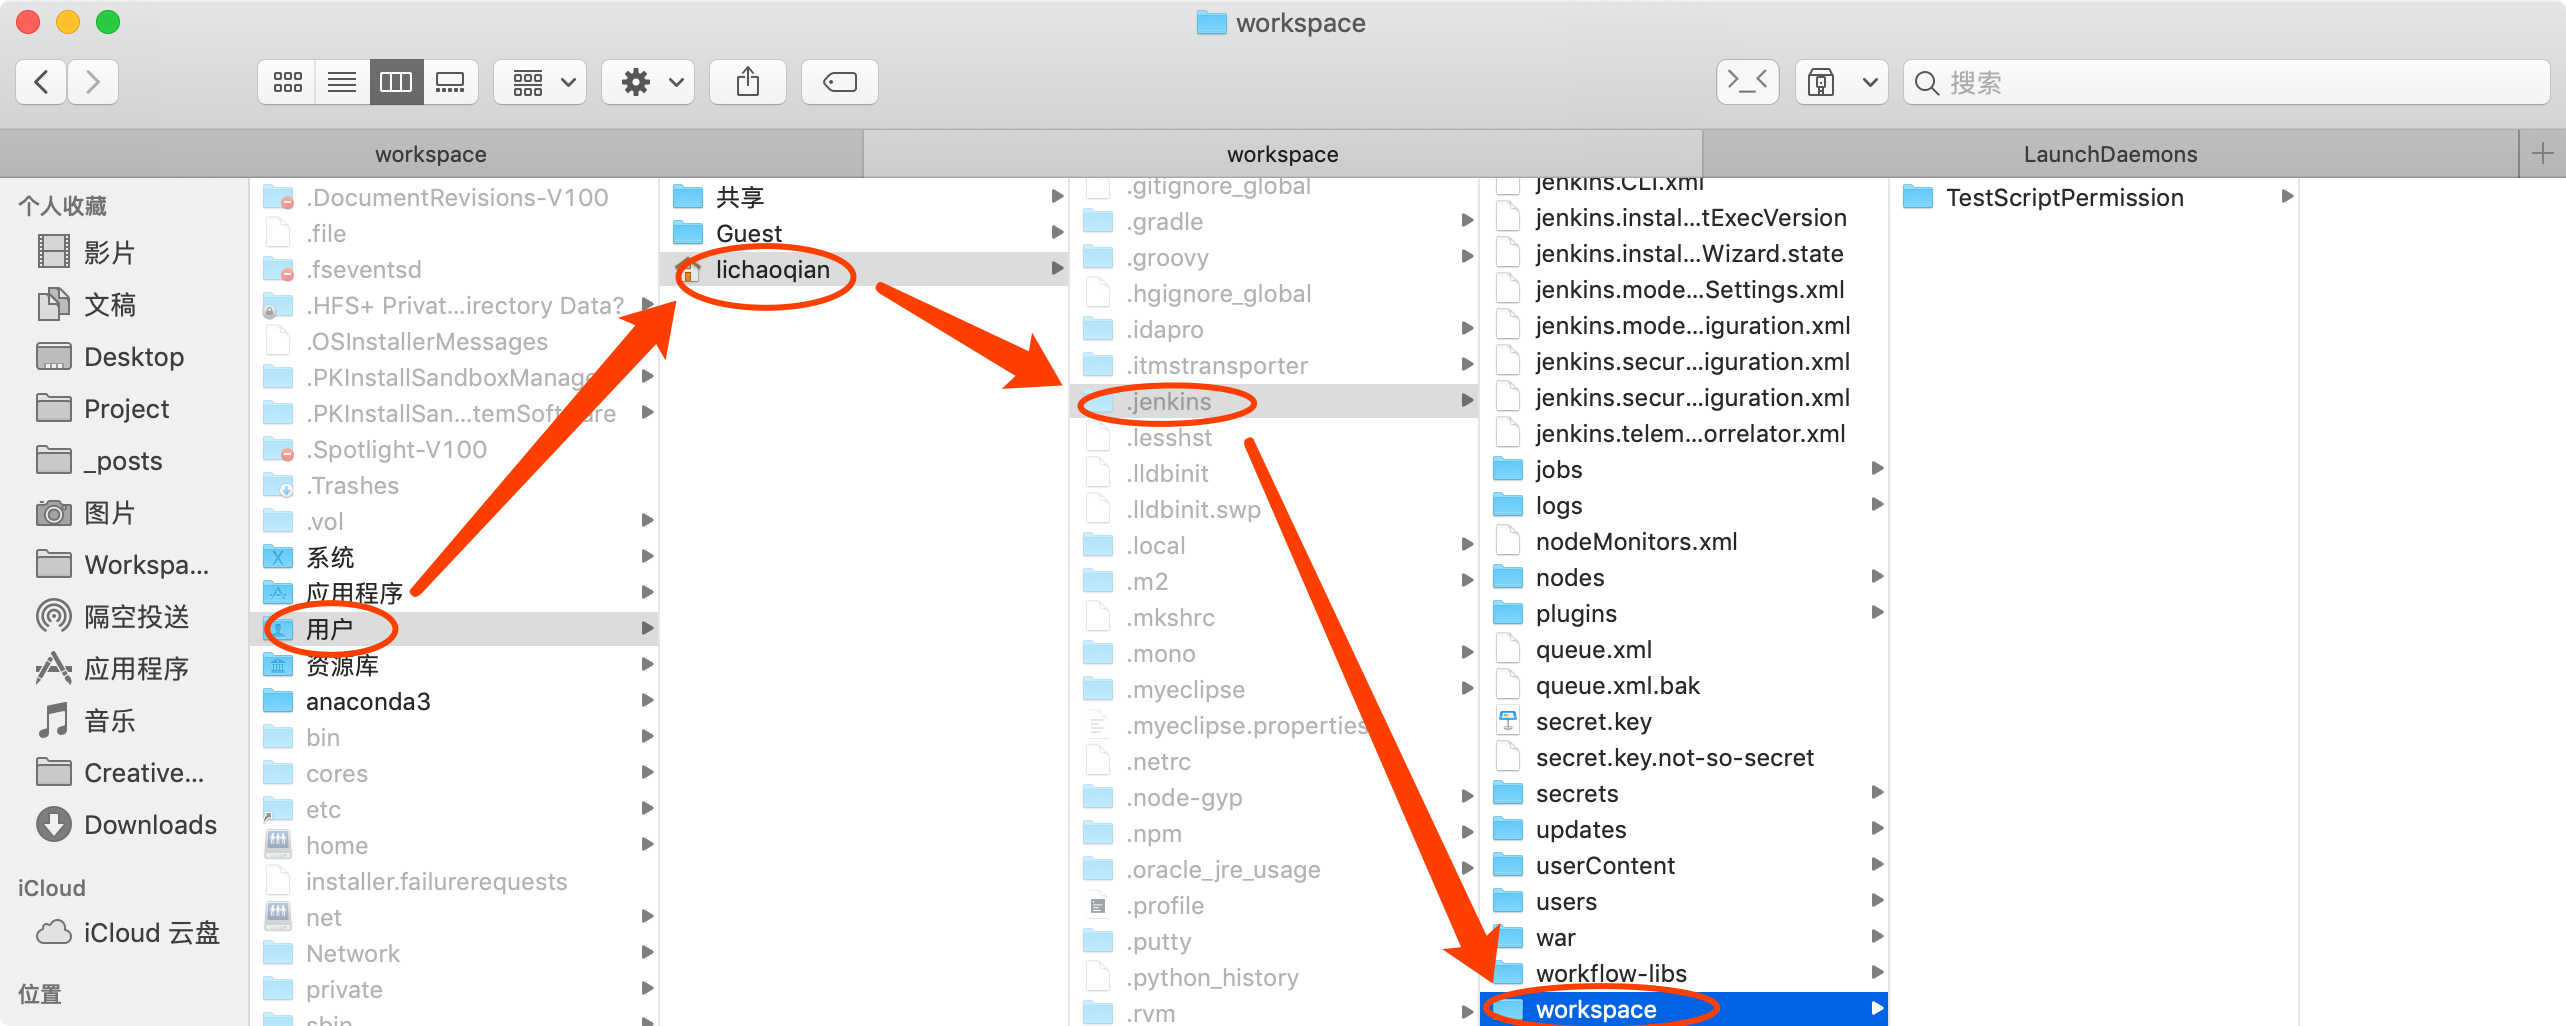
  • 错误的:有权限问题的Jenkins workspace目录

有权限问题的Jenkins workspace目录

  • 正确的:无权限问题的Jenkins workspace目录

无权限问题的Jenkins workspace目录

  • 如何验证你当前项目点击构建后的工作目录是哪里呢?

    答:直接构建,然后去查看你的项目显示在哪里啊。

3、权限问题解决(正确的启动Jenkins姿势)

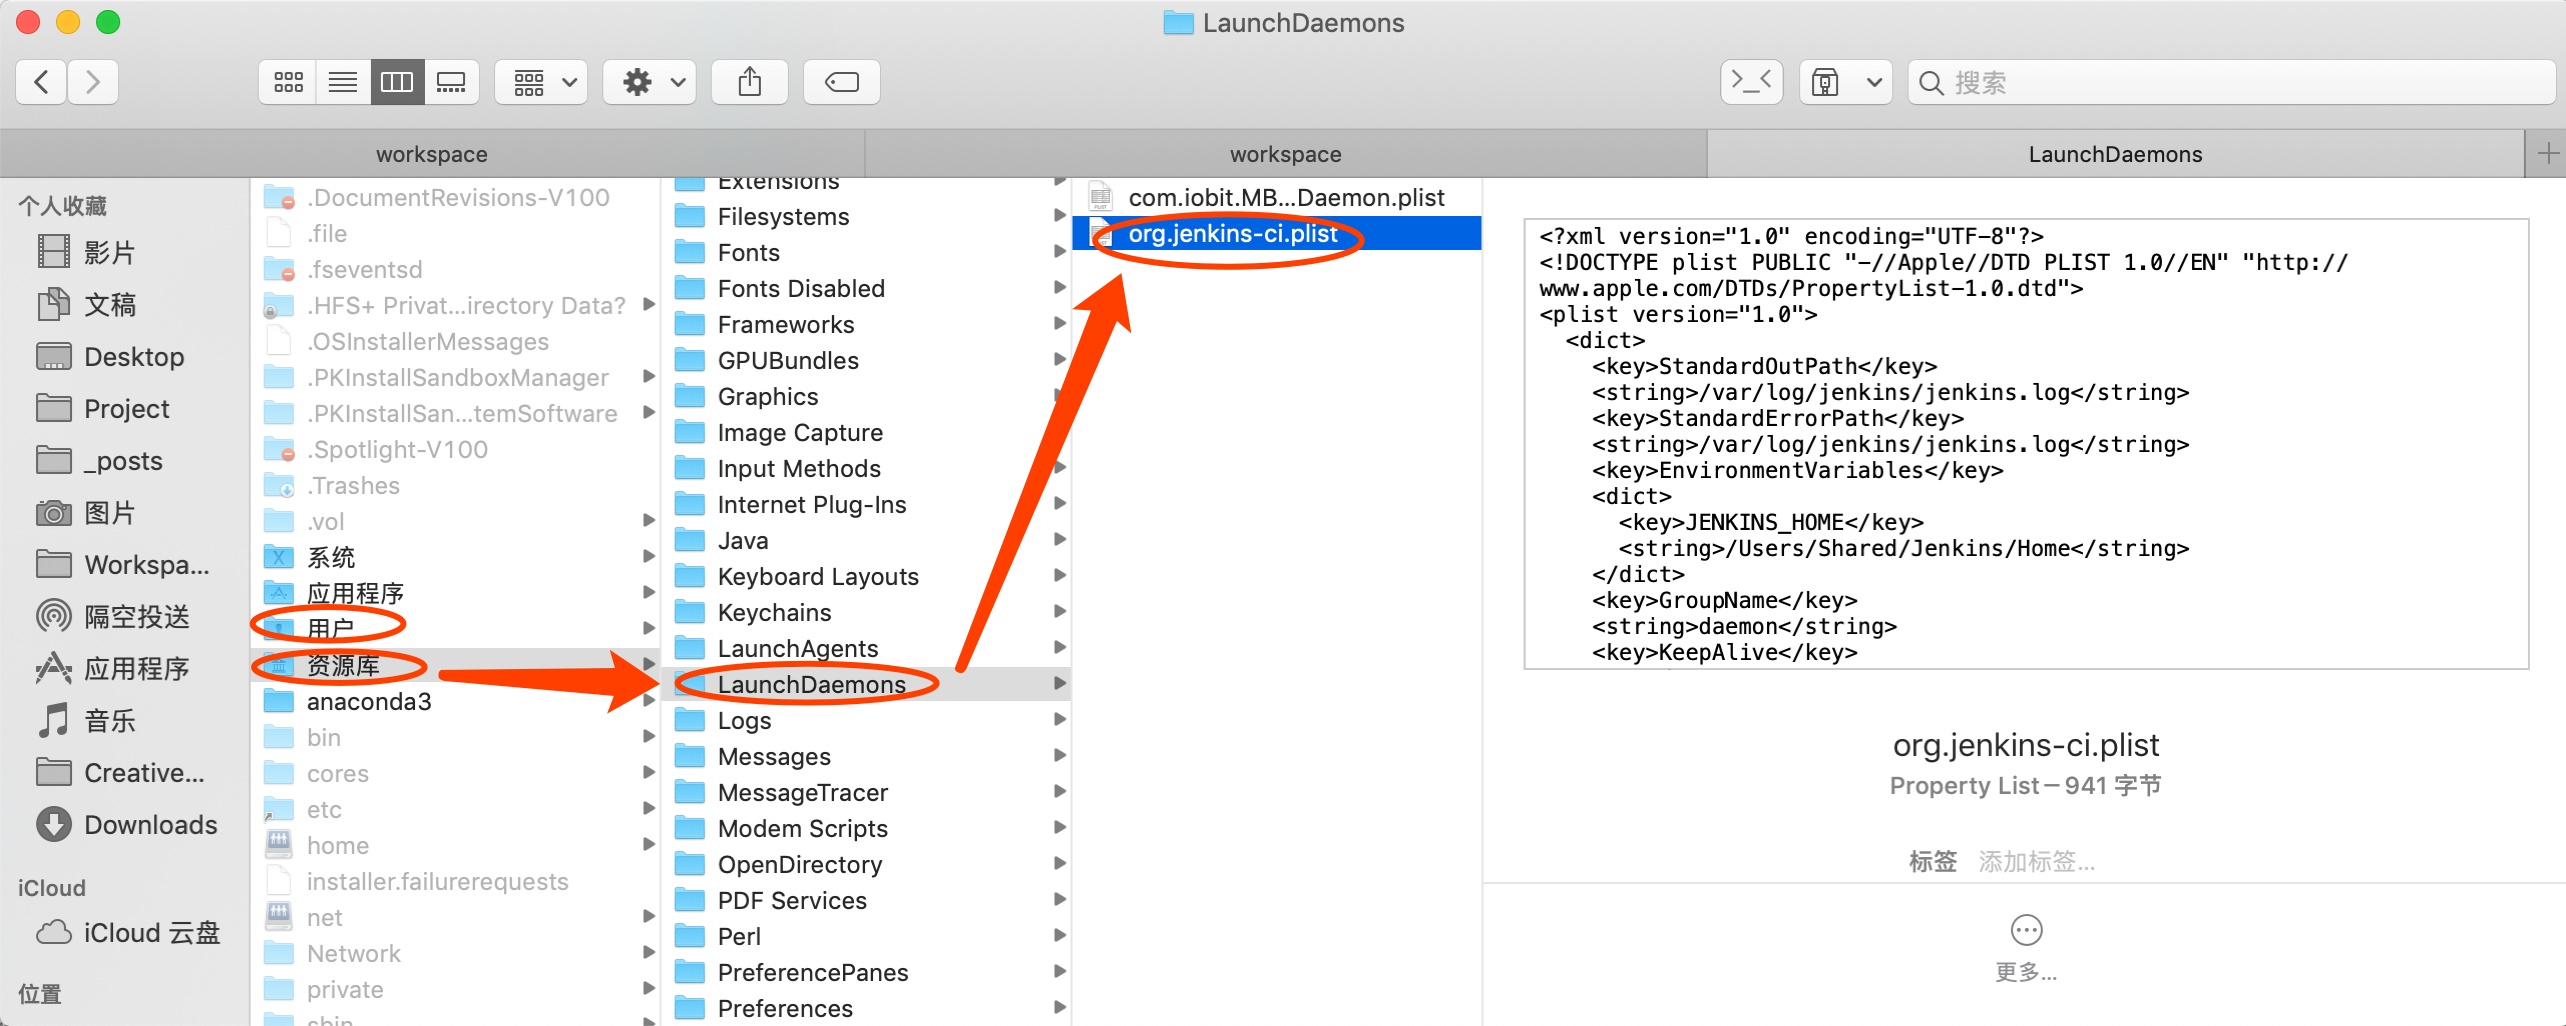
在使用正确的启动Jenkins之前,我们先来认识下下面的这个org.jenkins-ci.plist文件。它的位置 /Library/LaunchDaemons/org.jenkins-ci.plist 如下:

正确的启动Jenkins姿势

没有权限问题的Jenkins正确的启动方式如下(按下面方式打开,才不会出现权限问题):

1
2
$ sudo launchctl unload /Library/LaunchDaemons/org.jenkins-ci.plist
$ java -jar /Applications/Jenkins/jenkins.war --httpPort=8080

当你执行完这两行命令的时候,你可以在浏览器上输入http://localhost:8080来访问Jenkins了。(如果你只执行了第一行,没执行第二行,会出现无法访问)

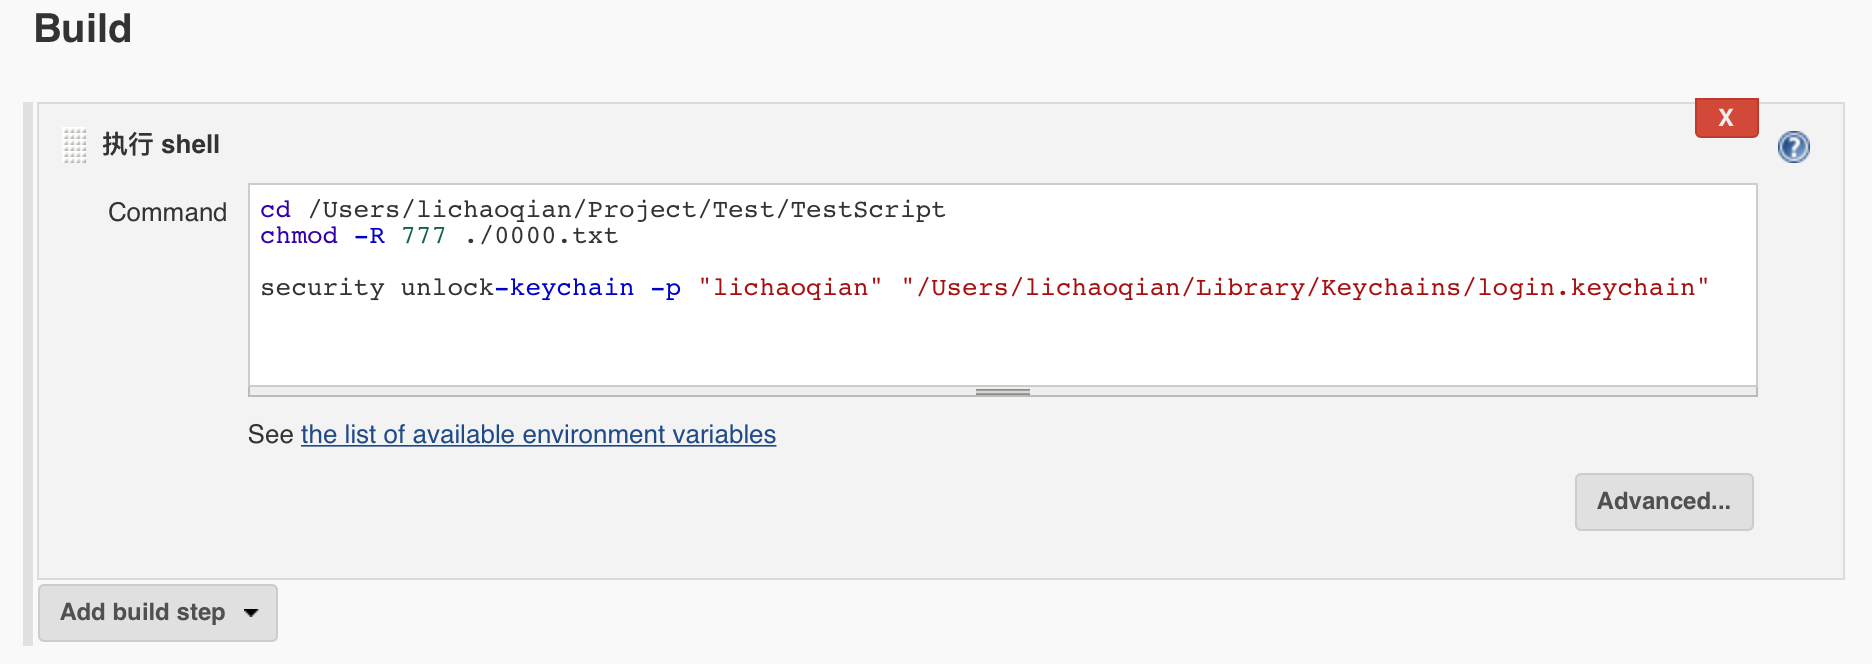
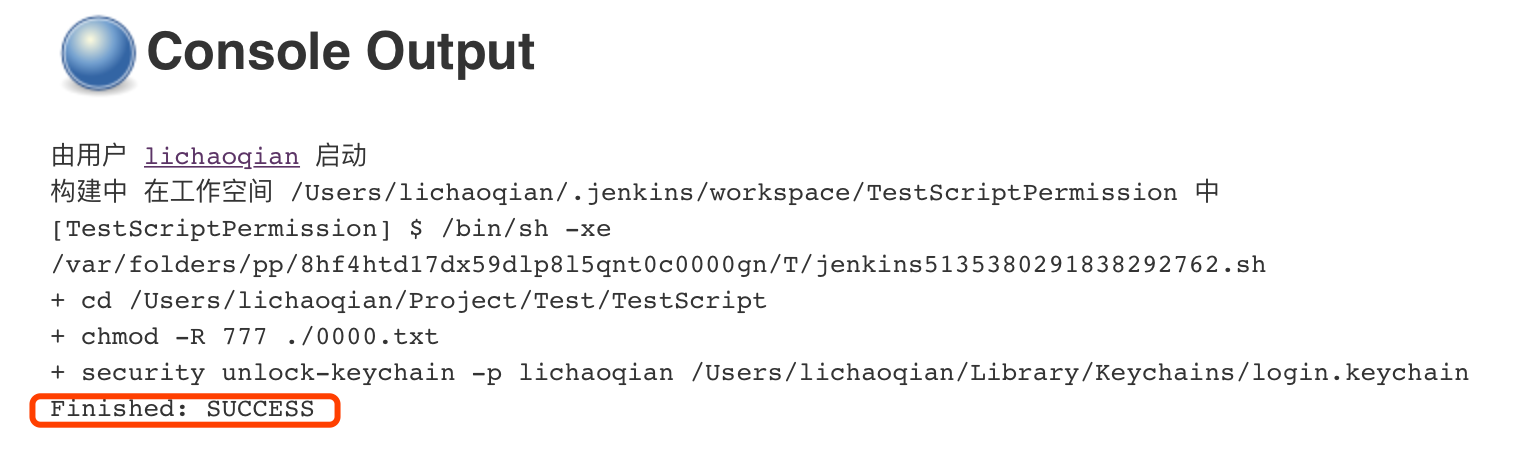
4、解决后的结果显示

  • 4.1、脚本内容

脚本内容

  • 4.2、脚本执行结果

脚本执行结果

至此,你的权限问题已完美解决。

休息一下

三、其他权限问题

  • Jenkins问题解决方案:

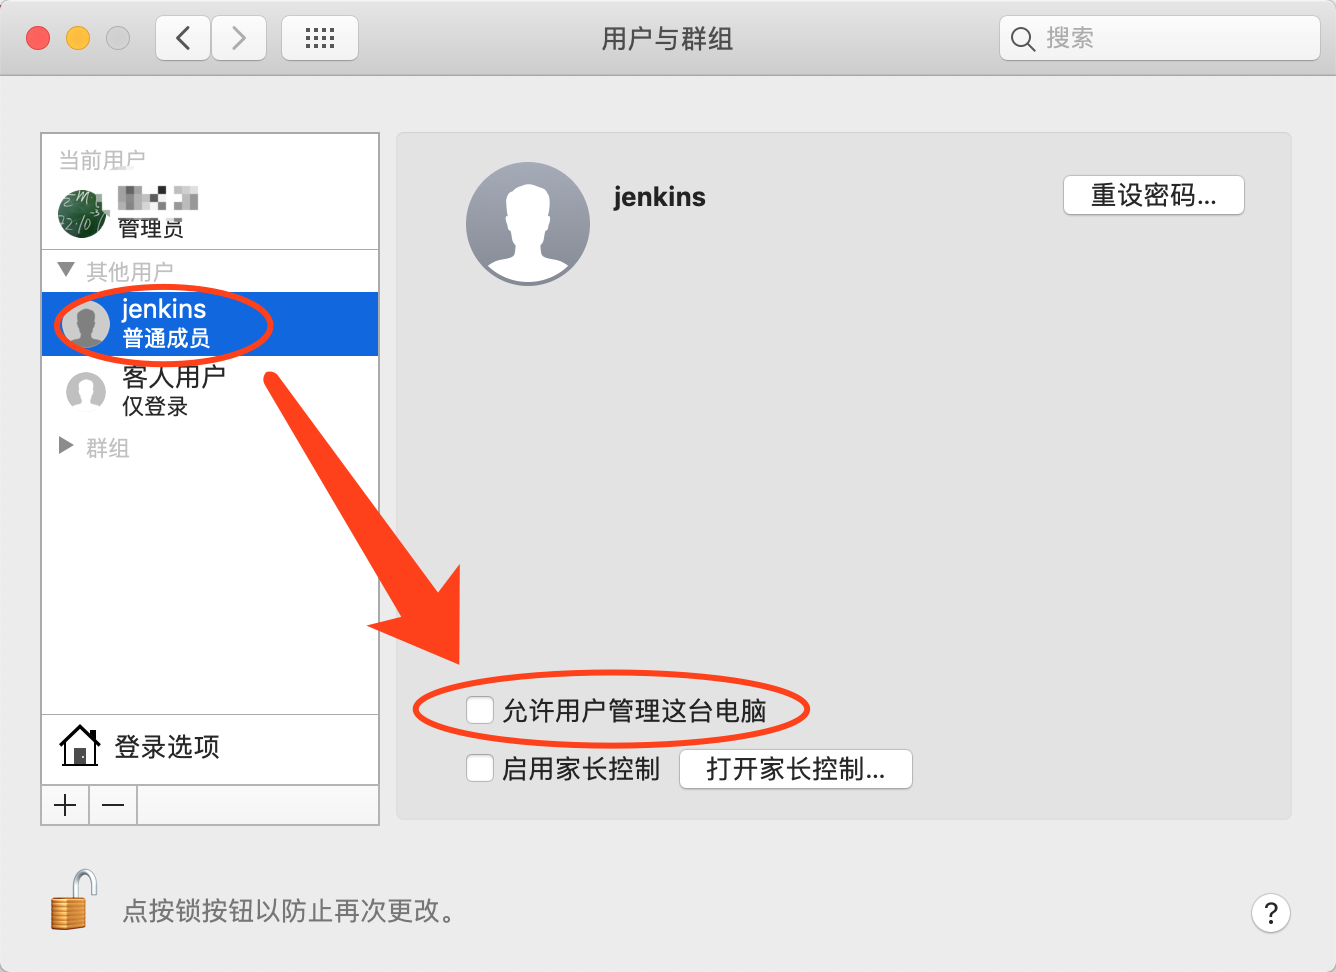
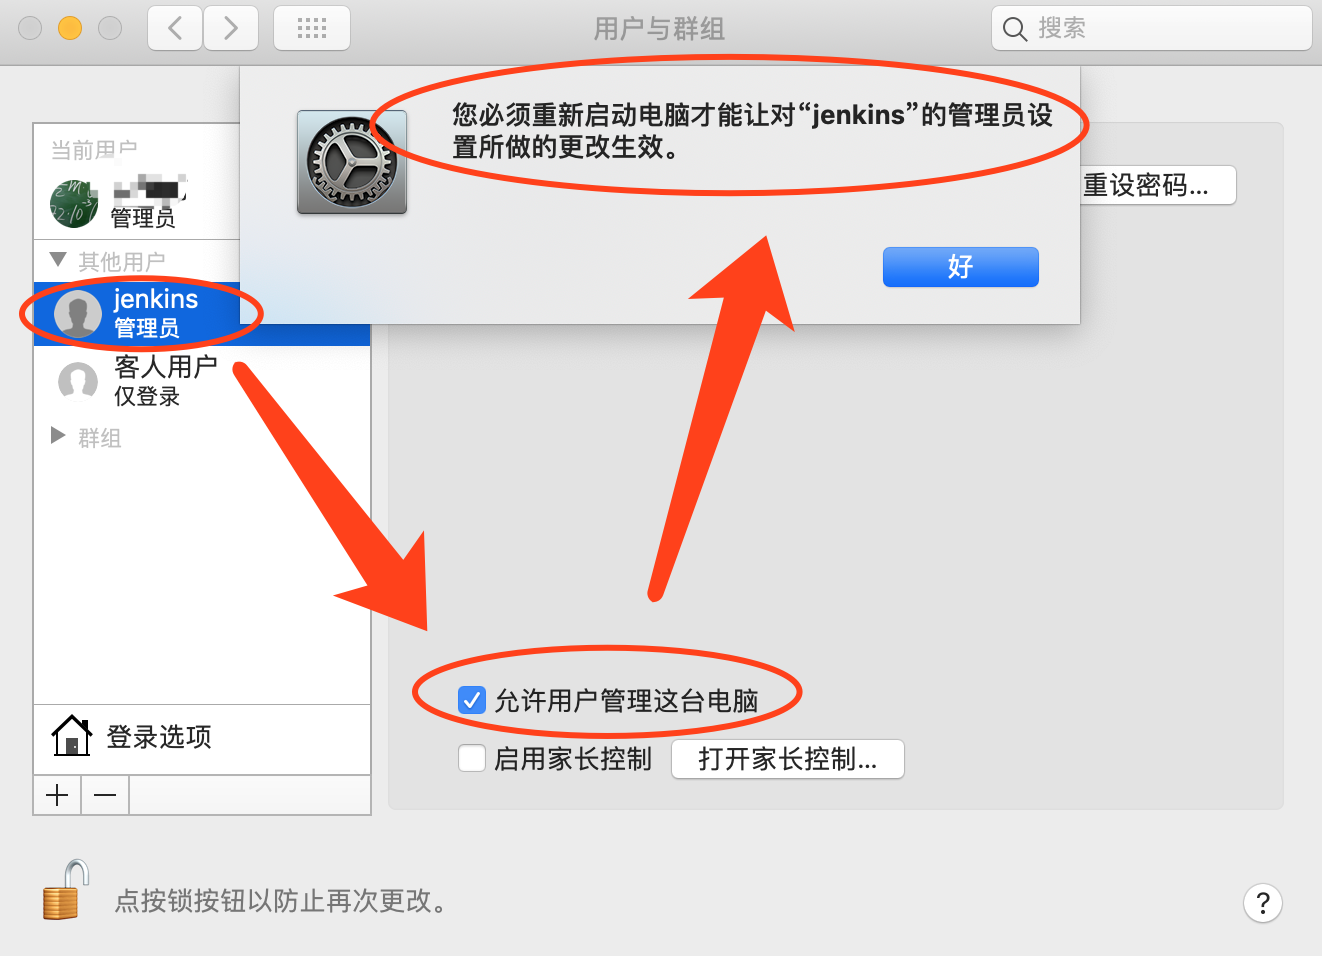
解决:进入mac 系统偏好设置 — 用户与群组 — 其他用户 — jenkins ,勾选允许用户管理这台电脑

unlock-keychain_Write permissions error

勾选选项。

unlock-keychain_3_JenkinsSolve

四、Jenkins权限问题其他解决方法(未实践)

  • 未实践方式1(都未实践):

Jenkins执行脚本提示没有权限的解决办法 未实践,因为已经通过上述正确的启动Jenkins来解决了。所以这里没去实践。不过看内容应该是可行的。后续有时间再补充。

  • 未实践方式2(看了应该无效):

提高Jenkins用户权限,详见《Terminal -> 终端命令使用.md》中的用户相关操作。应该无效

iOS进阶_多Configuration

利用多Configuration打包不同环境

前言

序言:

现象:Xcode默认只有DEBUG和RELEASE两种模式。

问题:如果我们在项目中想增加预发布环境或者再增加其他多个环境呢?

错误(不当)做法:如果在项目中用if else 弄个全局变量来控制,每次打包之前去手动修改,这样不仅繁琐,而且还会出错。

正确(推荐)做法:下面来一下在Xcode中添加多个环境变量的方法.

详细做法参考:使用Xcode增加环境变量(多种环境区分),不再累诉。

一、认识

1、几个描述文件的认识与区别

通过以下表格,你将认识到为什么你这个环境需要使用这个描述文件打包,用其他描述文件会有什么问题。

描述文件类型 可安装的设备 证书环境(开发/生产) 使用的推送 描述文件使用的环境(测试/预生产/生产)
development 已注册的设备 开发环境的证书 测试环境的推送 测试环境
adhoc 已注册的设备
(查看描述文件即可知道它没法做到在所有设备上都能安装的)
生产环境的证书 生产环境的推送
(这个创建描述文件的时候你就该知道的)
预生产环境
appstore/
inhouse
所有的设备 生产环境的证书 生产环境的推送 生产环境

2、几种环境的认识

环境 需要可以安装的设备 需要测试的推送
测试环境 在《已注册的设备》上可安装即可 测试环境的推送
预生产环境 至少《已注册的设备》上都能够安装吧 生产环境的推送
生产环境 要《所有的设备》上都能安装才行 生产环境的推送

3、环境与描述文件的总结

环境 应该使用的描述文件 备注
测试环境 development 不需要上线
预生产环境 adhoc 不需要上线
生产环境 appstore / inhouse 需要上线

4、Configuration的认识

4.1、错误认识

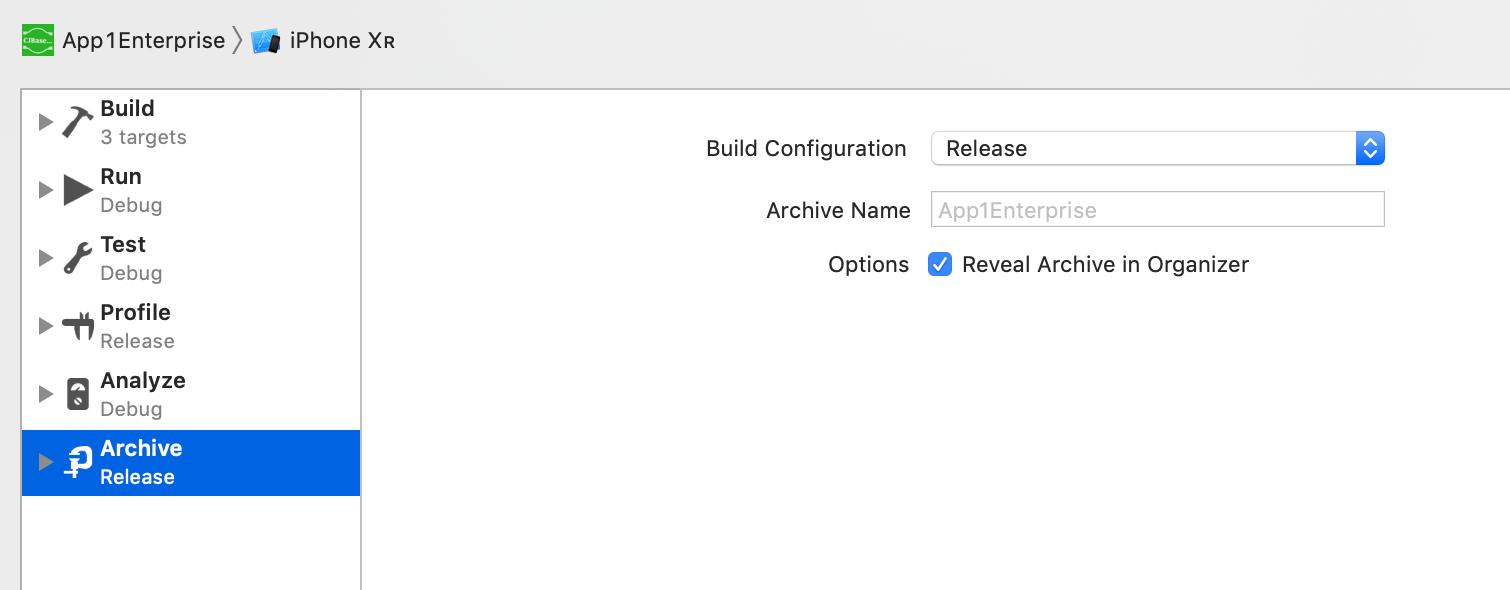
只知道Archive打包的时候使用的是Release模式,殊不知任何操作Archive打包的时候使用的模式都是可以通过Edit Scheme来更改的。

image-20190427145459385

4.2、正确认识:

他代表着各种配置。

二、问题背景

1、需要多Configuration的问题背景

对话:帮我打个测试包

对话:帮我打个预生产的包吧

对话:预生产测好了,帮我最后打个生产环境的包,我再测下,没问题就可以上线了。

那么,你就可能出现,每次打包的时候,去一个配置里面频繁修改证书(dev、adhoc、appstore/inhouse)。

为了避免每次打不同包,还得去那个Configuration里切换证书,你何不多建个Configuration呢?(Xcode默认的已经有且只有DEBUG和RELEASE两种模式)

2、多Configuration使用的问题背景

2.1、默认情况下的Configuration常见使用

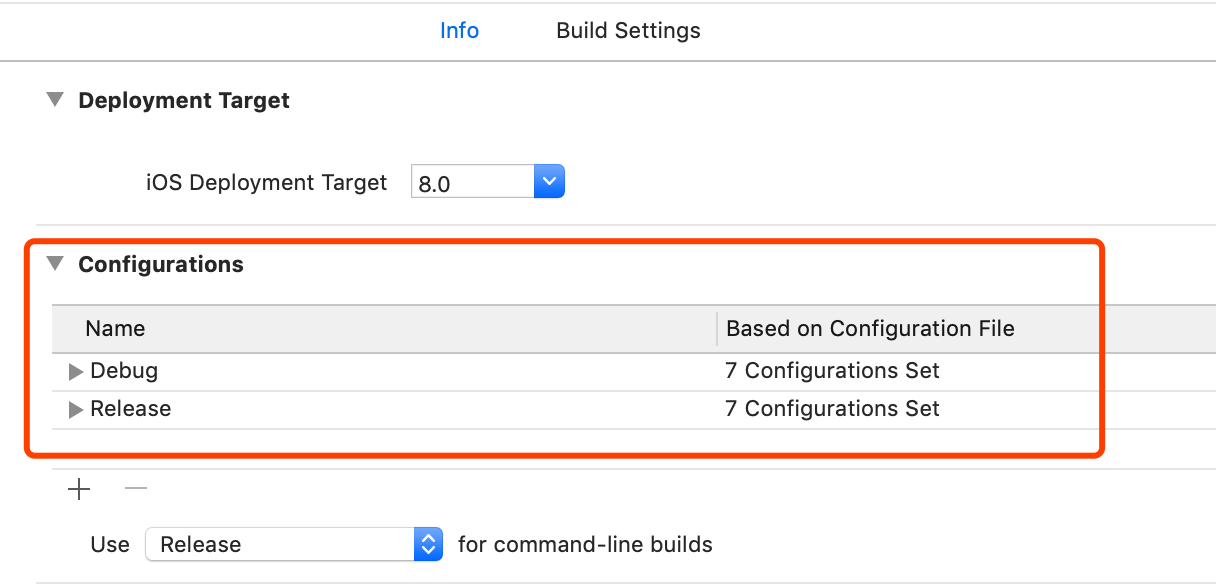
Xcode默认只有DEBUG和RELEASE两种模式,如下图:

Xcode默认只有DEBUG和RELEASE两种模式

通常我们的做法:

Configuration 通过作为什么环境使用
DEBUG 开发环境
RELEASE 生产环境

2.2、默认情况下的Configuration使用的问题

问题:如果我们在项目中想增加预发布环境或者再增加其他多个环境呢?

错误(不当)做法 正确(推荐)做法
项目 从一开始就没考虑到Configuration的使用,在项目中用if else 弄个全局变量来控制,每次打包之前去手动修改 根据需要新增的环境个数,增加对应的Configuration个数。
原因 这样不仅繁琐,而且还会出错 确保不用修改代码,只需要在Edit Scheme中修改想要使用的Configuration即可。

三、操作步骤

1、生成新的Configuration(只能使用Duplicate方式)

1.1、Duplicate方法略。
1.2、Duplicate后,必须需要修改的东西
必选需修改项 操作方法 得到
更新新增Configuration使用的Pod 重新执行pod install

2、Configuration区分

需求背景:区分配置

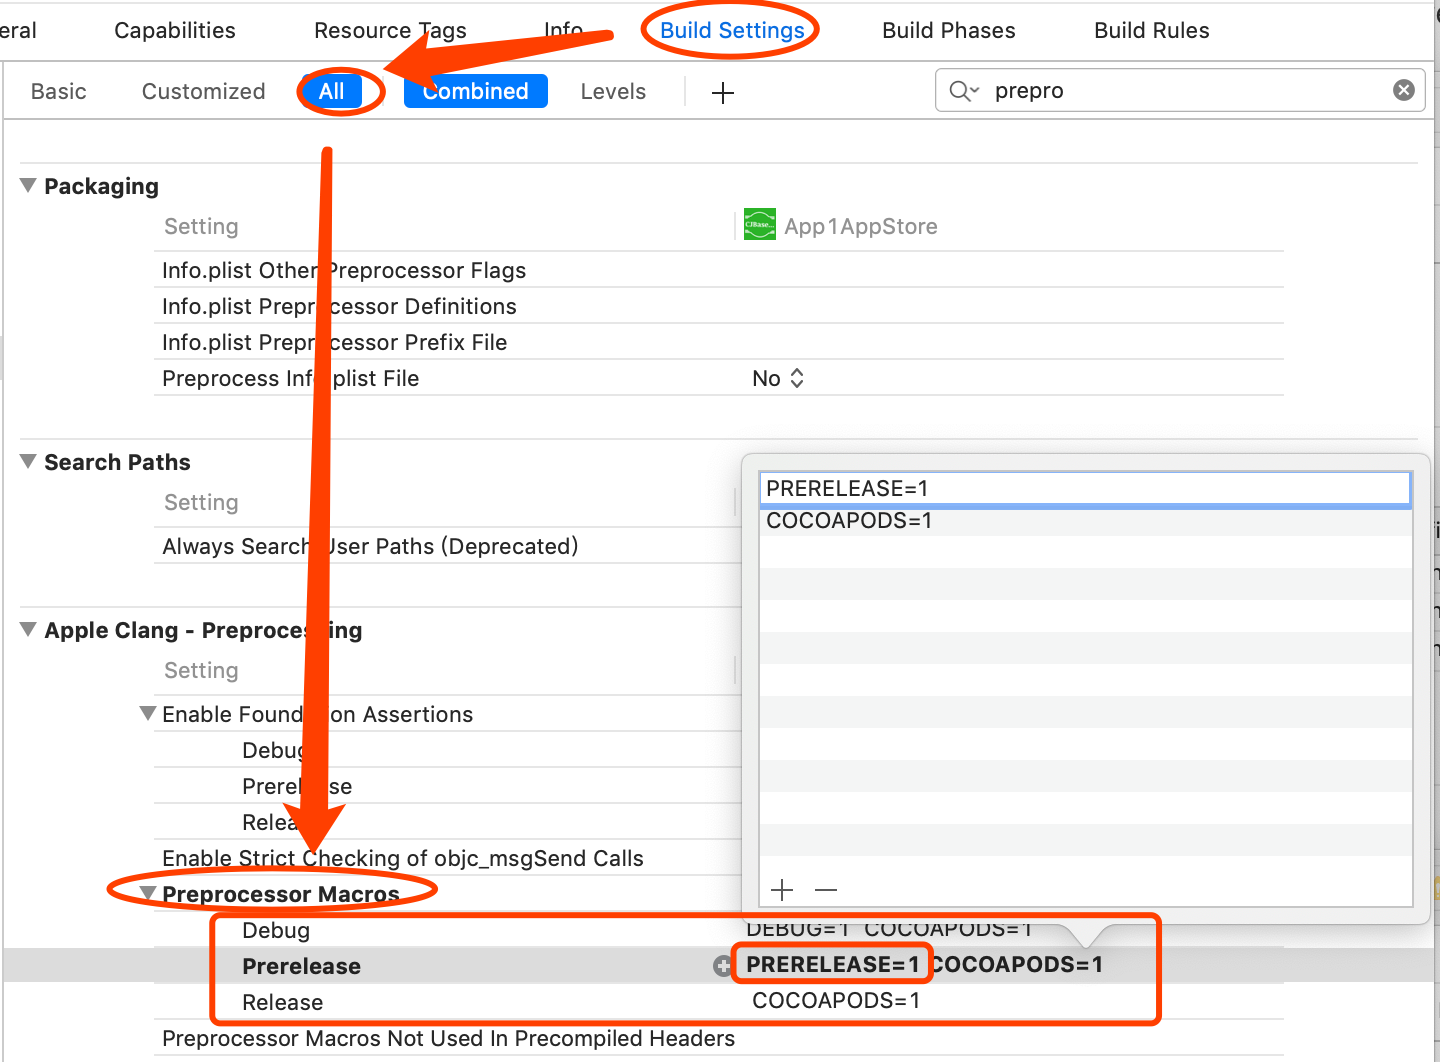
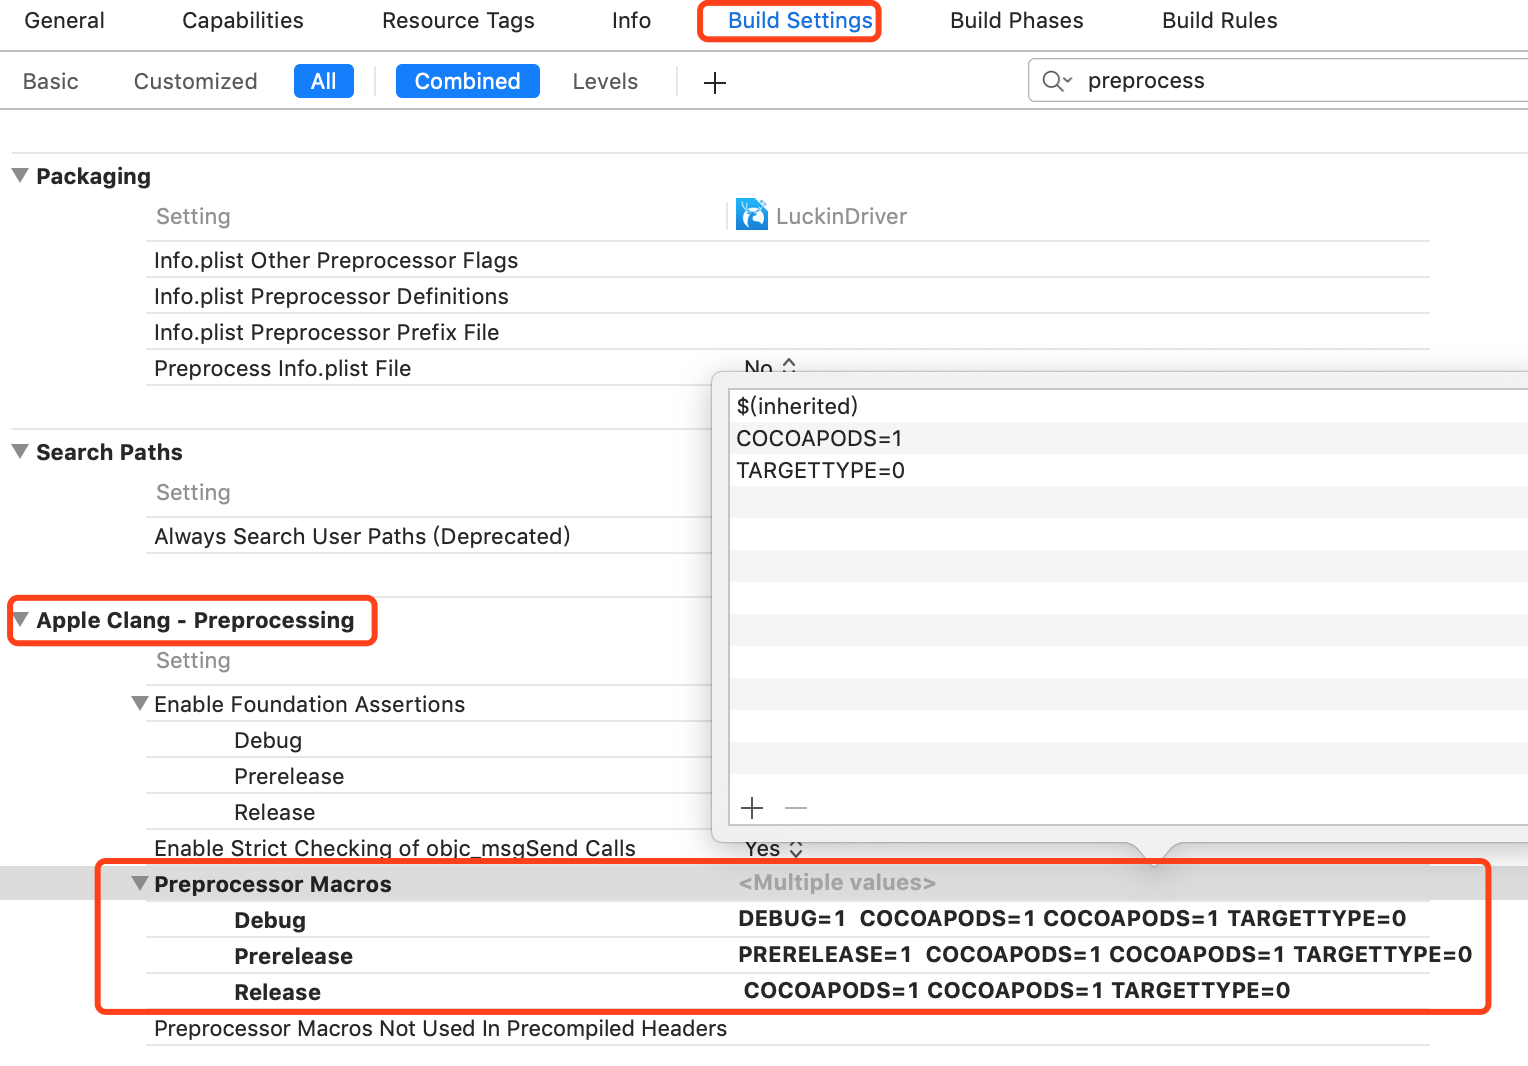
解决办法:为Target的Prerelease Configuration在Preprocessor Macros中添加宏,如添加PRERELEASE=1

  • 在Preprocessor Macros中为我们刚新增的Prerelease的Configuration中添加PRERELEASE=1

多Configuration_PreprocessorMacros添加后

Configuration代码区分需用到的知识:

含义 示例
#if 既关心宏是否定义,又关心宏的逻辑的真假
#ifdef
#ifndef
仅仅关心宏是否被定义,不关心宏的逻辑真假

代码区分如下:

1
2
3
4
5
#if DEBUG

#elif PRERELEASE

#endif

至此,Configuration添加完成 。

分割图1